SK Store WordPress Theme
Detailed Documentation
- Created: March 15th, 2016
- Latest Update: May 27th 2016
- By: Sunrisetheme
- Email:admin@sunrisetheme.com
For support please checkout Sunrise Theme Ticket SUPPORT
INTRODUCTION
General
We would like to thank you for purchasing SK Store! We are sure that you have made an excellent choice in selecting it. You also have agreed that this item is unique among tons of Premium WordPress themes. Before getting started, please make sure that you always check out our SK Store WordPress Theme documentation files. We offer all kinds of useful information that you need to use for your purchased item. Besides, Knowledgebase, Articles, Forum Search in our Free support center are available for you to fully satisfy your questions. Thank you, we hope you enjoy our theme. SK Store can only be used with WordPress and we assume that you already have WordPress installed and ready to go. If you do not, please follow the below WordPress information section to see our section on WordPress to help you get started.
WordPress information
To install this theme, you must have a working version of WordPress already installed. If you need help installing WordPress, follow the instructions in WordPress Codex. Below are all the useful links for WordPress users:

- WordPress general - General information about WordPress how to install it on your server.
- First steps with WordPress - A detailed document with many topics about how to begin WordPress.
- WordPress FAQs - Providing answers to the most popular questions about WordPress.
Requirement for SK Store
To use SK Store, your server must be running WordPress 4.3 or higher, PHP5.5 or higher, and mysql 5 or higher. Below is a list of items you should ensure your host can comply with.
- Please make sure that your server has the minimum requirements to run WordPress at least.
- Always check to ensure that you have updated the latest version of WordPress
- You can download the latest version of WordPress from offical WordPress from offical website.
- Always create secure passwords for FTP and Database
THEME INSTALLATION
To install SK Store you must have a working version of WordPress already installed. Make sure your installed Wordpress version is 4.3 or higher. You also need to have PHP 5.5 or higher versions and MySQL 5.0 to function correctly. If you need help installing WordPress, follow the instructions in WordPress Codex
What's Included

When you purchase SK Store, you need to download our theme package on from Themeforest.
Extract our full package, then you will see all the files and folders, including 02 .zip files and 03 folders. Below is a full list of everything that is included when you download our theme, along with a short description of each item.
- SKStore.zip - This is the theme file you need to add to install theme
- SKStore-child.zip - The child theme just for users who want to make code changes
- Documentation folder - Contains the document providing you with basic guides to use SK Store theme
- Plugins folder - Contains the necessary plugins used for SK Store theme
- Revslider.zip - The Revolution Slider which creates beautiful image sliders for your site
- K2T shortcodes.zip - A plugin which includes all shortcodes for theme which helps you build your own pages
- DHVC WooCommerce.zip - A plugin which allows you to create brands for your shop: each brand can be named, described and assigned an image
- Woo Detail Product Page Builder.zip - A plugin which creates product detail pages of different
- js_composer.zip - Visual Composer - the most popular page builder for WordPress
- Advanced-custom-fields-pro.zip - A graphic user interface layer for custom fields
- Sample data - Contains 04 files.
- SKStore.xml - Includes all dummy data of some pages from our demo
- SKStore-revoslider.zip - Revolution slider settings
How to Install SK Store via WordPress
Following some steps below, you can completely install SK Store in few minutes.
- Step 1: Login to your WordPress Admin
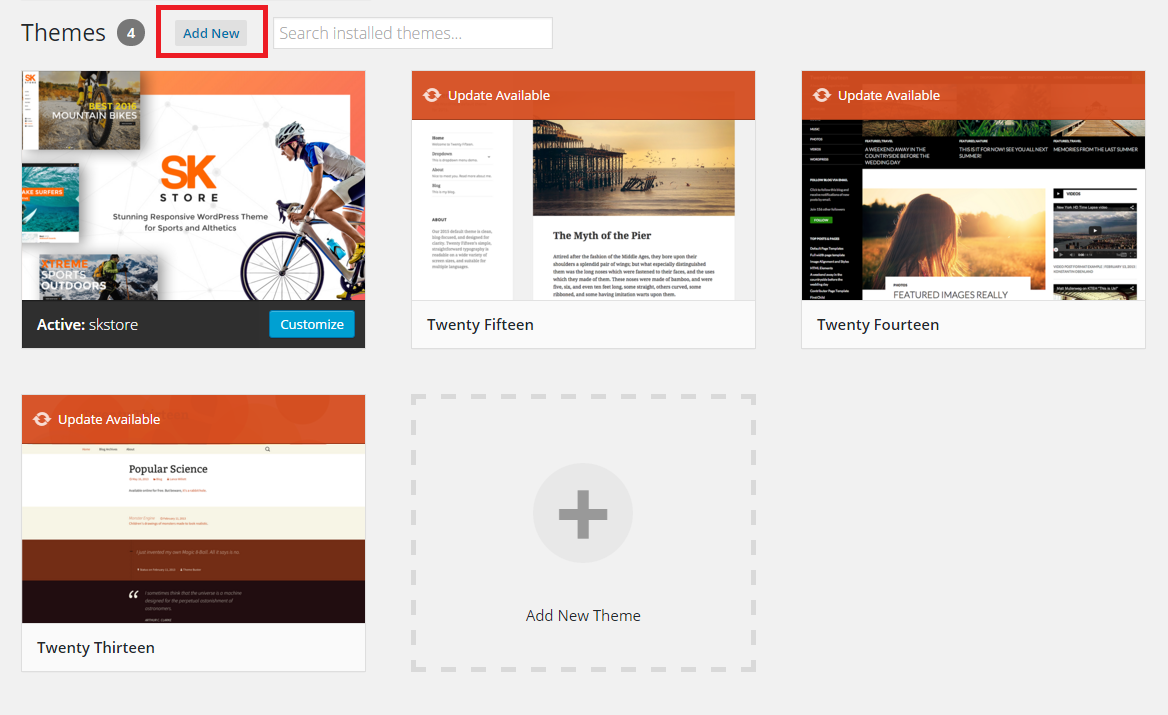
- Step 2: Go to Appearance >>> Themes >>> Add new
- Step 3: Click to Upload >>> Select installation files, choose SKStore.zip.
- Step 4: Click Install now button and then wait while the theme uploaded and installed
- Step 5: Finally, click the Activate link
Common Theme Installation Errors
If you get the “Are You Sure You Want To Do This” message when installing SK Store via WordPress, it means you have an upload file size limit. Install SK Store via FTP if this happens, or call your hosting company and ask them to increase the limit.
2. Upload size limitIf you get this message when you install our theme on localhost, here is a solution for you:
- Through php.ini file
- Through function.php
- Through .htaccess method
Step 1 - Find the php.ini file on your host
Step 2 - Find the following lines and adjust the value. We suggest to change the upload file limit to 10M

You may add the below mentioned code in the functions.php file of your theme
@ini_set( 'post_max_size', '64M');
@ini_set( 'max_execution_time', '300' );
You may try modifying the existing .htaccess file in the root directory or creating a new one.
Add the following code in the existing or new htacess file:
php_value post_max_size 64M
php_value max_execution_time 300
php_value max_input_time 300
How to Install SK Store via FTP
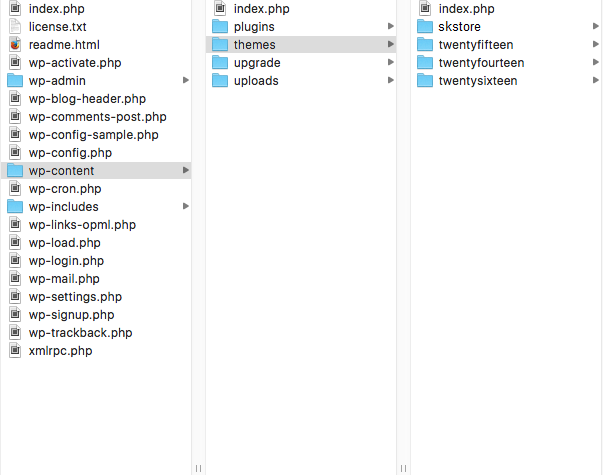
- Step 1 – Log into your hosting via an FTP software
- Step 2 – Unzip the SKStore.zip file, and ONLY use the extracted SKStore theme folder
- Step 3 – Upload the extracted SKStore theme folder into /wp-content/themes/.
- Step 4 – Login to your WordPress Dashboard, go to Appearance >>>> Themes
- Step 5 – Click to Activate link to enable SKStore theme
Import Manual Demo Content
This is the second way for you to import our demo content. Continue reading below to learn how to manually import demo content.
Check The Following Plugins Before Import
- Visual Composer: The most popular page builder for WordPress
- Advanced Custom Fields Pro: A graphic user interface layer for custom fields
- K2T SK Store shortcodes: A plugin which includes all shortcodes for theme which helps you build your own pages
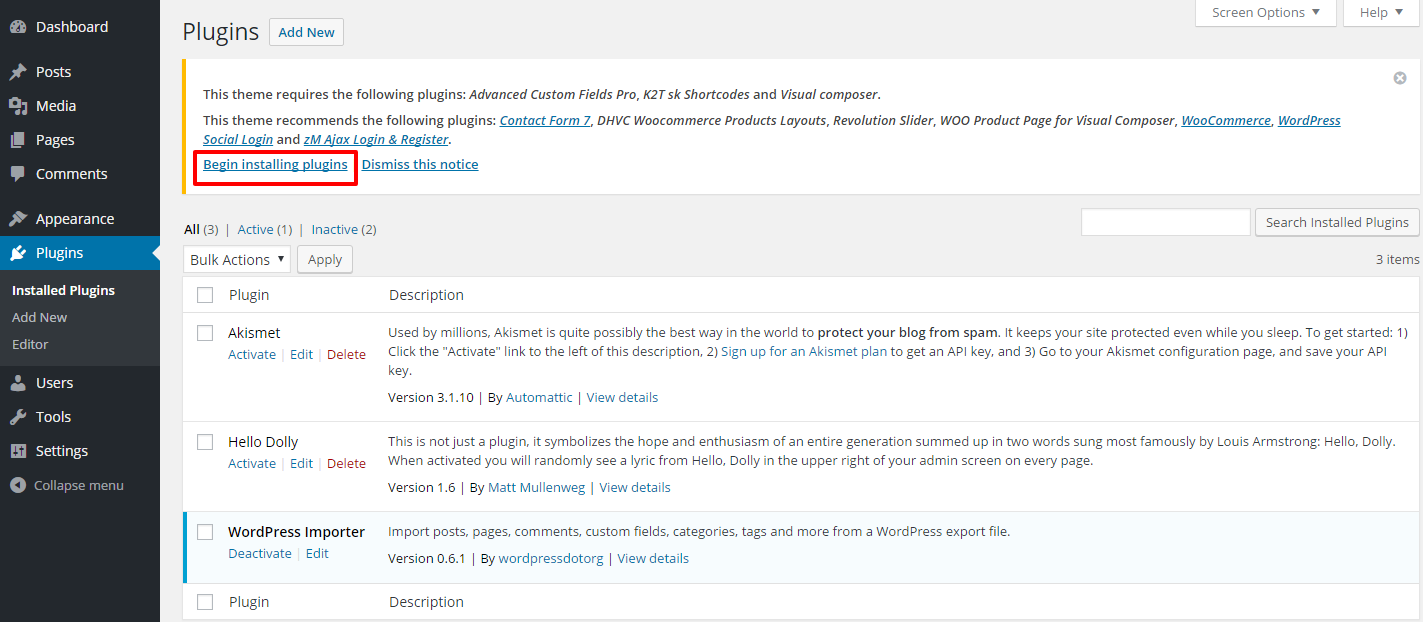
That are required plugins to use this theme, besides there are some recommended plugins including Contact Form 7, DHVC WooCommerce Products Layouts, Revolution Slider, WOO Product Page for Visual Composer, WooCommerce, WordPress Social Login and zM Ajax Login & Register
How to Install Plugins
Once you activate SK Store, you will see a notification message to install and activate the required and recommended plugins
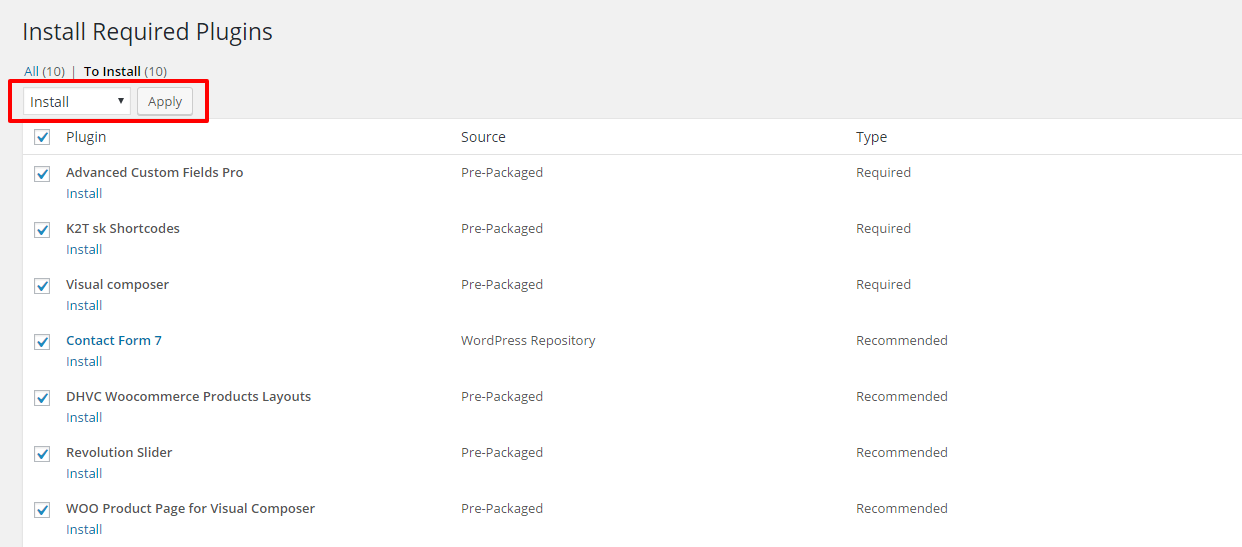
- Step 1: Click to Begin installing plugins
- Step 2: Select All the plugin >>> Install, then click to Apply
- Step 3: Click to Activate to enable the plugins you want to use
Where To Find Demo Files
But before moving straight to the point, there are some notes worth checking:
- Make sure you have installed all recommended plugins before importing sample data.
- In /Sample Data/ folder of our package, you can find 02 files which are:
- SK Store.xml - Includes all dummy data of some pages from our demo
- SK Store-revoslider.zip - Revolution slider settings
- The import process may take several minutes due to large data and your server capacity. If your server setting "Max Execution Time" is too low, increase it (as your hosting provider). Please do not close the browser until it finishes. If it fails, you can run this process again until seeing the "Success Message".
Demo Images are not installed due to some copyrighted licenses - If you have to run the process more than once, menu items may be duplicated. Just go to Appearance > Menus and edit/delete Menu items
- Feature images are not imported (We use licensed photos on our demo page). Instead you will see placeholder images.
How To Import XML Files
To install sample data, please following these steps below:
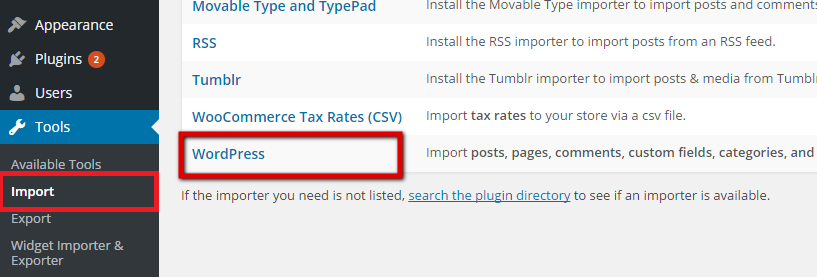
- Step 0 - Make sure you have installed SK Store theme and all required & recommended plugins
- Step 1 - Go to Tools >>> Import, then click to "WordPress" and wait until installation is finished
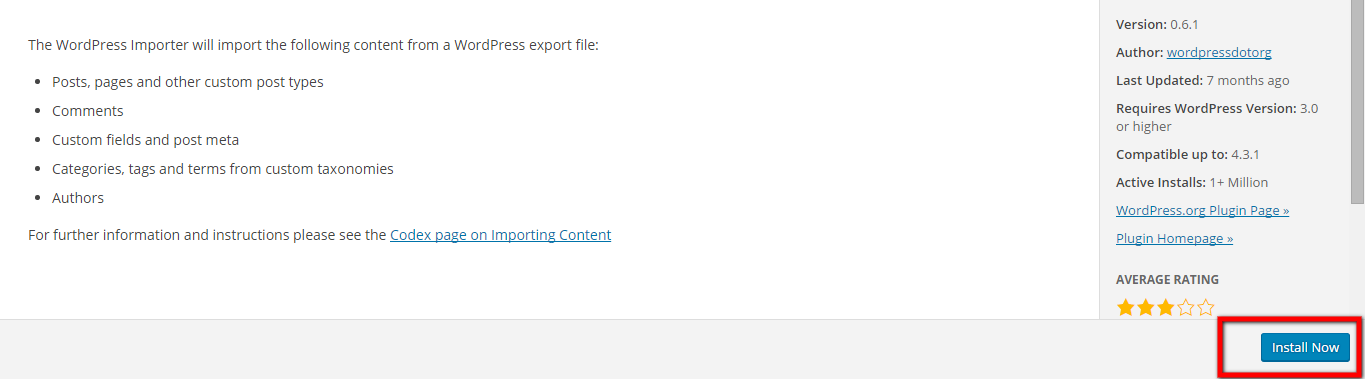
- Step 2 - If it is not yet installed before, you have to install it by clicking on Install Now
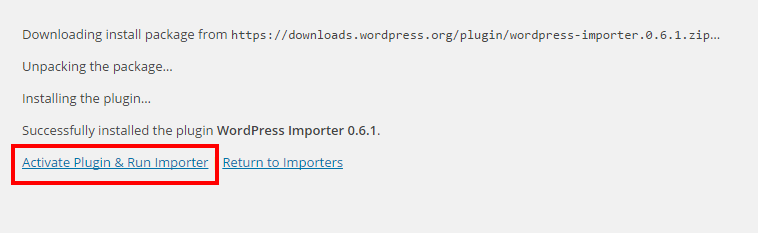
- Step 3 - After installed successfully, click on Activate Plugin & Run Importer
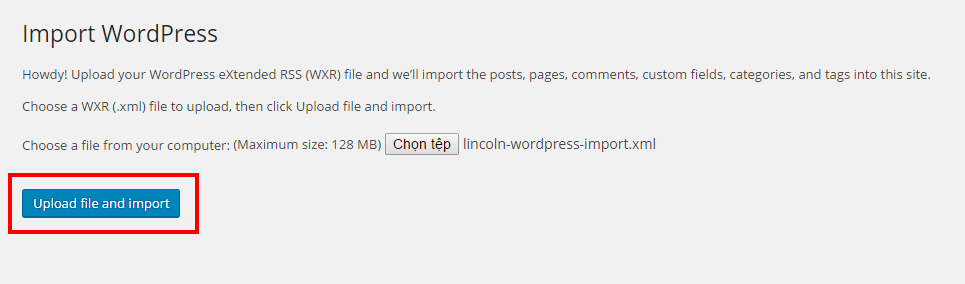
- Step 4 - When the installation is done, go ahead and click to "Choose File" button and import SK Store-wordpress-import.xml file. Don't cancel the importing process
- Step 5 - When you see the message "All done. Have fun!", you will know that the import process is done. Note: you may need to re-import the second time if the data is large.
- Step 6 - Done, then you have to set Homepage, Menu, Widgets for your site
And now you finished!
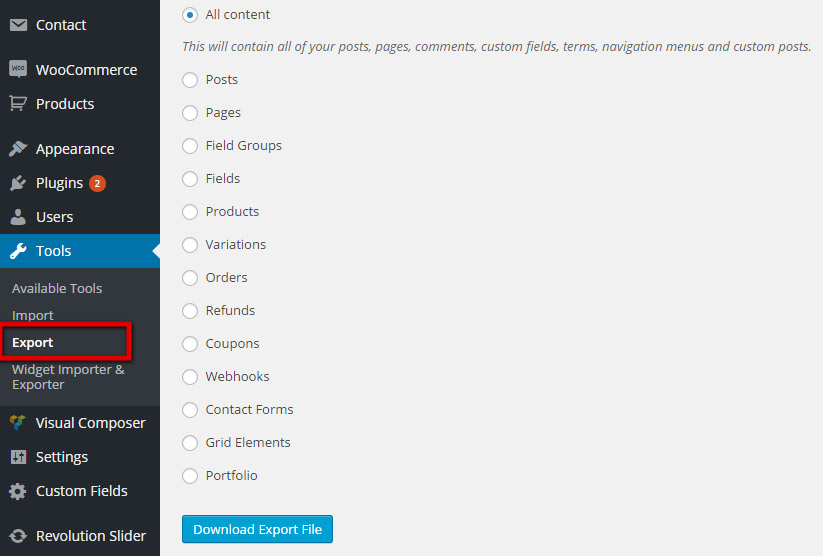
NOTE: You can get the .xml file by going to Tools >> Export >> Choose file and click "Download Export File". In the screenshot above, we have exported all content demo data. Then we got the file named "content-export.xml"
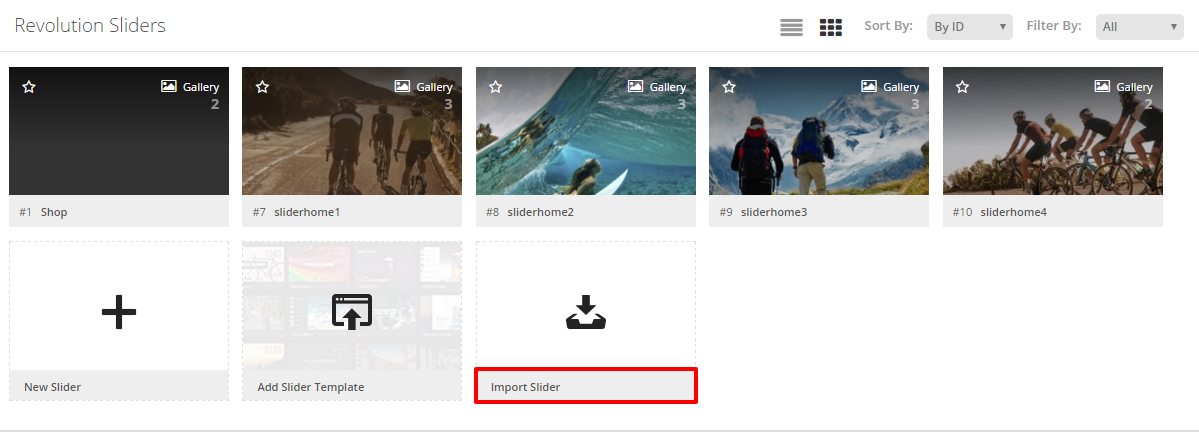
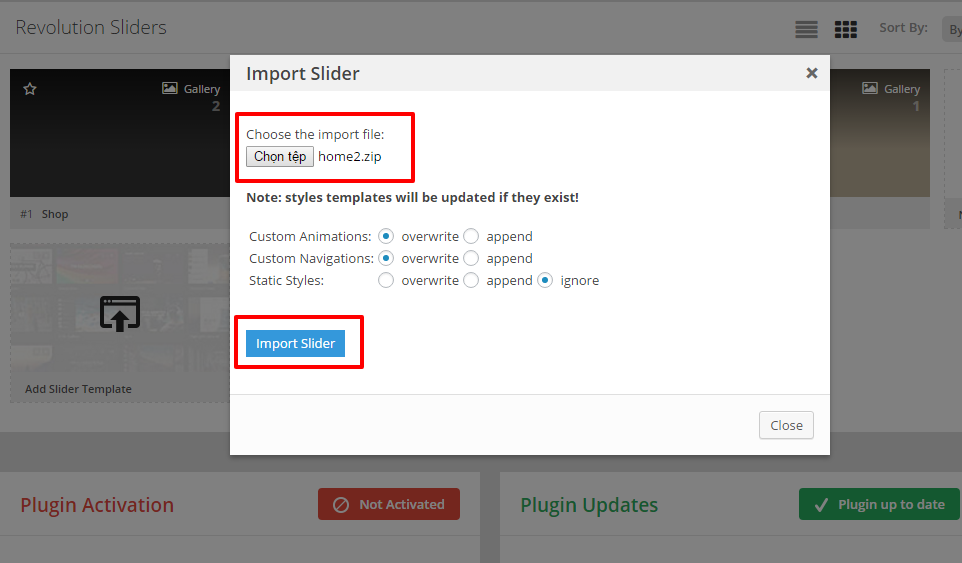
How To Import Revolution Slider
To install revolution slider, please following these steps below:
- Step 1: First, go to Revolution Slider >> Import Slider
- Step 2: Choose .zip file to upload and import. Click "Import Slider" to finish!
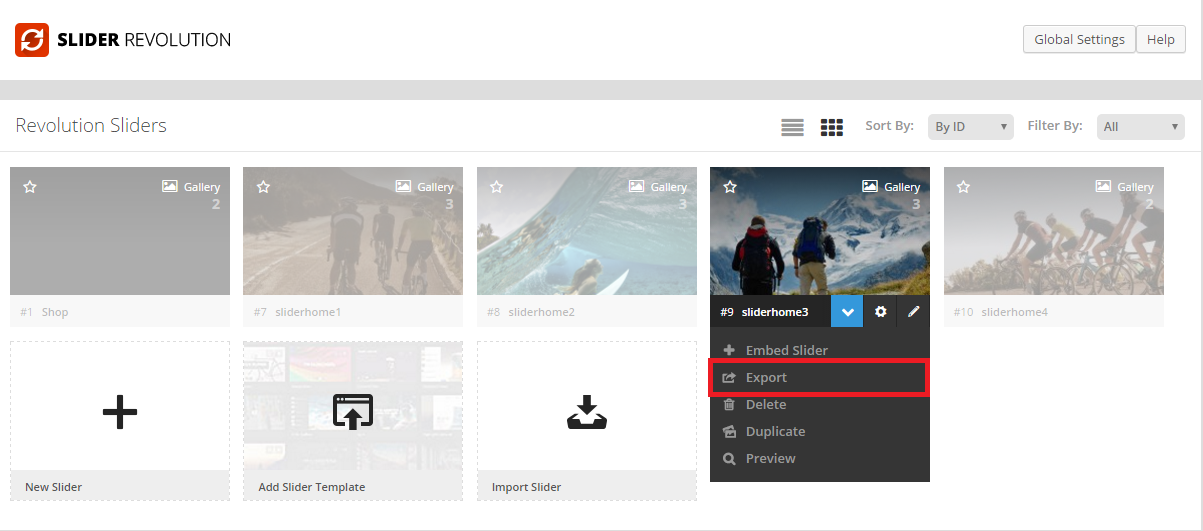
- Step 3: In case you want to export slider from a website, you can go to Revolution Slider. And then hover to the slide that you might want to export data. Click to the down arrow sign >> Export Slider
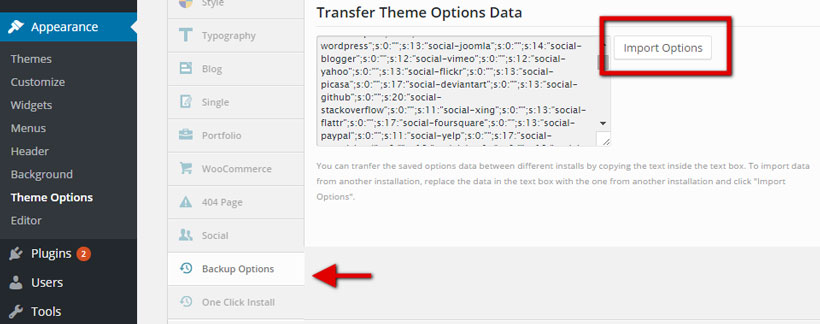
How To Import Theme Options Data into WordPress
To transfer theme options data into your website, go to Apperance >> Theme Options >> Backup Options >> Import Options (.txt file)
NOTE: You can get the .xml file by going to Tools >> Export >> Choose file and click "Download Export File". In the screenshot above, we have exported all content demo data. Then we got the file named "content-export.xml"
When you see the message "All done. Have fun!", you will know that the import process is done. Note: you may need to re-import the second time if the data is large.
And now you finished!
HOW TO
This is necessary steps for you to setup your site
Upload Logo & Favicon
1. Upload Logo
To upload your logo, you navigate to Theme Options. Please follow the below steps to upload your logo:
- Step 1: Login to your WordPress Dashboard
- Step 2: Go to Appearance >>> Theme Options >>> Header
- Step 3: After clicking to Header tab, you scroll to the bottom of page - Logo section and upload your logo. The logo size in our demo is 116x33px. Please use jpg, jpeg, png or gif image for best performance.
- Step 4: If you want to use Text logo, you turn ON and fill text you want to show, for example the name of your site
- Step 5: If you want to make retina logo, you can use a big logo (2x times your regular logo dimension.). The retina logo in our demo is 232x66px
- Step 6: There are also options to choose alignment of the logo, and adjust the left, top logo margins. This allows you to fine tune the placement of your logo.
- Step 7: Click to Save all changes and see them on front-end.
Note: If your logo is narrowed down in tiny shape
- (1) You can resize it by navigating to Appearance >> Theme Options >> Header >> Headers Section. Then move your mouse pointer to the space between two blocks. If the logo block was too small, you need to resize it until you satisfy with the result.
- (2) Also, don’t forget to adjust the padding size in “Logo Margin” of Theme Options. That is also the reason causing the logo’s narrowing. The final way to resolve this problem is to have some code knowledge to be able to edit the height of header section.
- (3) You can remove the max height limit by adding this code to Apperance >>> Theme Options >>> General >>> Custom CSS .k2t-logo, .k2t-logo img { max-height: inherit; max-width: inherit }
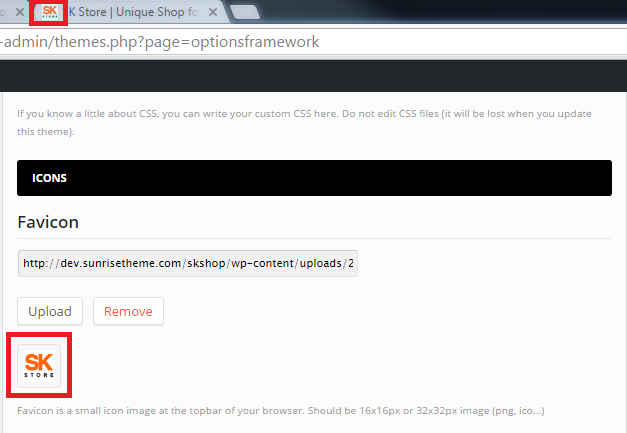
2. Upload Favicon
To upload your favion, you navigate to Theme Options. Please follow the below steps to upload favicon:
- Step 1: Go to Appearance >>> Theme Options >>> General
- Step 2: You scroll to the bottom of page - Icons section Favicon - Favicon is a small icon image at the topbar of your browser. The size should be a 16x16px or 32x2px Png/Gif image
- Step 2: You can upload icons for iphone, ipad
- Iphone icon - The iPhone icon is a file used for a web page icon on the iPhone. When someone bookmarks your web page or adds your web page to their home screen, this icon is used. If this file is not found, these products will use the screen shot of the web page, which often looks like no more than a white square.
- Iphone retina icon - The same as iPhone icon but for Retina iPhone.
- Ipad icon - The same as iPhone icon but for iPad.
- Ipad retina icon - The same as iPhone icon but for Retina iPad.
Menu Settings
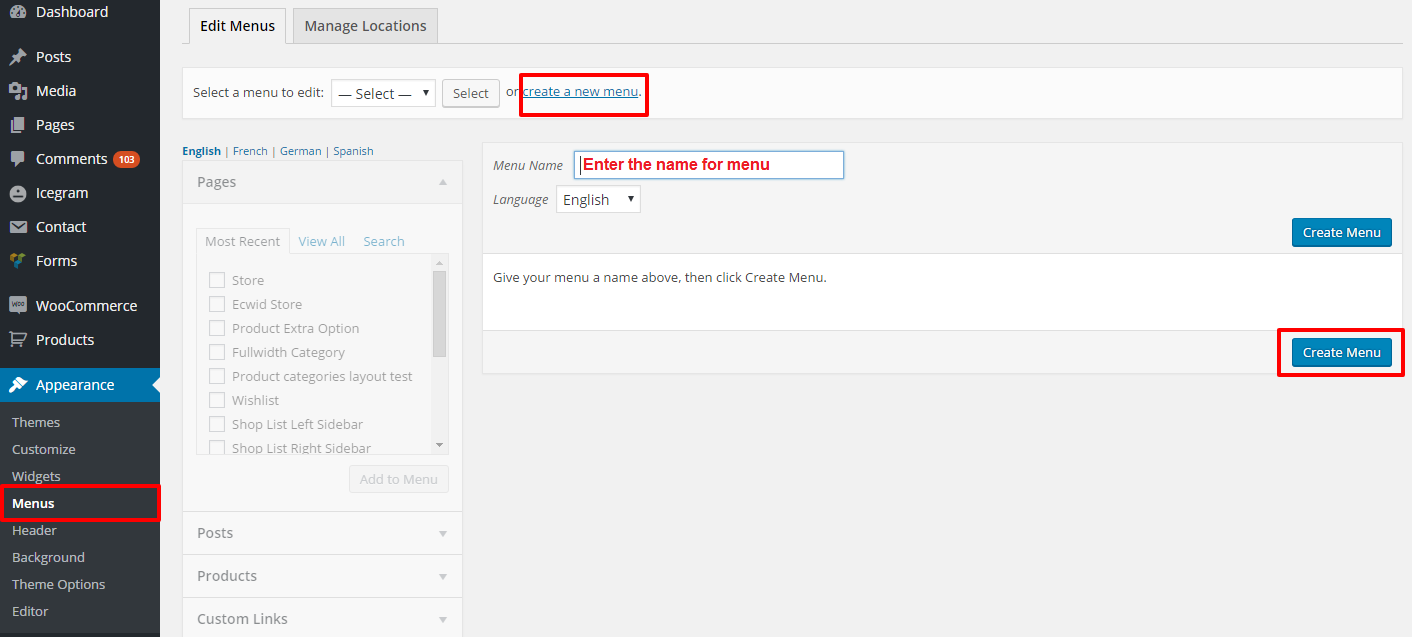
1. How To Create A Menu
Follow the below steps to create a new menu:
- Step 1: Login to the WordPress Dashboard
- Step 2: Go to Appearance >>> Menus , then click to Create a new menu at the top of page
- Step 3: Enter the name for your menu in the Menu Name box
- Step 4: Click to Create Menu button
Your menu is created, now you can add pages for menu. Please follow the below steps
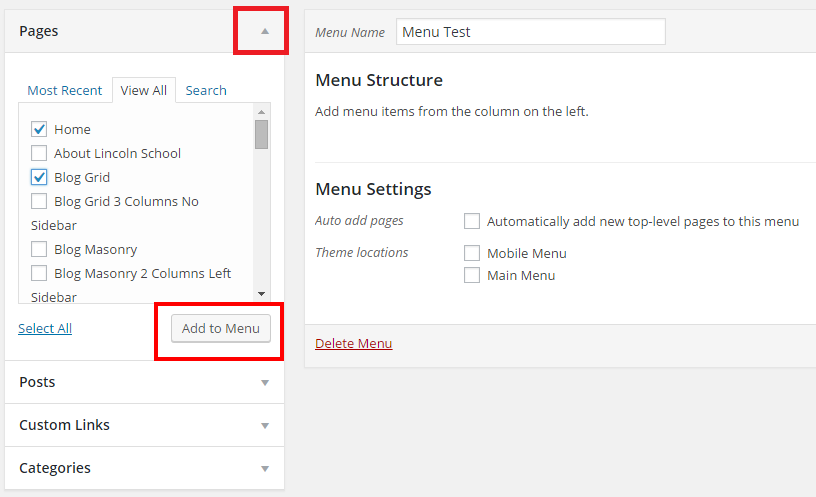
2. How To Add Pages To Your Menu
You can choose pages to add to your menu in Pages section in the left corner. Besides, you also can add posts, custom links or categories to menu
- Step 1: Click to Pages section in the left corner of Dashboard
- Step 2: Select the View All to see all published pages on your site
- Step 3: Select pages you want to add to menu by check the box and click to Add to Menu
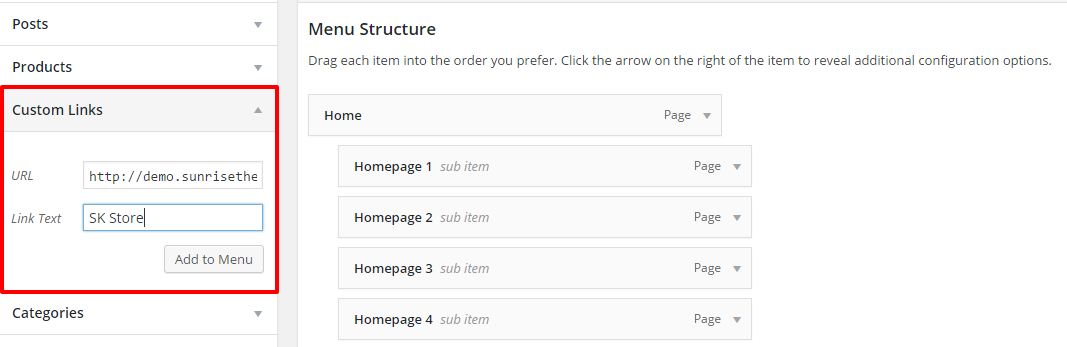
- Step 4: If you want to add items to menu by using custom link, you click to Custom link, fill URL link and Link text, then click to Add to Menu
- Step 5: To create sub-menu of the parent menu, you just drag and drop items to the right side a distance compared with the parent menu
- Step 6: Click to Save menu button once you have added all items you want to menu.
- Step 7: You have to assign your menu to the location you want, please follow some steps below
3. How To Assign A Menu To a Location
After you have created a menu, you have to assign it to one of the pre-defined locations. Follow the below steps to assign a menu to a Location
- Step 1: Go to Appearance >>> Menus and click Manage Location
- Step 2: Assign each Theme Location with a menu, you can assign a menu to several Theme Locations
- Step 3: Click to Save Changes button
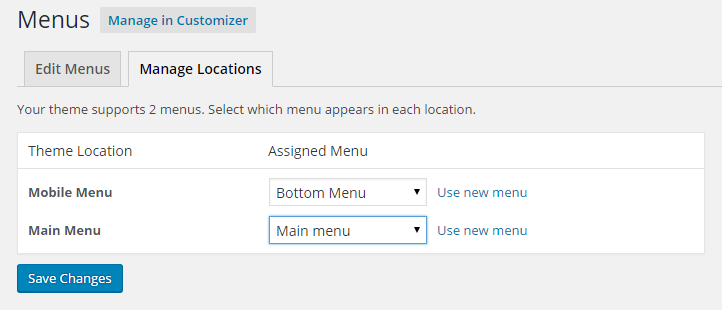
Menu is displayed on front-end

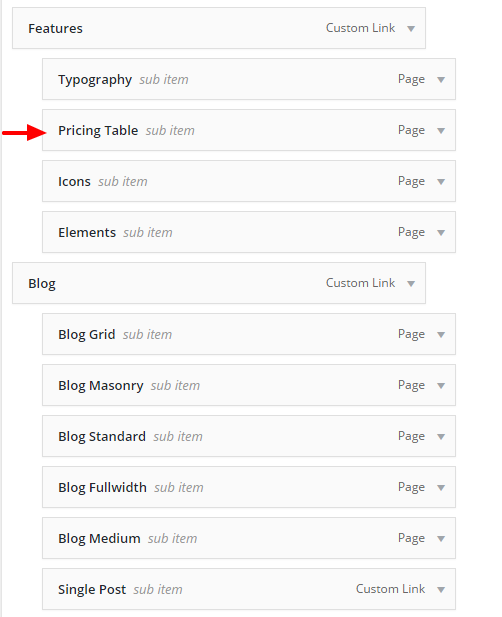
4. How To Create Mega Menu
SK Store supports Mega menu feature. The Mega Menus are available for the first level items of menu in "Main Menu" area. Follow some steps below to create a mega menu:
- Step 1: Only first level items can enable the Mega Menu. Click the “arrow icon” next to any parent level menu item to expand the option box.
- Step 2: Check the box "Enable Mega Menu"
- Step 3: Select Yes to display the “Mega Menu Fullwidth”. Also choose "Mega Menu Position" such as Left or Right.
- Step 4: If using Mega menu background, click the “Upload Image” button to upload an image
- Step 5: Now you need to add child items for the first level item, like the image below
- Step 6: Now, you need to add child items for the second level items, like the image below
- Step 7: Click to Save Changes button
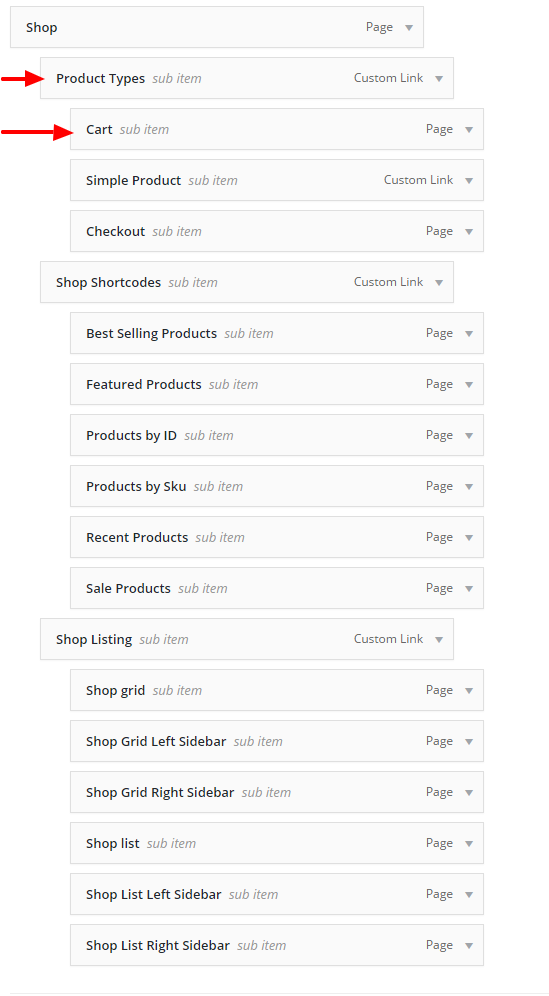
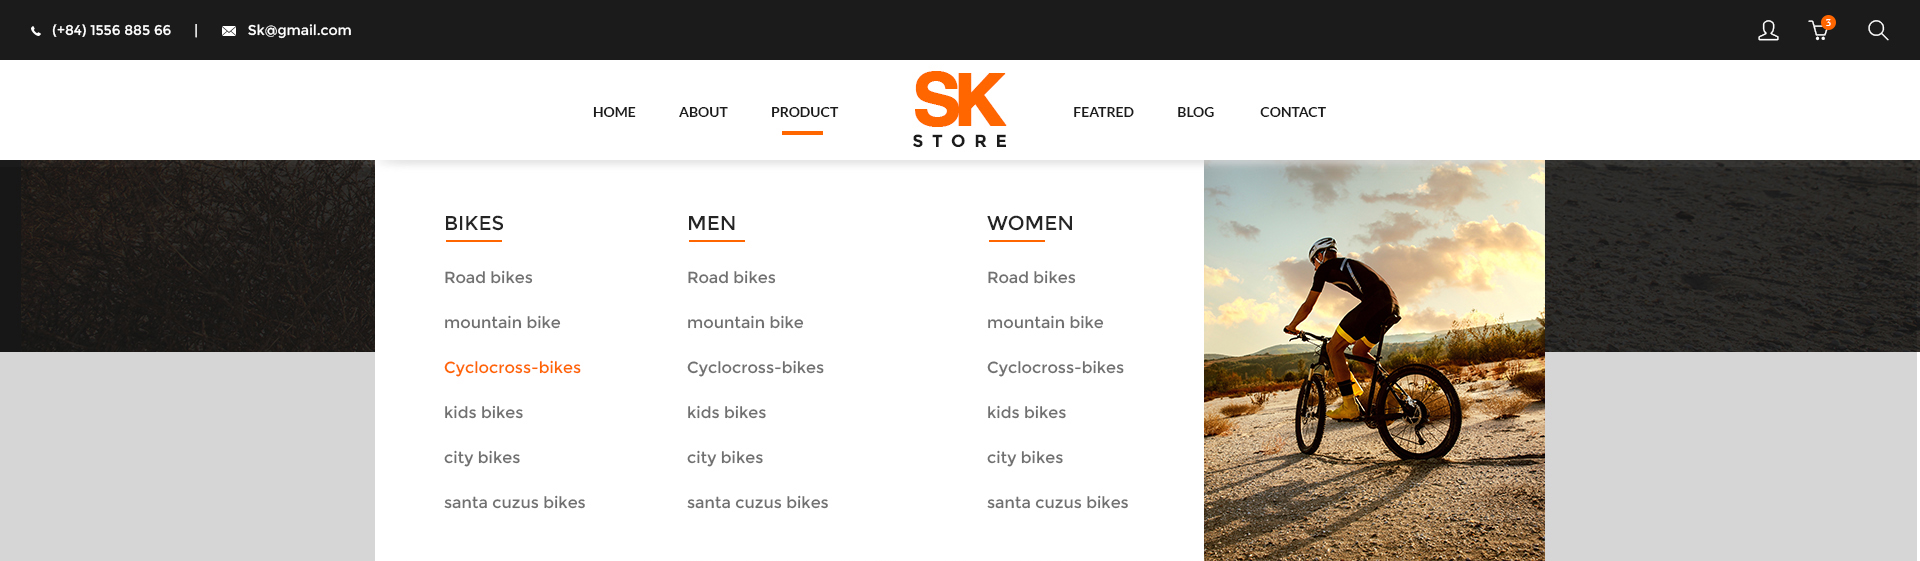
The mega menu on front-end should be dispayed like the below image:
Create Posts
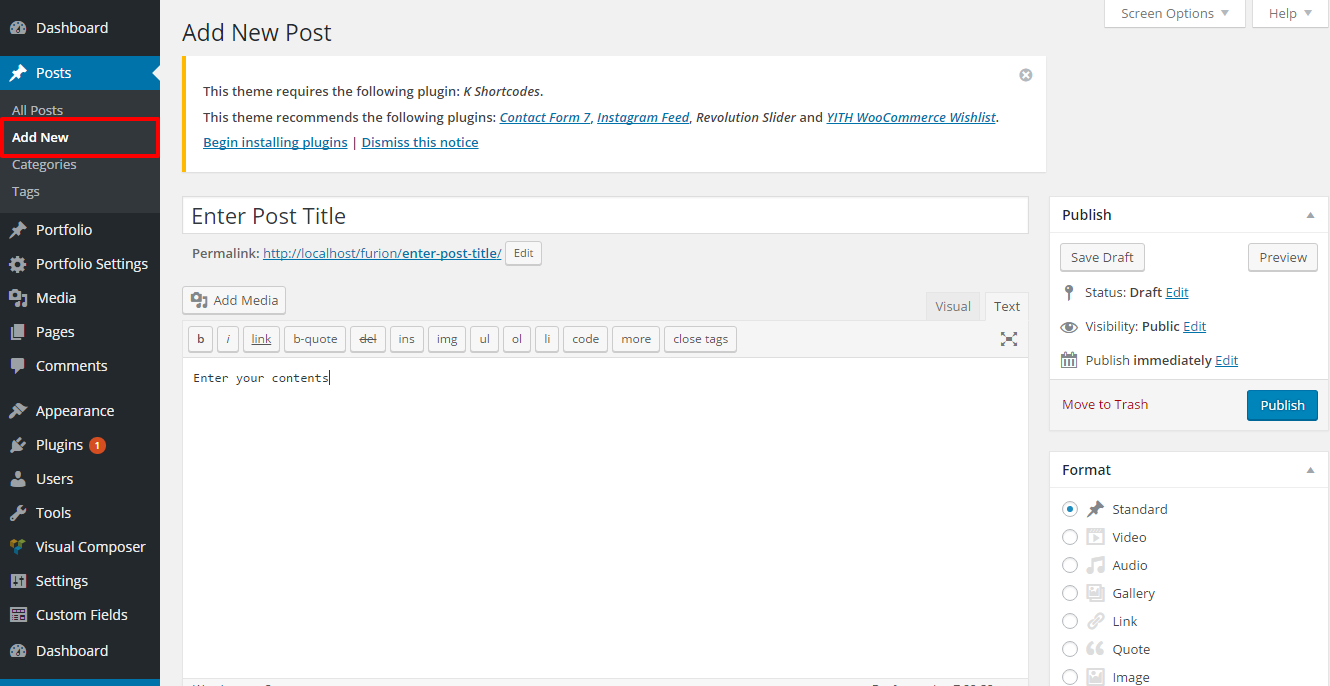
1. How To Add A New Post
To create a new post, you follow the below steps:
- Step 1: Login to your WordPress Dashboard
- Step 2: Go to Posts >>> Add new post
- Step 3: Then, you enter your post title, contents in the text editor
- Step 4: You need to select post format, category and add tags
- Step 5: Upload a featured image for your post
- Step 6: Scroll down to Post options box, you will need to setup some options about layout, metadata, format. Please check Post options for more information
- Step 7: Click to Publish post. When your post is published, it can be the below image:
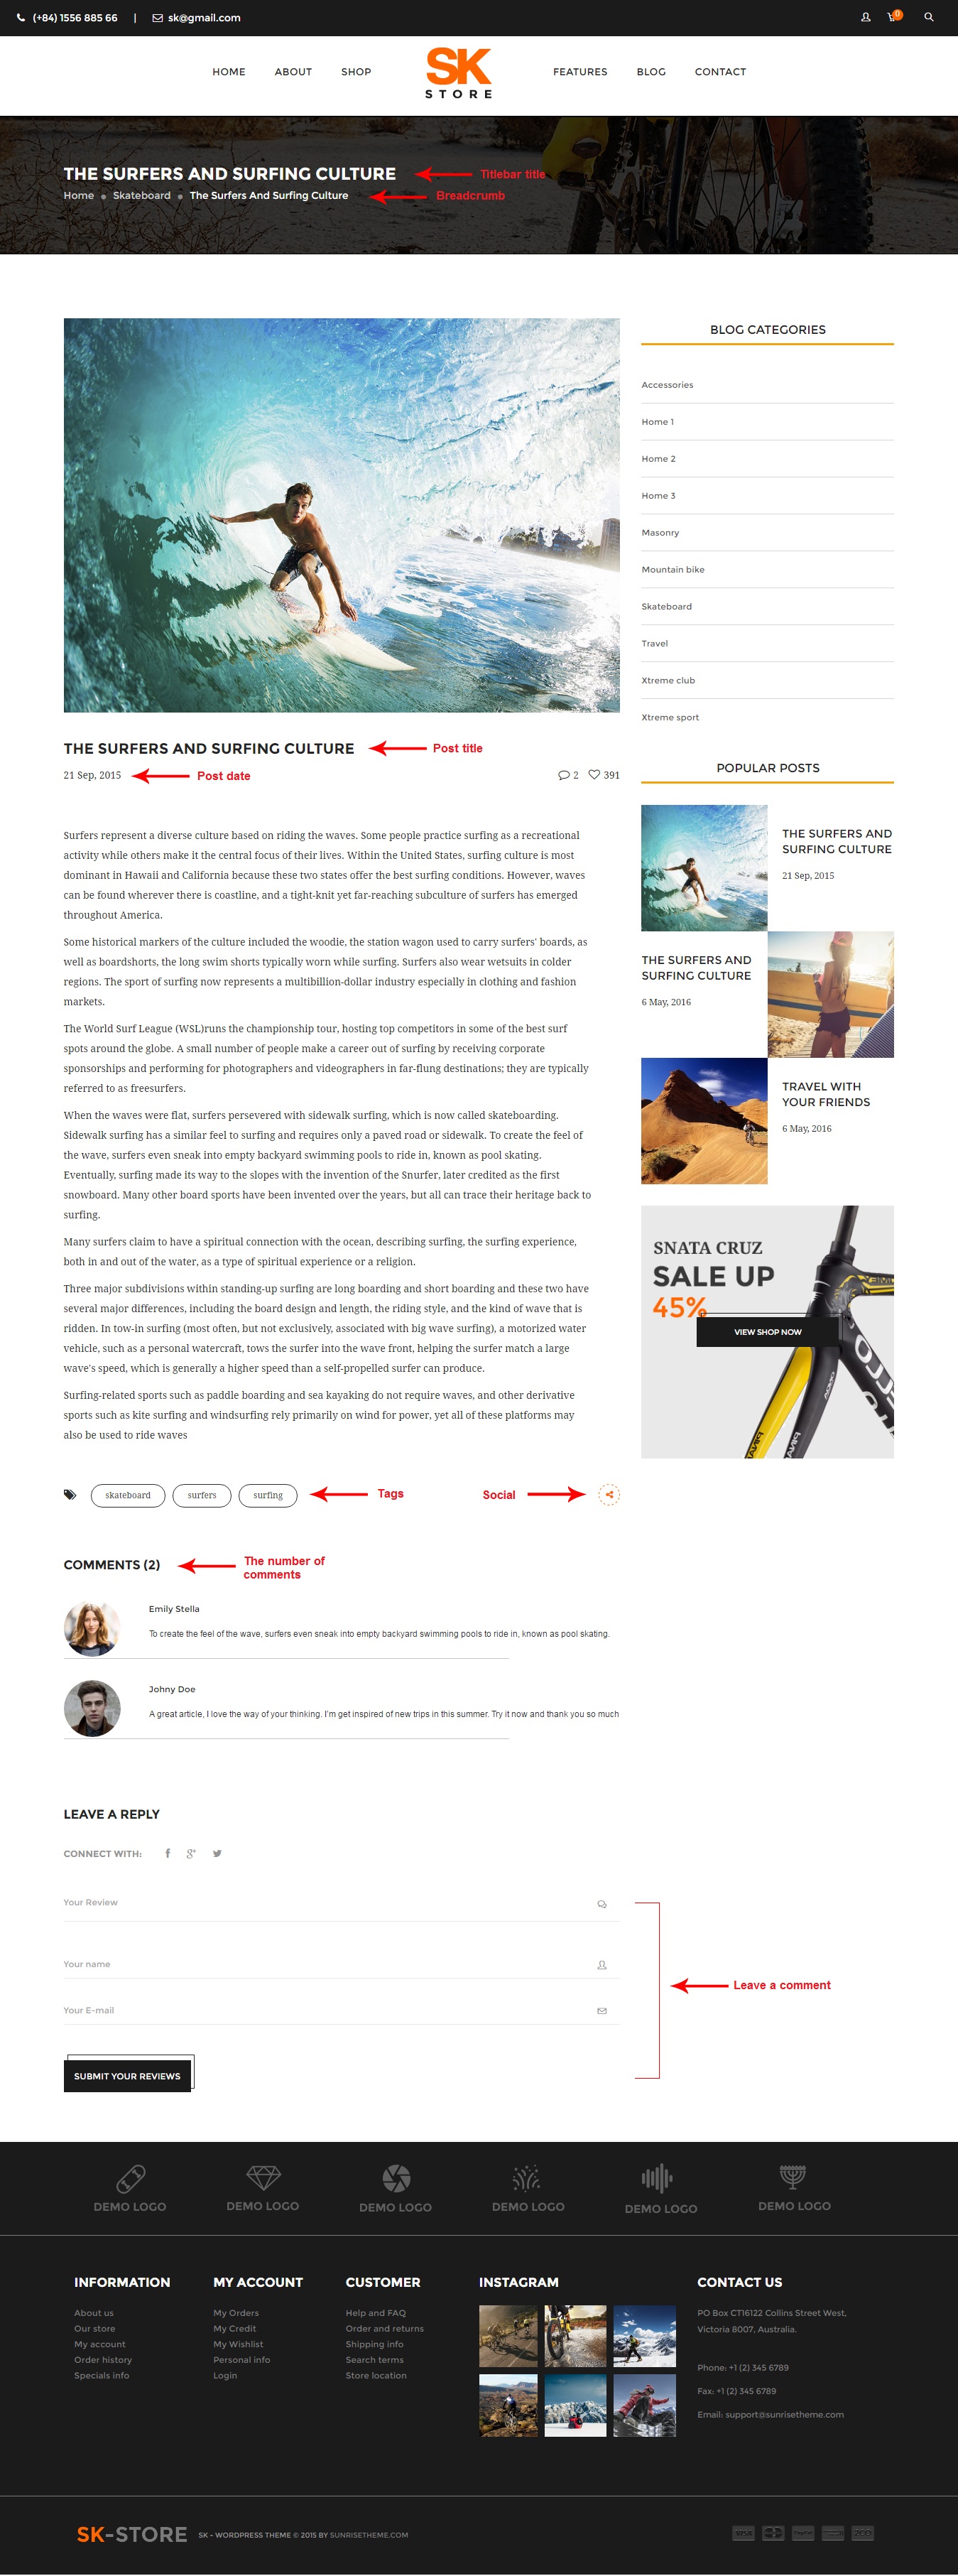
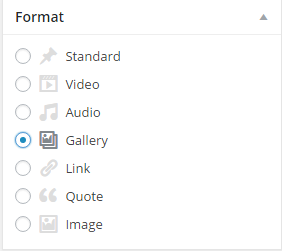
2. How To Add A Gallery Post
To create a gallery post, you follow the below steps:
- Step 1: Login to your WordPress Dashboard
- Step 2: Go to Posts >>> Add new post
- Step 3: Then, you enter your post title, contents in the text editor
- Step 4: You need to select "Gallery" post format, select category and add tags
- Step 6: Scroll down to Post options box, click to Post format tab, you will see Gallery format and some other options
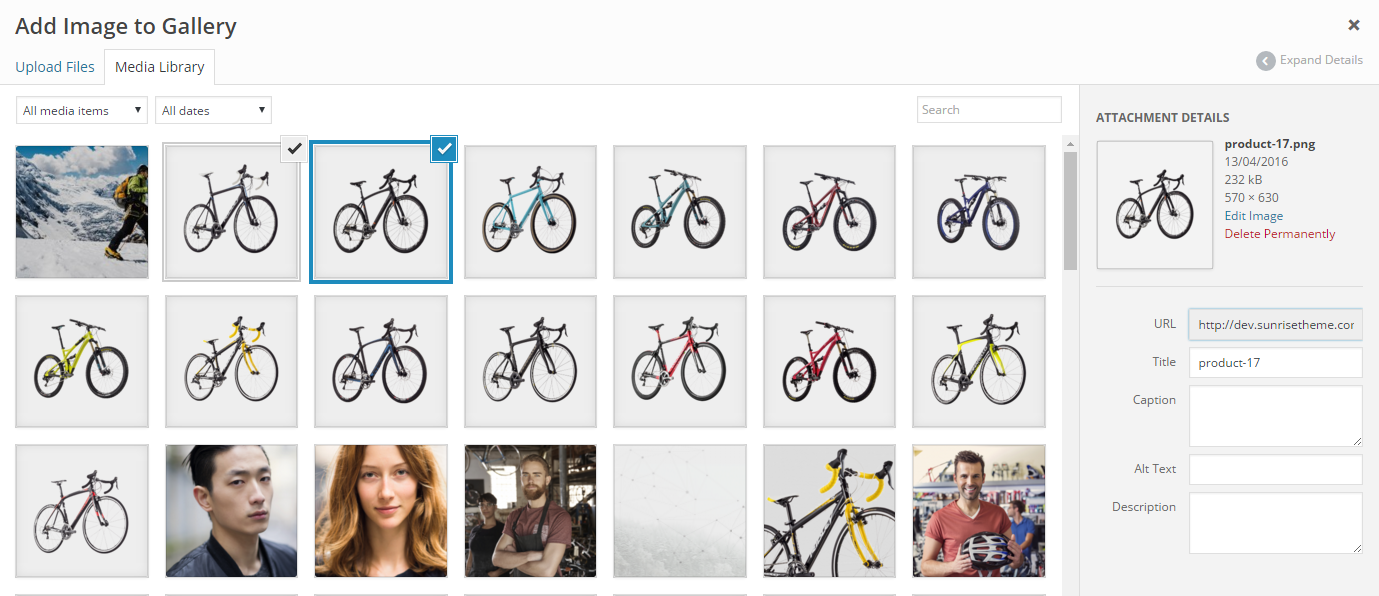
- Step 7: CLick to Add to gallery to select and upload images you want to gallery
- Step 8: Setup some options for your gallery:
- Gallery format: add images, audio, video... from gallery.
- Gallery auto play: True or False. If you choose True, your gallery will play in auto. Default is False.
- Gallery duration time: fill duration time for your gallery. Default is 5000.
- Gallery speed: custom the speed. Default is 300.
- Gallery pagination: True or False. If you choose True, your gallery will be paginated. Default is False.
- Gallery navigation: True or False. If you choose True, your post will have gallery navigation. Default is True.
- Gallery mousewheel using: True or False. If you choose True, the gallery can be used by mousewheel. Default is True.
- Step 9: Upload a featured image for your post
- Step 10: Click to Publish post
3. How To Add A Video Post
To create a video post, you follow the below steps:
- Step 1: Login to your WordPress Dashboard
- Step 2: Go to Posts >>> Add new post
- Step 3: Then, you enter your post title, contents in the text editor
- Step 4: You need to select "Video" post format, select category and add tags
- Step 6: Scroll down to Post options box, click to Post format tab, you will see Video source and video format link
- Step 8: Setup some options for your video:
- Video source: Select video source: video link, upload local file, video embed code.
- Video format URL: You can only add link from Vimeo and Youtube
- Step 9: Upload a featured image for your post
- Step 10: Click to Publish post
4. How To Add An Audio Post
To create an audio post, you follow the below steps:
- Step 1: Login to your WordPress Dashboard
- Step 2: Go to Posts >>> Add new post
- Step 3: Then, you enter your post title, contents in the text editor
- Step 4: You need to select "Audio" post format, select category and add tags
- Step 6: Scroll down to Post options box, click to Post format tab, you will see Audio source and soundcloud format link
- Step 8: Setup some options for your audio:
- Audio source: Select audio source: soundcloud link or upload local file.
- Soundcloud format URL: Insert soundcloud link, or link audio from other websites (option for format "Link" only, please fill in full http:// address).
- Step 9: Upload a featured image for your post
- Step 10: Click to Publish post
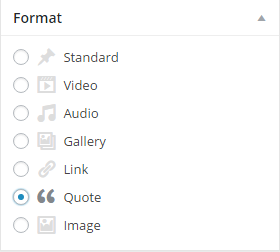
5. How To Add A Quote Post
To create an quote post, you follow the below steps:
- Step 1: Login to your WordPress Dashboard
- Step 2: Go to Posts >>> Add new post
- Step 3: Then, you enter your post title, contents in the text editor
- Step 4: You need to select "Quote" post format, select category and add tags
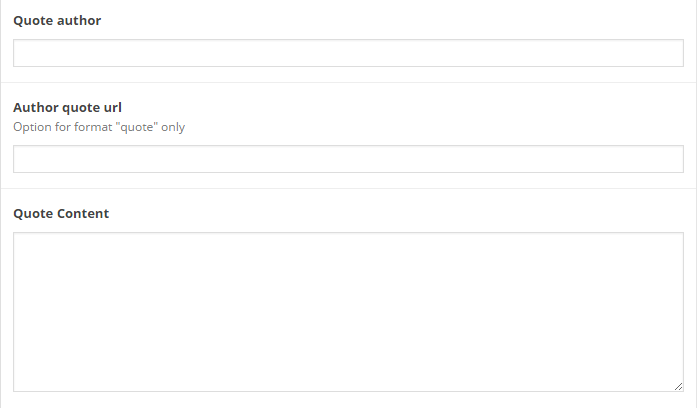
- Step 6: Scroll down to Post options box, click to Post format tab, you will see Quote
- Step 8: Setup some options for your audio:
- Quote author: Fill the author name of the quote.
- Author quote URL: Add author link.
- Quote content: Fill the quote.
- Step 9: Upload a featured image for your post
- Step 10: Click to Publish post
Create Blog Page
1. How To Create A Blog Page
- Step 1: Login to your WordPress Admin
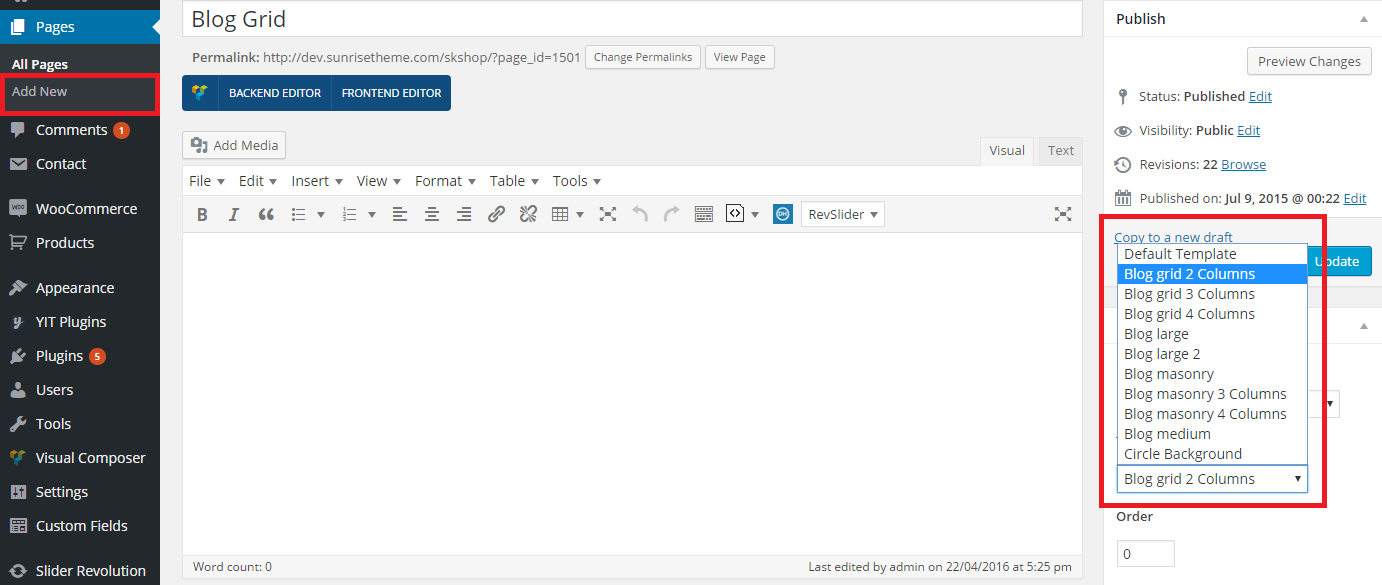
- Step 2: Go to Pages >>> Add new page
- Step 3: Enter title for your blog and select template for your blog in "page attribute"
- Step 4: Scroll to Page options, you will need to setup some options about layout, titlebar for your blog page. Please see Page options to know more details
- Page layout: You can select sidebar for your blog page including right sidebar, left sidebar, 100% width.
- Page titlebar: You can select show/hide titlebar. Please see Page options to know more details
- Blog: Allow you to select specific categories of posts for your blog page
- Step 5: Click to PUBLISH page


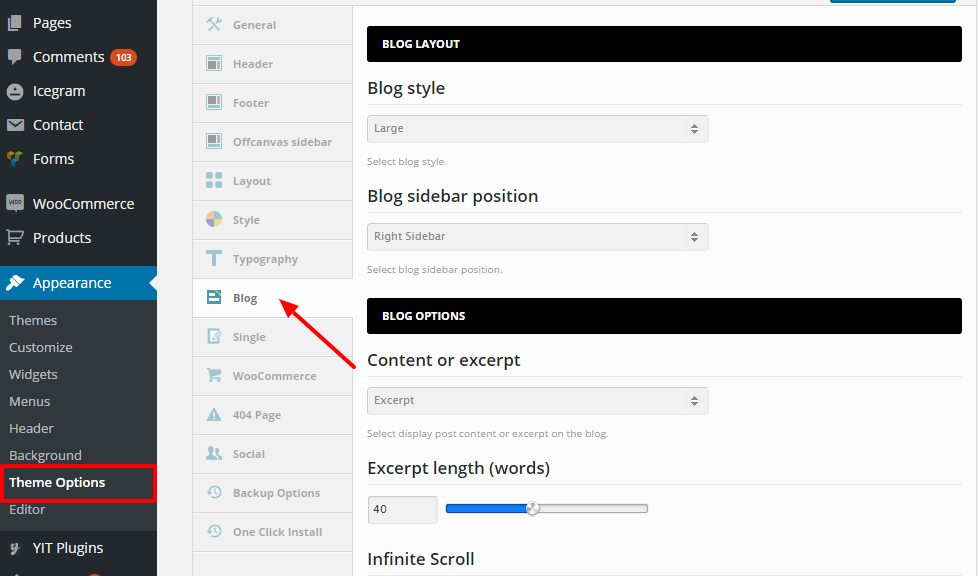
2. How To Setup Blog Category Page
To setup for your blog category page, please go to Theme Options and follow the below steps. All the changes that have been made in this 'Blog' section of Theme Options will effect the entire website. That means if you make any adjustments in a certain page, it will overwrite options in Theme Options.
- Step 1: Login to your WordPress Admin
- Step 2: Go to Appearance >>> Theme Options
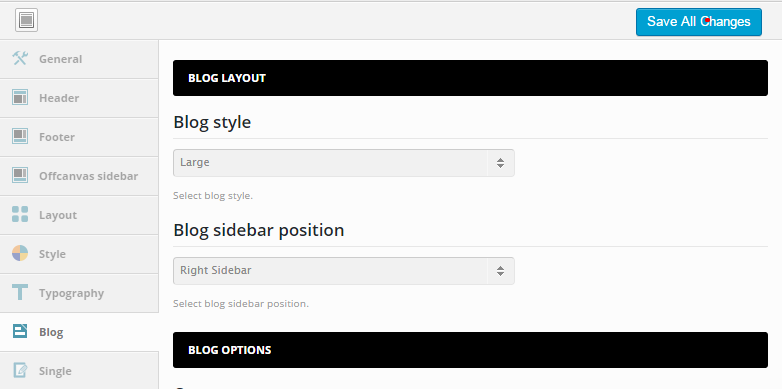
- Step 3: Click to Blog tab, you wwill see blog setting options
- Step 4: In Blog layout there will have options for you to setup layout, sidebar, style for blog
- Blog sidebar position: Right sidebar, left sidebar, two sidebars or no sidebar
- Blog style: There are 4 styles icluding large, large 2, timeline, masonry, medium, small.
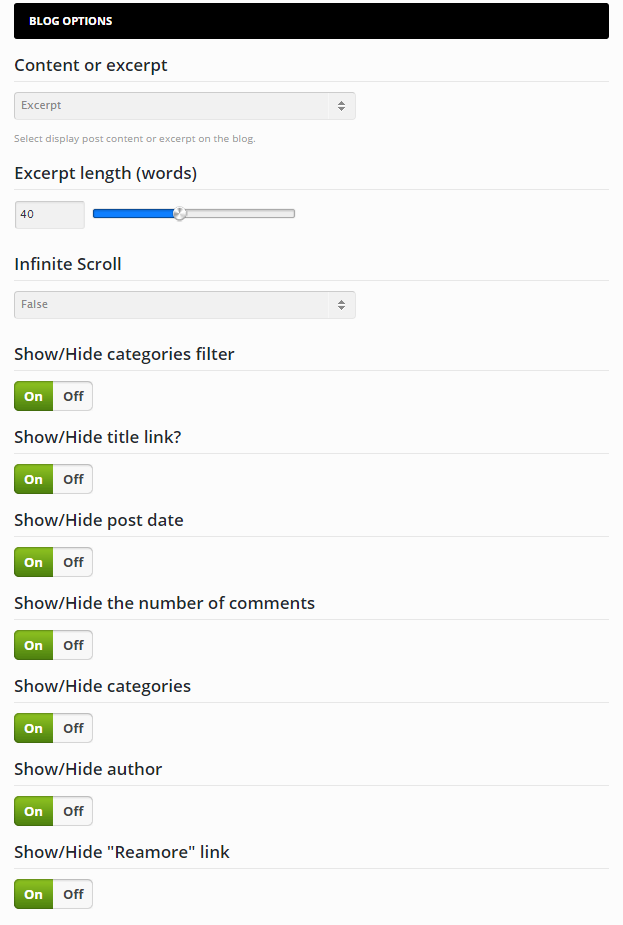
- Step 5: Blog options
- Content or excerpt: select to display content or excerpt on the blog
- Excerpt length: The number of displayed excerpt words
- Infinite scroll: You can use Pagination number to navigate to the next page
- Title link: You can show or hide title link
- Post date: Enable to show published date information
- Comments: Show the number of comments
- Author: Show the name of author
- "Readmore" link: Show the readmore button
- Step 6: Finally, Save changes
- Step 7: Click to PUBLISH your blog page
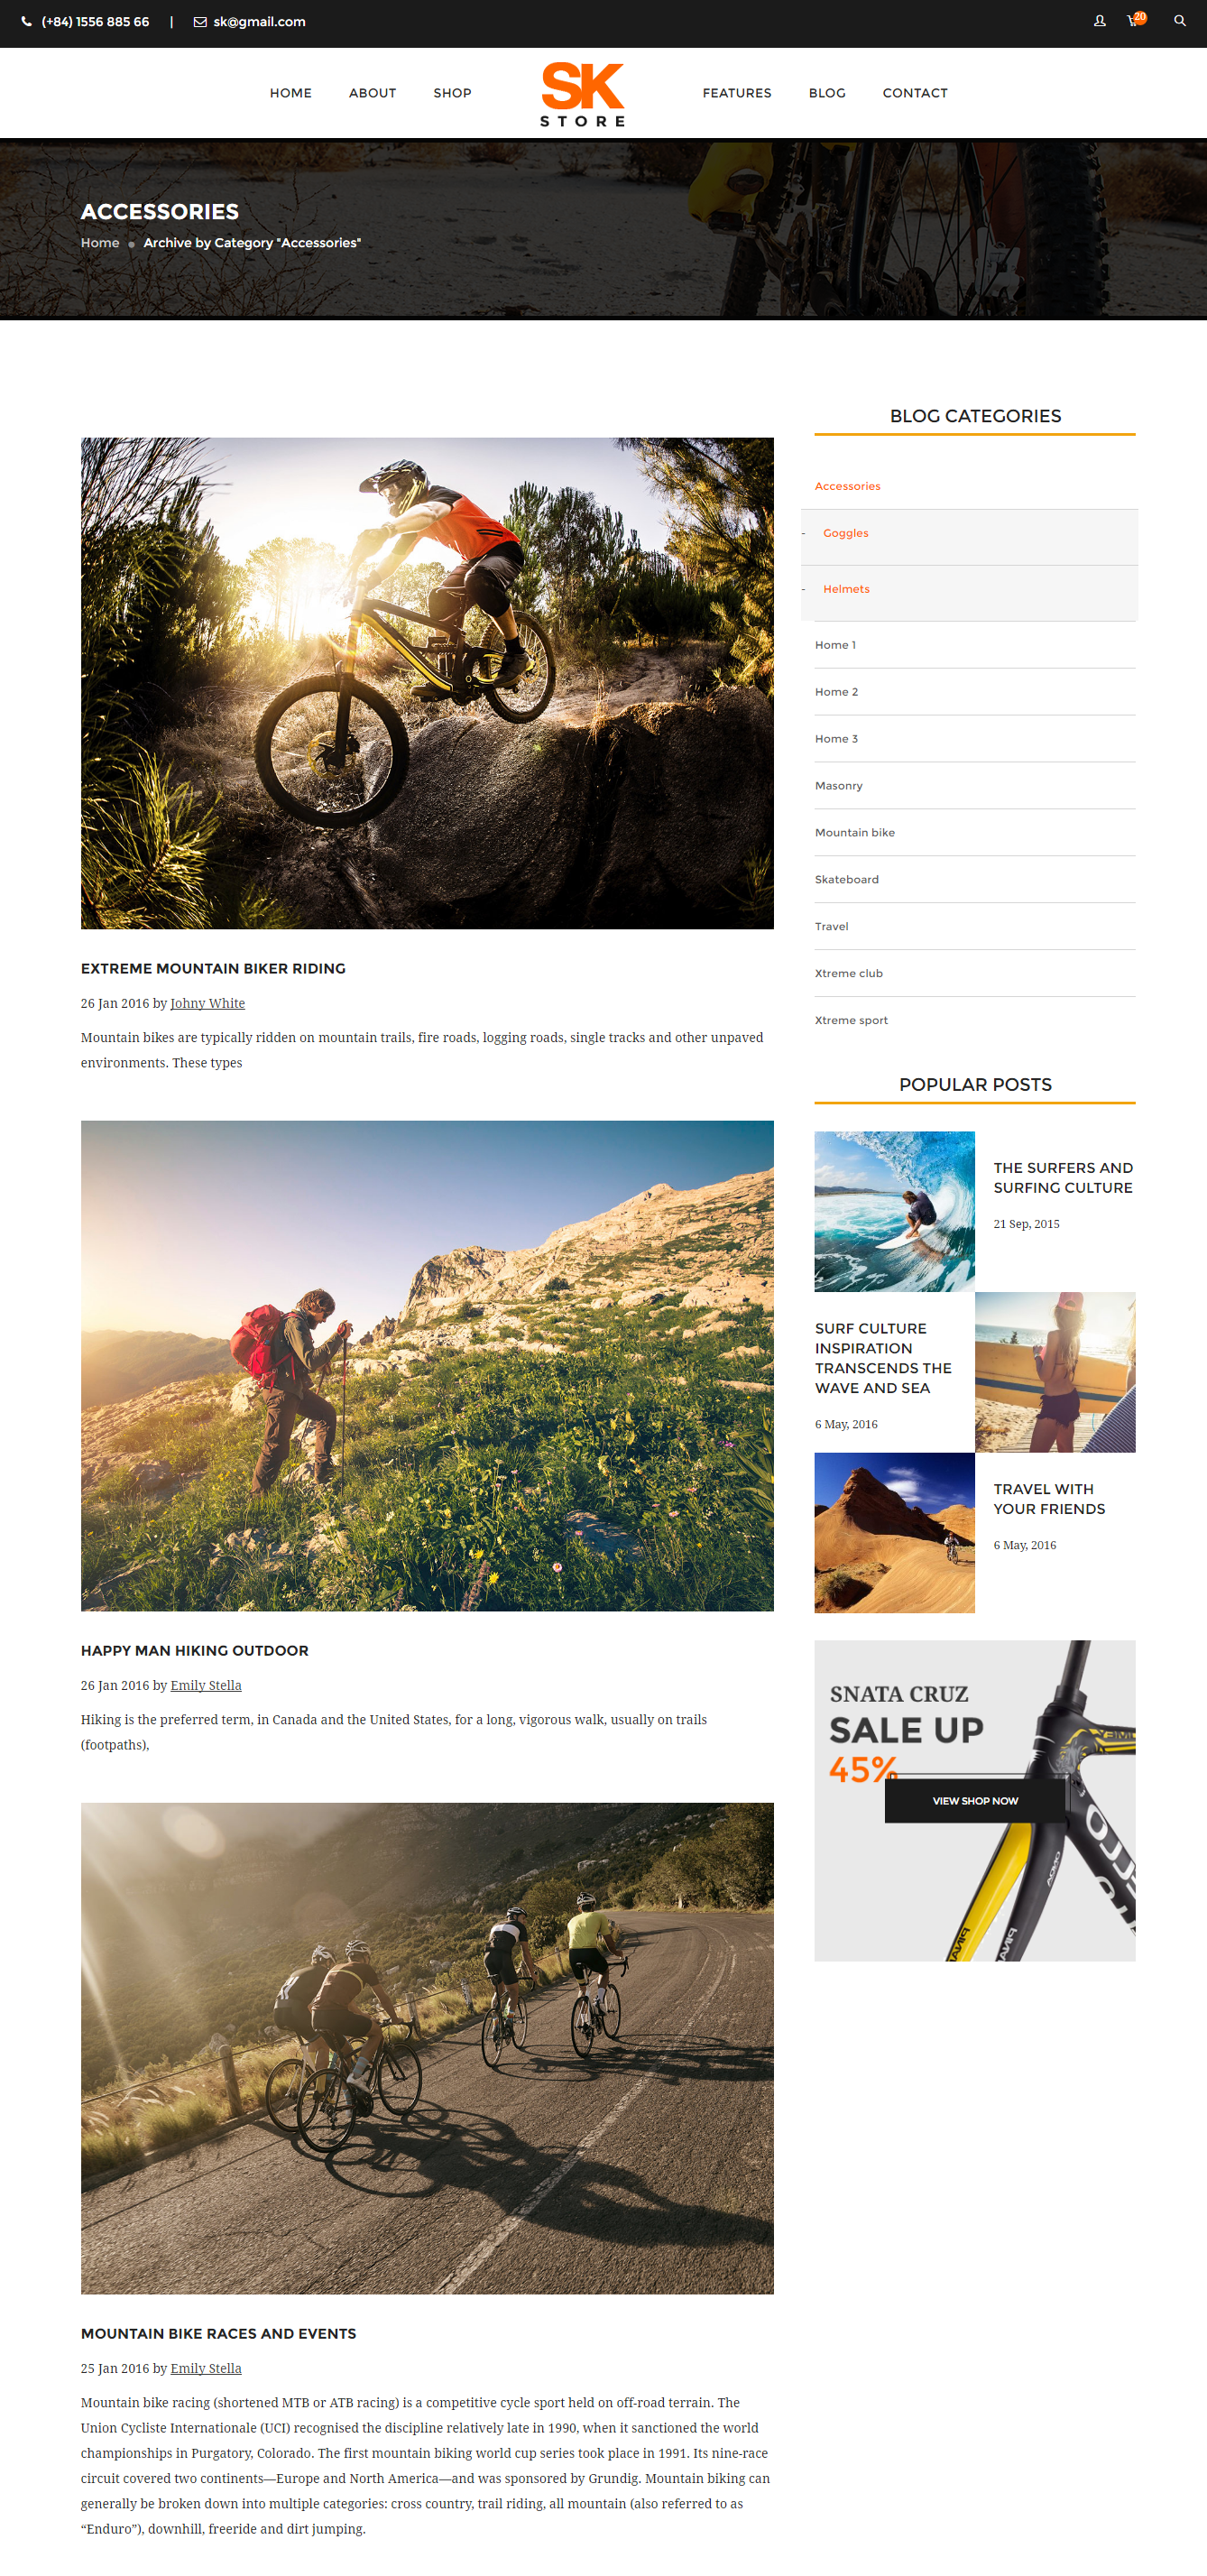
- Accessories Category Page
- Mountain Bike
- Skateboard
Front-end setttings
Setting Homepage
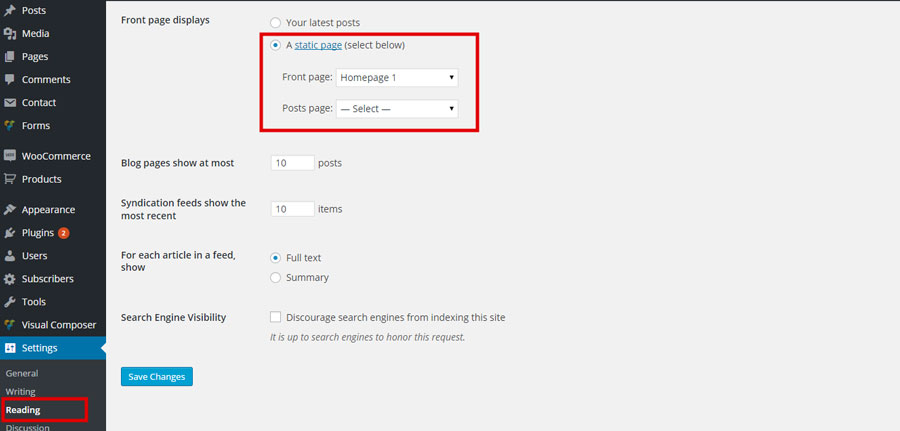
To create a homepage, please follow the below steps:
- Step 0: Make sure you created two new pages in WordPress (under Pages >>> Add new), and publish them. For the purpose of example, we’ll call these “Home” (for the front, or Home, page) and “Blog”.
- Step 1: Go to Settings >>> Reading in your WordPress Admin
- Step 2: Set "Front page displays" to a "Static Page"
- Step 3: In Front Page, choose a page which will be your homepage and select a page for posts page
- Step 4: Save changes
Sample Codes For Homepages
Here we provide you 04 demo pages, each comes with different style and purpose:
- 1. Homepage 1:
- 2. Homepage 2:
- 3. Homepage 3:
You can insert the following code into the back-end's visual section:
You can insert the following code into the back-end's visual section:
You can insert the following code into the back-end's visual section:
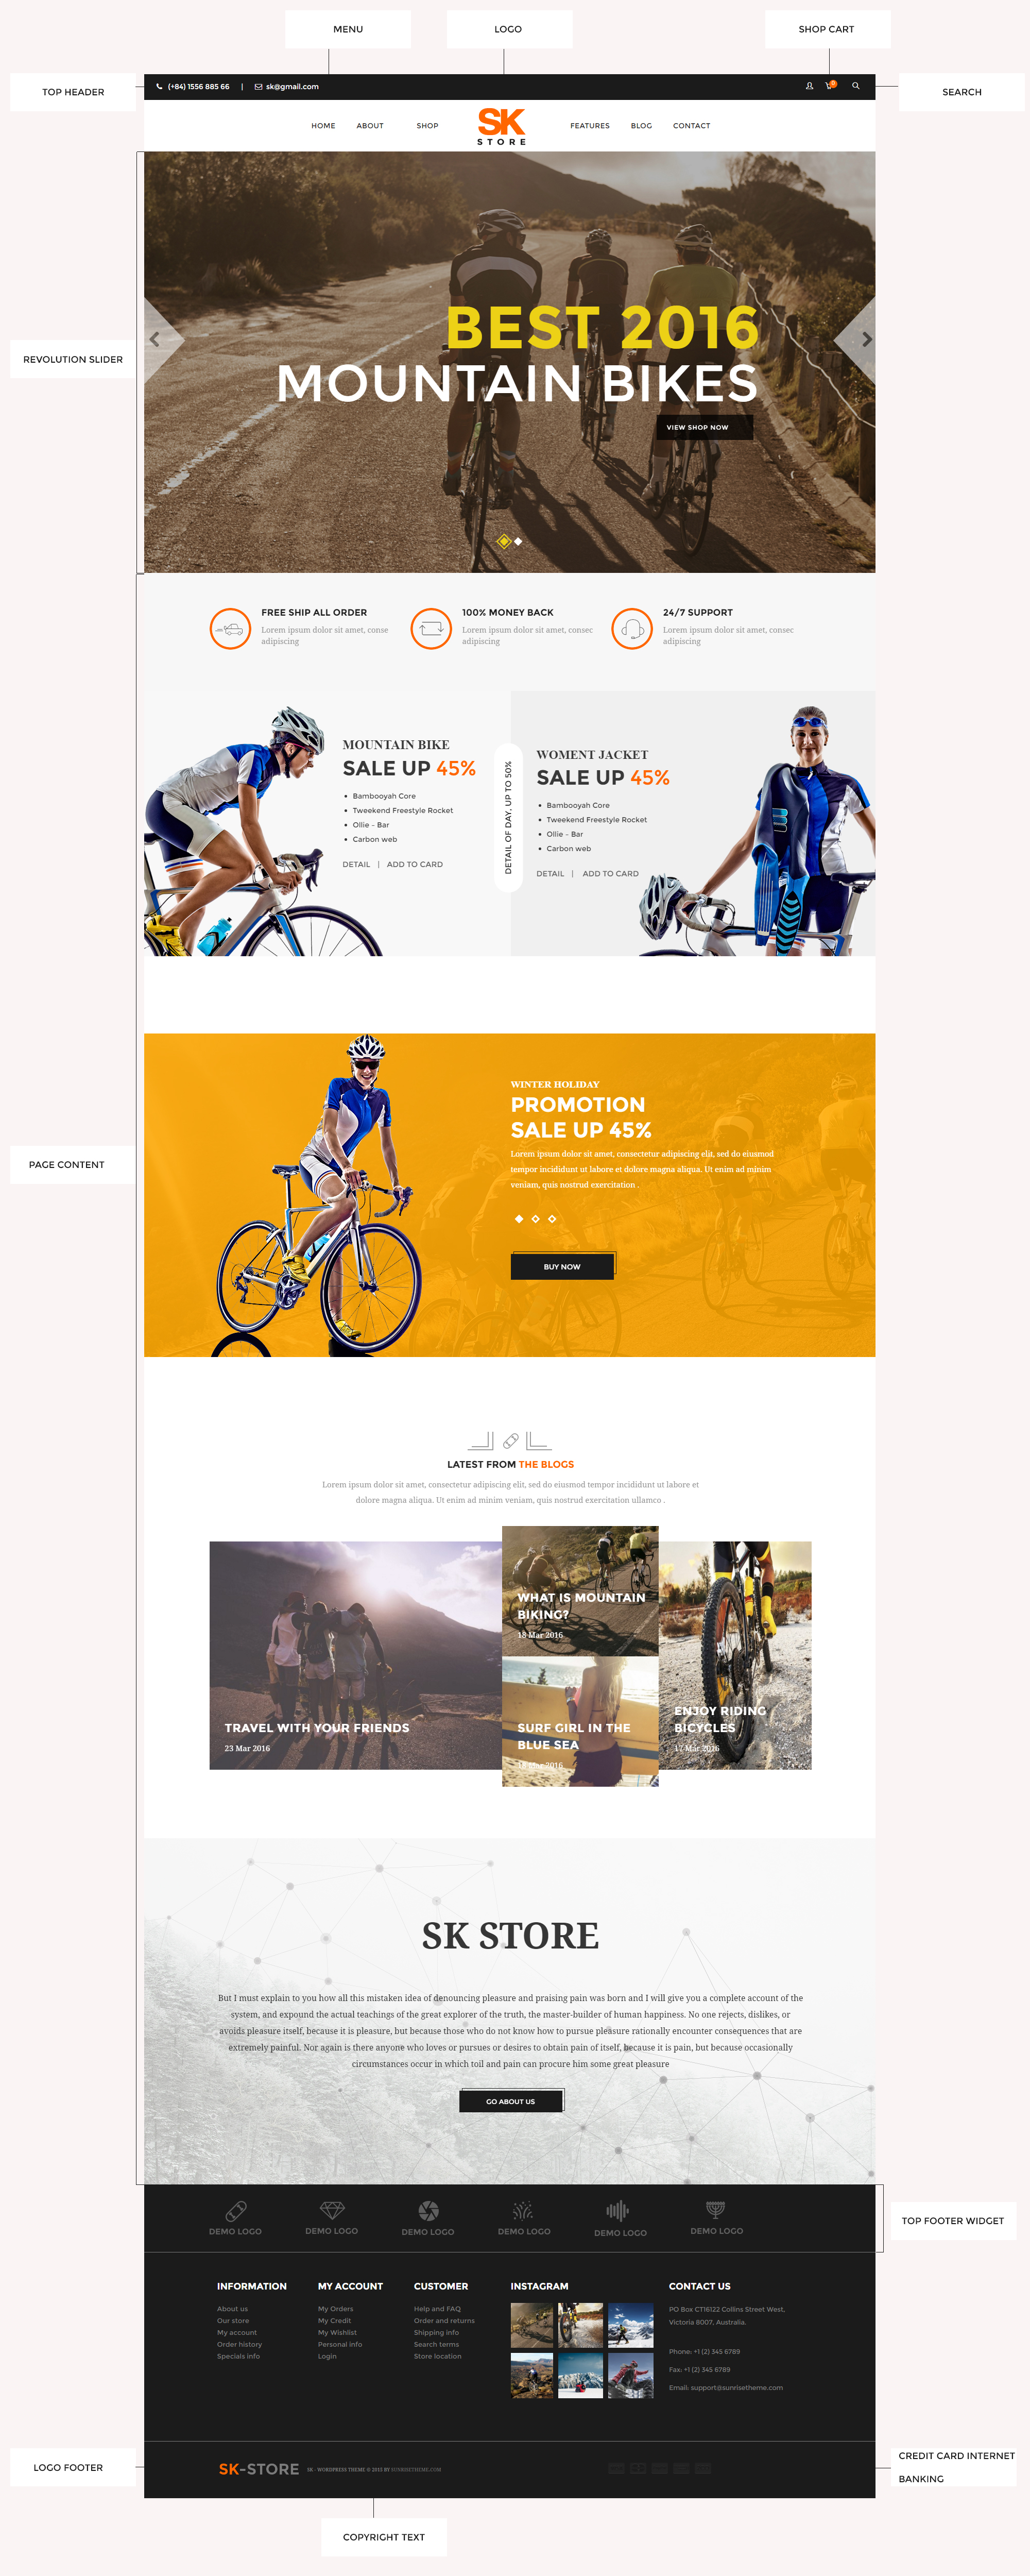
Below is an example of WordPress theme with direct instruction for every section. This captures some main components in contributing a web page:
- Secondary Menu: This might not be included in some web designs. But you can customize it by navigating to Appearance >> Theme Options >> Header. Then you navigate to "Top Header Section" and click "On" to activate it.
- Top Navigation Sidebar: You can see in this demo.
- Search: You can also add more icons to Top Navigation such as Text Editor, Social, Widgets, Canvas Sidebar, Woocommerce Cart, Logo, Custom Menu by navigating to Theme Options >> Header. Then scroll down to "Middle Header Section".
- Primary/Main Menu: In order to change all the title in the main menu, you can go to Appearance >> Menus. More information
- Logo: You can change logo by navigating Appearance >> Theme Options >> Header. Then scroll down to 'Logo' section. More information
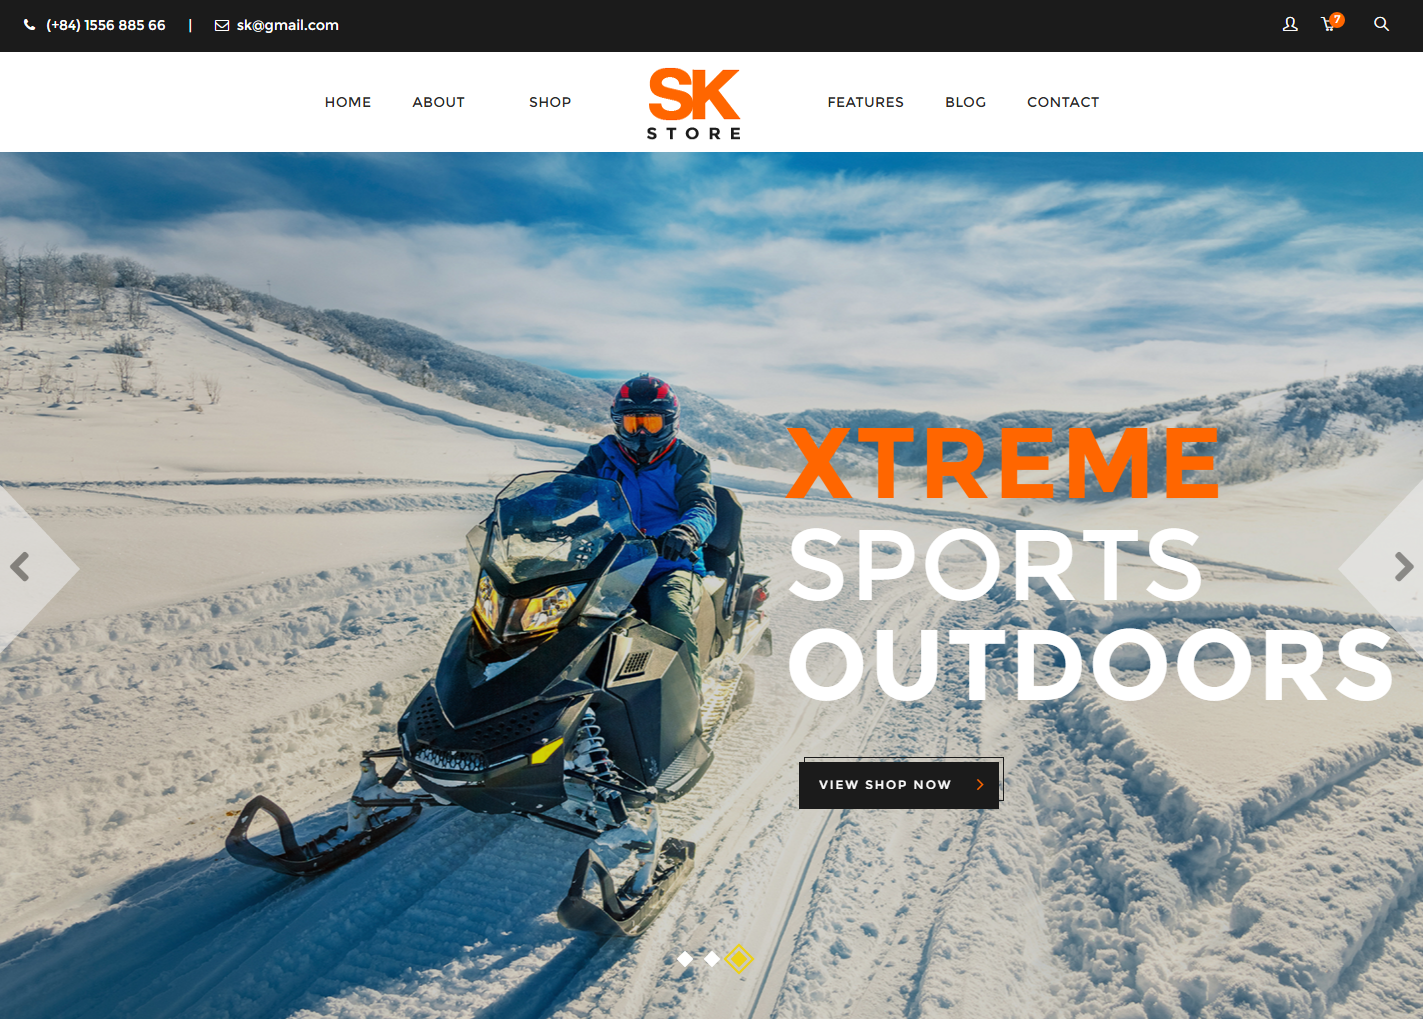
- Revolution Slider: This section seperates the main body and the menu header. It is often focused because it is the most popular way to attract users by its flexible slider and appealing messages on that.
- Page Content:This section of a web page plays the most important role partly because it contains visual block, content, image, video, which are built by shortcodes in Visual composers or codes. It also occupies the largest part in a web page.
- Footer:Web page footer content most often conveys technical information. You can customize it by navigating to Theme Options >> Footer. More information
- Copyright text:This copyright text is in the footer of web page. You can go to Appearance >> Theme Options >> Footer. Then scroll down to the 'Footer copyright text'.
- Social Accounts: To customize all the social links in page bottom, you can go to Appearance >> Theme Options >> Social and then change the links.
Revolution Slider Settings
Below, we guide how to import revolution slider for your page, please follow some steps below:
- Step 0 - Make sure you have installed SK Store theme and all recommended plugins, especially Revolution Slider
- Step 1 - Go to Revolution Slider >> Import Slider
- Step 2 - Choose .zip file to upload and import. Click "Import Slider" to finish!
In case you want to export slider from a website, you can go to Revolution Slider. And then hover to the slide that you might want to export data. Click to the down arrow sign >> Export Slider
Header Settings
1. SK Store's Header
SK Store supports you with 03 header sections including top, middle (main) and bottom header. Below, we will guide you how to setup each header section. Please follow step by step:
Front-end setttings

SK Store's main header includes logo, main menu, search and cart icons. After you have uploaded a logo and created menu, you will follow the below steps to complete main header settings
- Step 1: Login to your WordPress Admin
- Step 2: Navigate to Appearance >>> Theme Options and click to Header tab
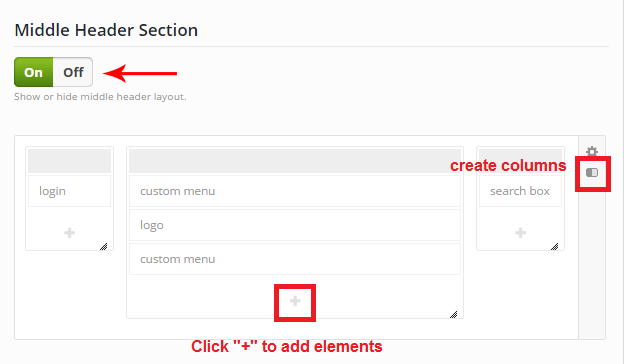
- Step 3: Scroll to Header layout, you will see options for top, middle and bottom header section
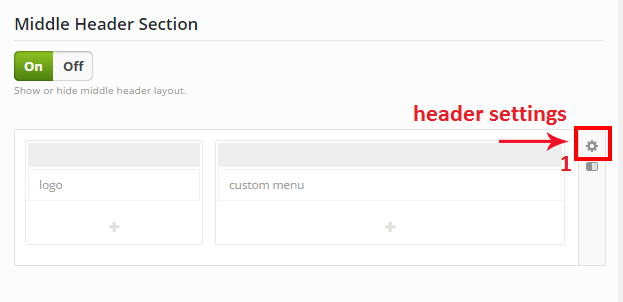
- Step 4: Click ON to enable middle header section
- Step 5: Click to symbol like the below image to create 03 columns, the max is 03 columns
- Step 6: Click to "+" to add elements, then you will see the box to choose elements. You select login for the first column, select 02 menus, logo for the second column; note: Logo will be placed between 02 menus. For menu, there are different menu options for you to select. All menus will be created in Appearance >>> Menus, select Cart, search box for the third column.
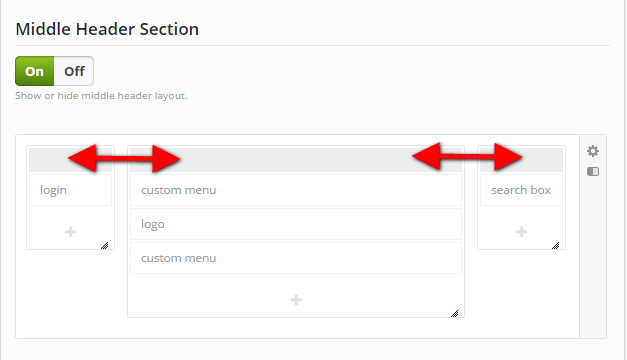
- Step 7: You can drag and drop elements and change columns width freely.
- Step 8: Save all changes
2. Sticky Header
Sticky menu on middle header
To use sticky header, you follow the below steps:
- Step 1: Login to your WordPress Admin
- Step 2: Navigate to Appearance >>> Theme Options and click to Header tab
- Step 3: Scroll to Header Settings, you will see options for sticky header
- Step 4: Select header section you want to fix. There are three options to select Sticky menu Sticky menu on top header, Sticky menu on middle header or Sticky menu on bottom header
- Step 5: Save all changes

3. Header Settings and Back-up Options
Header Settings
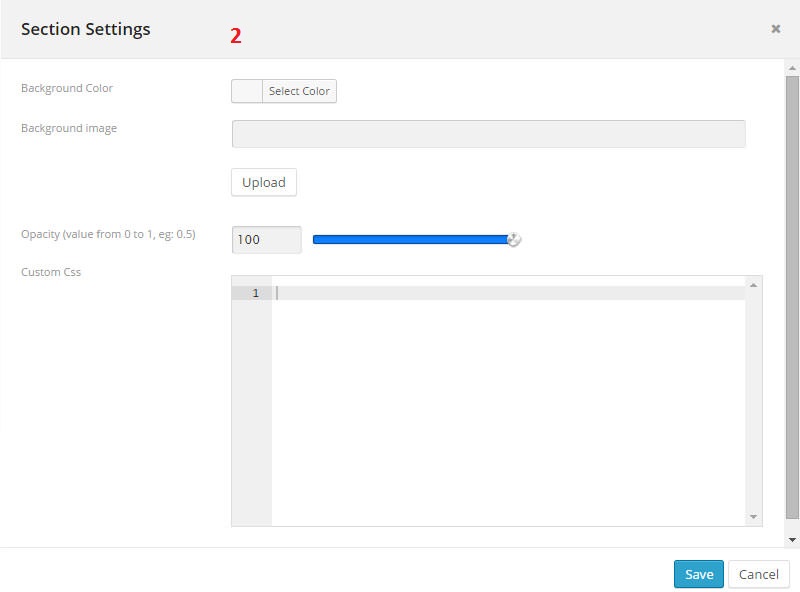
You can set up background color, image, opacity, custom css in each of header section (top, middle or bottom), follow the below steps:
- Step 1: Login to your WordPress Admin
- Step 2: Navigate to Appearance >>> Theme Options and click to Header tab
- Step 3: Scroll to Header Layout, you will see options for header sections
- Step 4: Click to turn ON to enable header section you want to use
- Step 5: Click to "settings" symbol like the below image
- Step 6: Save all changes
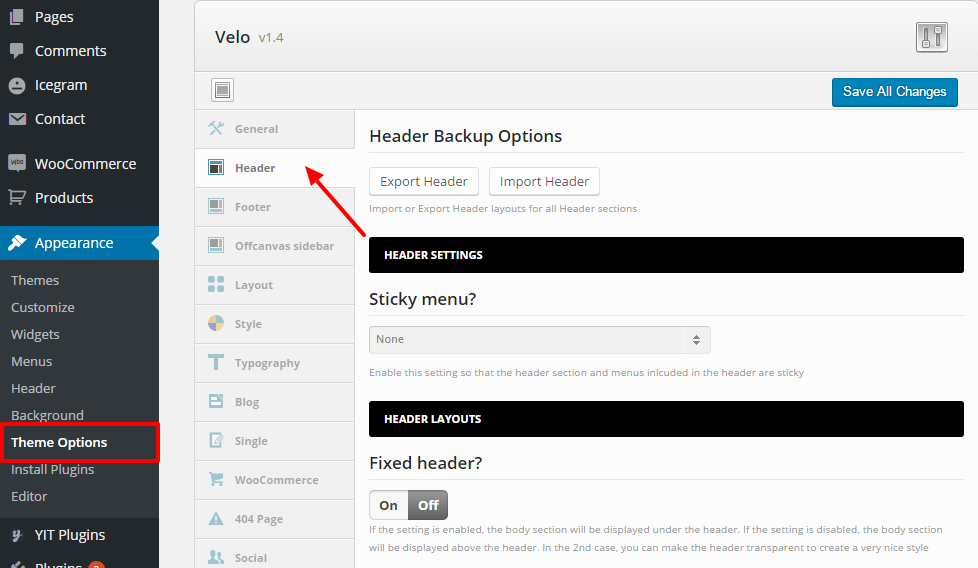
Header Back-up Options
SK Store supports you with header back-up options. This means you can backup your header settings before creating the new settings, in case you want to get the old header settings, you completely can import it again.
Follow the below steps, you will can back-up your header settings
- Step 1: Login to your WordPress Admin
- Step 2: Navigate to Appearance >>> Theme Options and click to Header tab
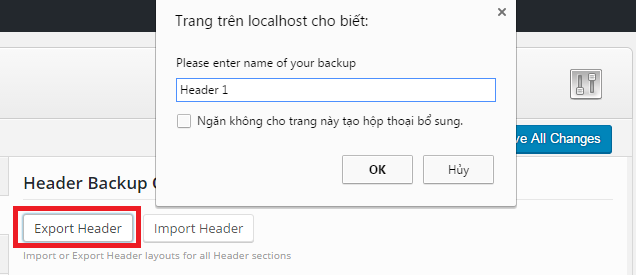
- Step 3: You will see Header Back-up Options. To back-up header, you click to Export Header, then enter the name of your backup and wait until you see a notification "Backup success"
- Step 4: To import the old header settings, you click Import Header
- Step 5: Select header file you export, then click Import now
- Step 6: Save all changes

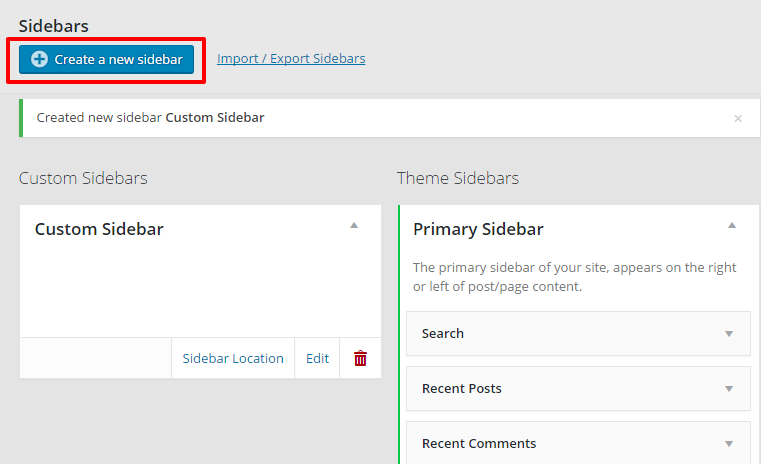
Create Custom Sidebar
SK Store allows you to create unlimited number of sidebars. You can set each page with a different sidebar of your choice. Follow the next step to learn how to set up your sidebar
- Step 0: Make sure that you install and activate Custom sidebars plugin
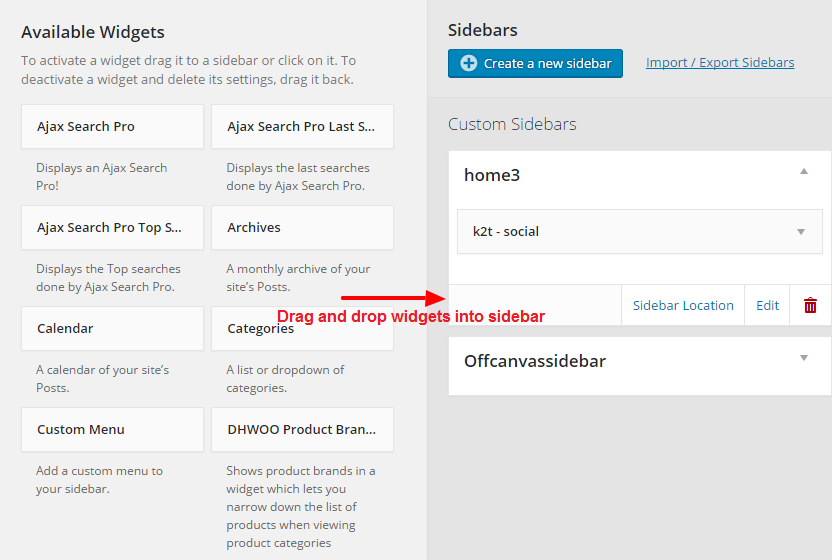
- Step 1: Go to Appearance >>> Widgets
- Step 2: Click to Add new sidebar to start to create a new sidebar, fill the name of sidebar you want
- Step 3: Drag widgets into your sidebar and customize each widget
- Step 4: In order that sidebar you have created is shown on individual page/post, you follow the below steps:
- Open the post/page in WP admin
- Scroll until you see Page/Post options
- Click to Page layout tab, you will see options to select the position of sidebar: left or right sidebar in "page layout" field
- In "custom sidebar" field, you fill the name of sidebar you have created
- Update or publish your page/post
Set Up Footer
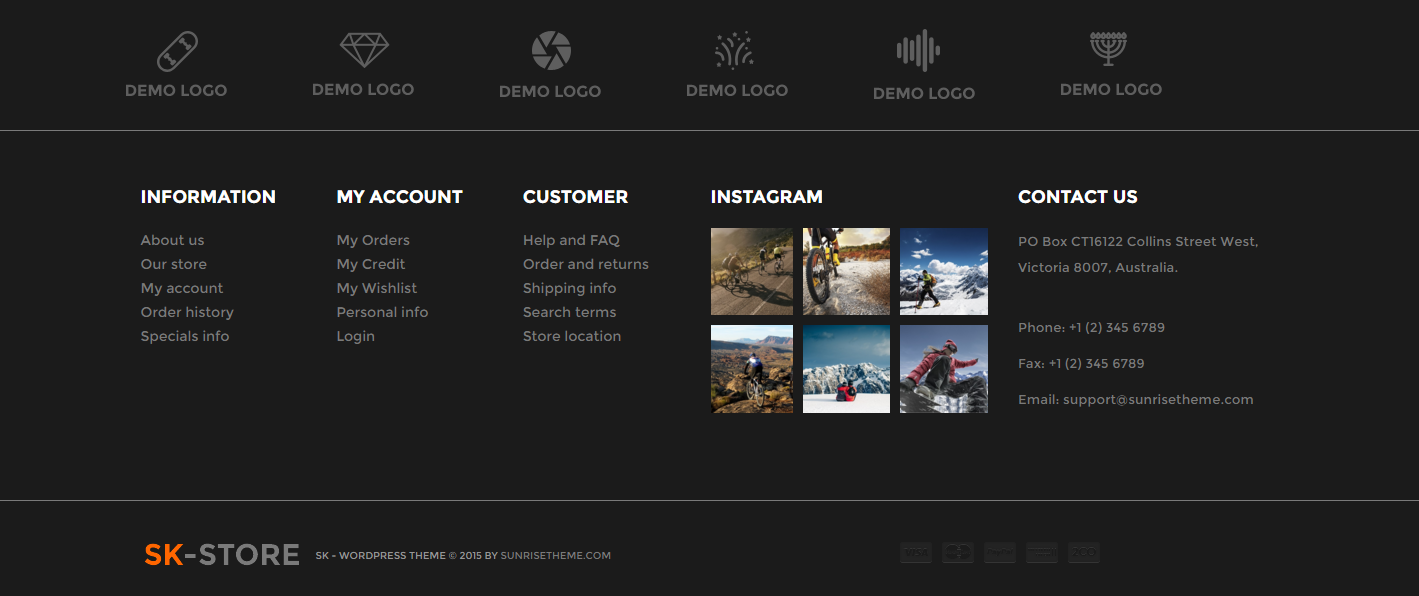
Make sure that you have installed WP Instagram widget plugin. To fill widgets for Footer, follow the steps below
- Step 1: Navigate to Appearance >> Widgets
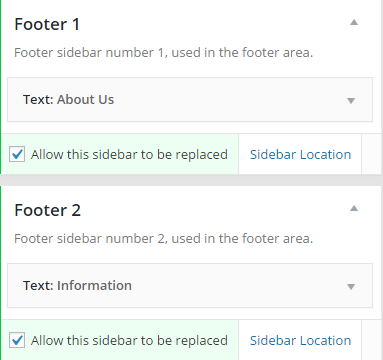
- Step 2: You will see sidebars which are footer 1, footer 2, footer 3, footer 4. Then you drag widgets you want into each footer
- Step 3: You can set up Footer in Theme options, see the below sections to know more details
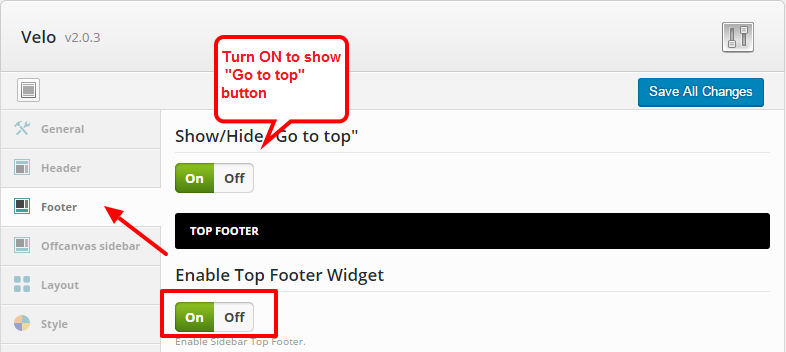
To create top footer widget, you should follow the below steps:
- Step 1: Navigate to Appearance >> Theme options >> Footer
- Step 2: Turn on to enable top footer widget
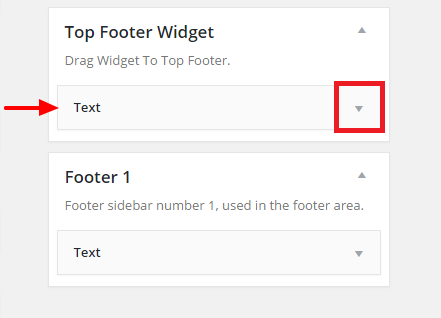
- Step 3: Then, you navigate to Apearance >> Widget, you will see Top footer widget in Theme sidebars section
- Step 4: Make sure that you have uploaded all logos (or banners) you want to your site. Then, drag and drop text in Available widgets section into Top footer widget and replace the mage link in the below code:
- Step 5: You can see top footer on front-end

To setup Footer, Follow the steps below
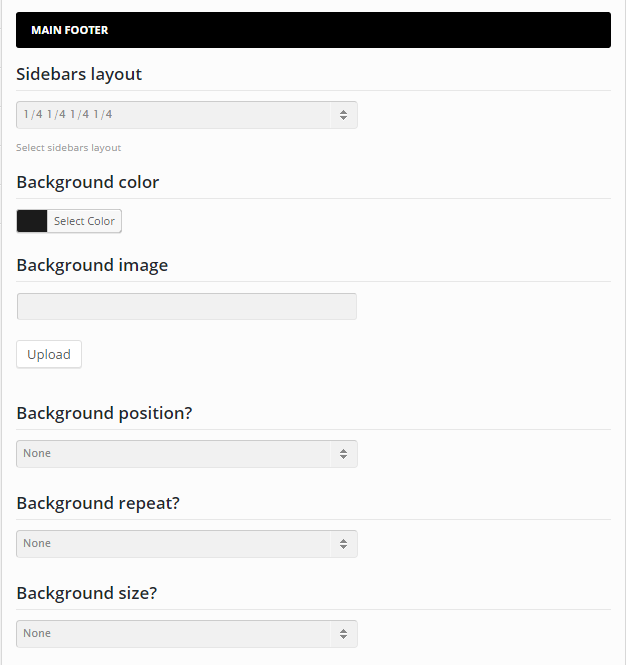
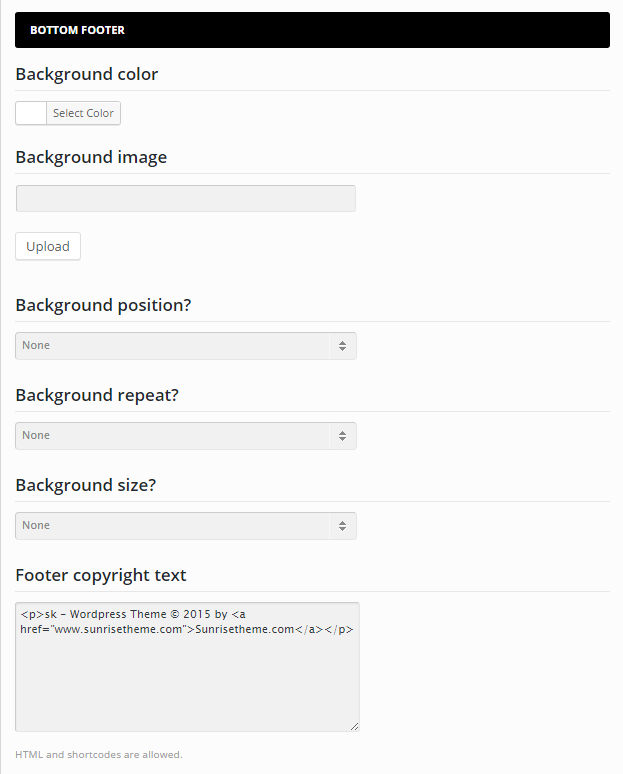
- Step 1: Navigate to Appearance >> Theme Options >> Choose Footer tab to display Footer options.
- Step 2: There are seven Footer Sidebar Layout options for you selecting. See changes when you select different types of Footer Sidebar Layout at front-end Settings Below.
- Step 3: You can setup Footer background image by uploading an image file.
- Step 4: To select Footer background color you click to Select Color, choose any color you want to.
- Step 5: There are also options to choose Footer Background position (left, right, center, top or bottom), Footer Background repeat, Footer Background size.
SK Store footer consists of the widget area and the copyright area. Both of these areas can be configured in theme options on the Footer tab. The widget area permit you to select to show 1, 2, 3 or 4 columns in the footer sidebar layout option, you can see some changes when you select different types of footer sidebar layouts.
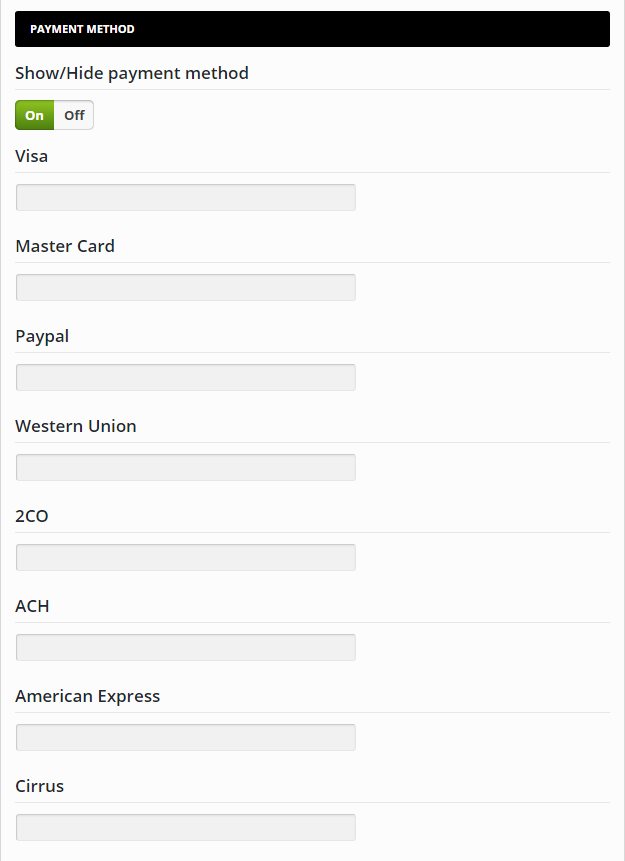
Footer Bottom Setup
To setup Footer, Follow the steps below
- Step 1: Navigate to Appearance >> Theme Options >> Choose Footer to display Footer options.
- Step 2: Upload logo for your bottom footer
- Step 3: Footer Right Bottom area is to display payment method, by turning On and fill your link to enable payment method you want to display.
- Step 4: Copyright area, you will enter information into Footer copyright text area such as product name, author, year.
Front-end setttings

Page Templates
SK Store provides you a great, number of sample pages and layout, which help you create an impressive website on your own:
- 1. About Us:
- 2. Contact us
You can insert the following code into the back-end's visual section:
You can insert the following code into the back-end's visual section:
FEATURES
Theme Options
To customize the appearance of your site, you go to Appearance >>> Theme Options to configure. Below is the detail of how to use those functions.
General
- Step 1: Navigate to Appearance >>> Theme Options >>>General.
- Step 2: Show or Hide Breadcrumb.
- Step 3: You can show/hide page loader
- Step 3: You can customize sidebar width
- Step 4: For Header code, Footer Code, custom CSS you can enter custom CSS or fill Google Analytics tracking code.
- Step 5: Finally, Save changes


Icons
- Favicon - Favicon is a small icon image at the topbar of your browser.
- Iphone icon - The iPhone icon is a file used for a web page icon on the iPhone. When someone bookmarks your web page or adds your web page to their home screen, this icon is used. If this file is not found, these products will use the screen shot of the web page, which often looks like no more than a white square.
- Iphone retina icon - The same as iPhone icon but for Retina iPhone.
- Ipad icon - The same as iPhone icon but for iPad.
- Ipad retina icon - The same as iPhone icon but for Retina iPad.
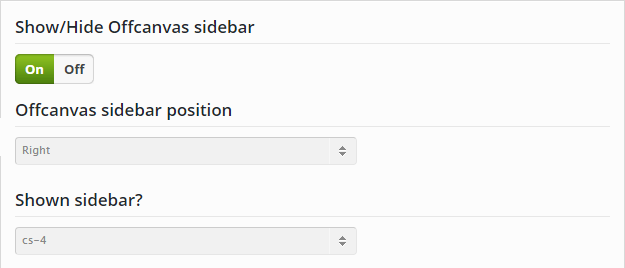
Offcanvas Sidebar
To setup Offcanvas Sidebar, Follow the steps below:
- Step 1: Navigate to Appearance >>> Theme Options >>> Offcanvas sidebar.
- Step 2: Check ON to show Offcanvas. Select the offcanvas sidebar position (left or right) and choose one of the sidebars you have created in Appearance >>> Widgets. For example "cs-4" sidebar. The "cs-4" stands for "the fourth custom sidebar" you create. More details, you can see Sidebar section.
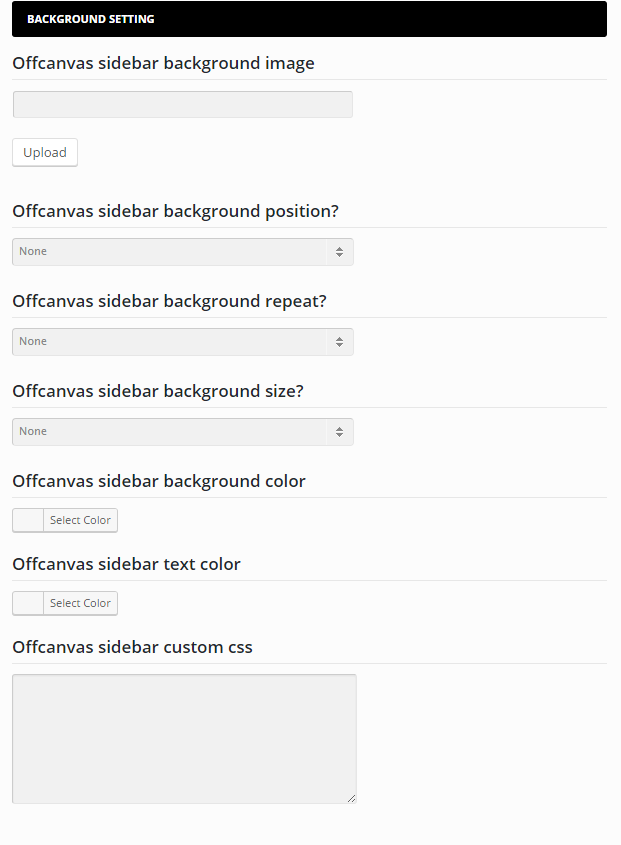
- Step 3: Besides, SK Store allows you to select Offcanvas sidebar background image, background repeat (No repeat, Repeat X, Repeat Y), background size (Auto, cover, contain), background color, text color, custom css.
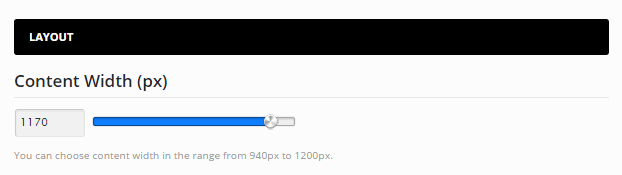
Layout
- Step 1: Navigate to Appearance >>> Theme Options >>>Layout.
- Step 2: Layout tab in theme options is where you can customize content width. You can choose content width in the range from 940px to 1200px.
- Step 3: Finally, Save changes
- You can select titlebar layout (Justify or Center).
- Enter Page titlebar top padding, bottom padding, choose background image or color, position (Left Top, Left Center, Left Bottom, Right Top, Right Center, Right Bottom, Center Top, Center Center, Center Bottom).
- Check ON to turn background parallax, customize titlebar shadow opacity, titlebar overplay cpacity, titlebar clipmask opacity according to percentage.
- Enter titlebar custom content.

Front-end setting

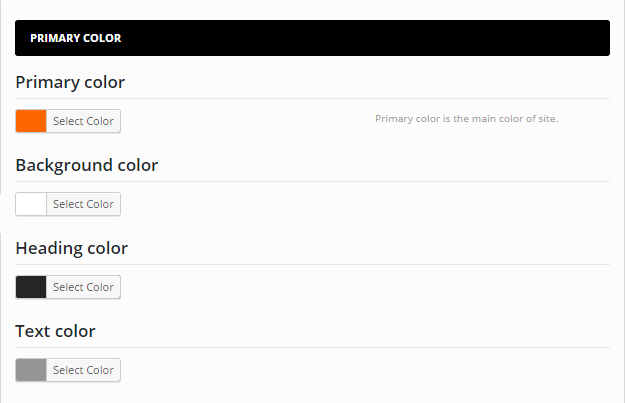
Style
- Step 1: Navigate to Appearance >>> Theme Options >>>Style.
- Step 2: Primary color: Select color for site in primary color (main color), select color for heading and text. Primary color is #ff6600
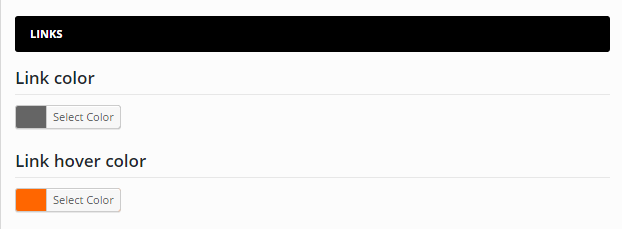
- Step 3: Link color: You can select color for link, link hover.
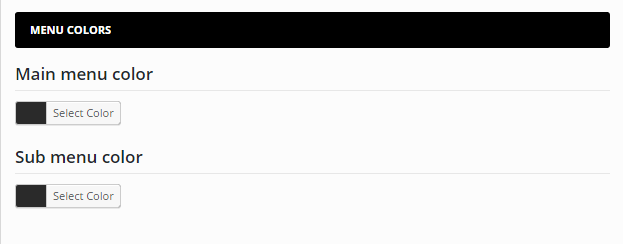
- Step 4: Menu color: You can set color for main menu and submenu.
- Step 5: Finally, Save changes
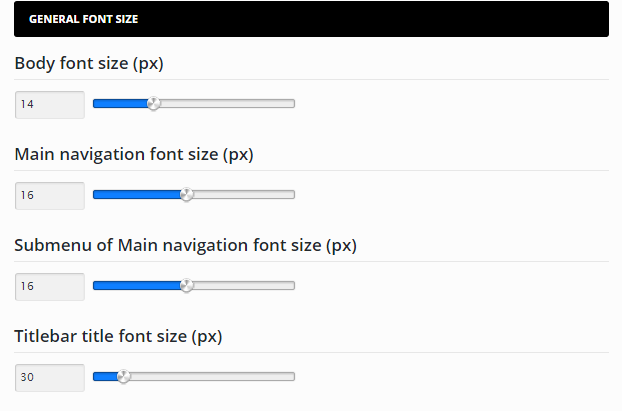
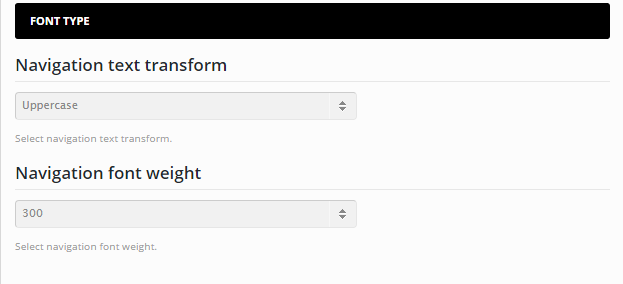
Typography
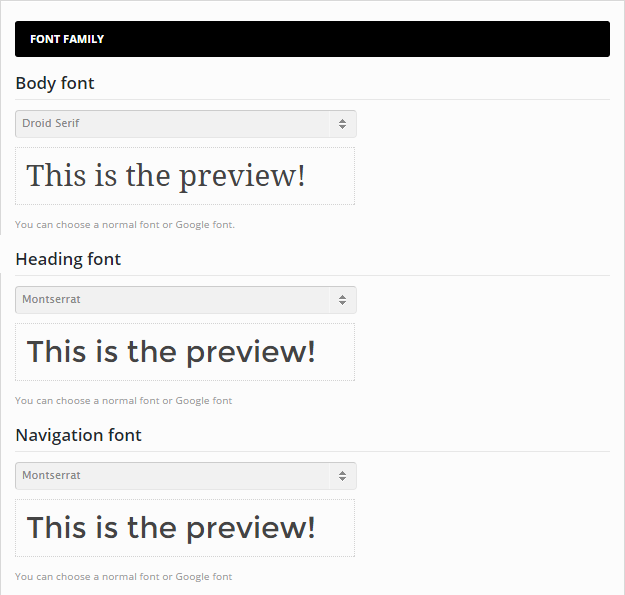
- Step 1: Navigate to Appearance >>> Theme Options >>>Typography.
- Step 2: You can choose a normal font or Google font for Navigation, Heading and Body.
- Font Family
- Headings Font Size
- General Font size
- Font Type
- Step 3: Finally, Save changes
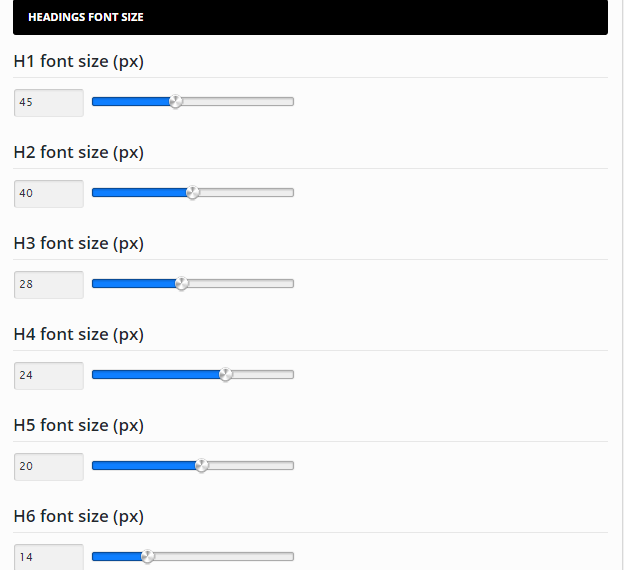
In this section, you can customize Font size for Heading types or Body.
Blog category page
All the changes that have been made in this 'Blog' section of Theme Options will effect the entire website. That means if you make any adjustments in a certain page, it will overwrite options in Theme Options.
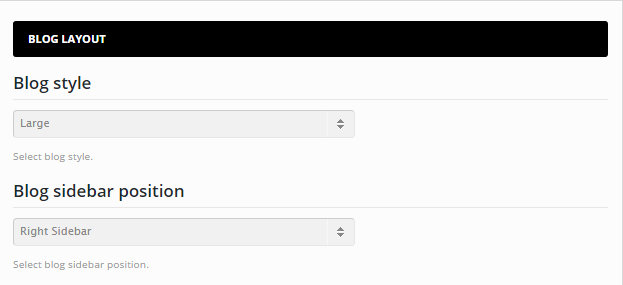
- Step 1: Navigate to Appearance >>> Theme Options >>>Blog.
- Step 2: Set up for blog layout
- Blog layout: Right sidebar, left sidebar or no sidebar
- Blog sidebar: Fill the name of sidebar you want to show (To create sidebar, you go to Appearance >>> Widget)
- Blog style: There are 4 styles icluding large, grid, masonry, medium.
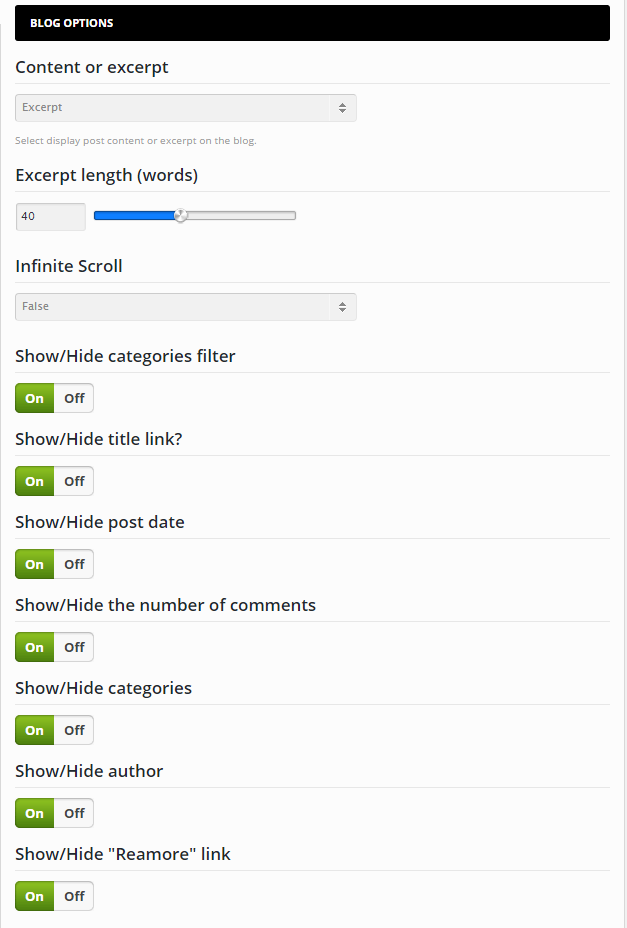
- Step 3: Blog options
- Content or excerpt: select to display content or excerpt on the blog
- Excerpt length: The number of displayed excerpt words
- Infinite scroll: You can use Pagination number to navigate to the next page
- Title link: You can show or hide title link
- Post date: Enable to show published date information
- Comments: Show the number of comments
- Author: Show the name of author
- "Readmore" link: Show the readmore button
- Step 4: Finally, Save changes
Blog category page
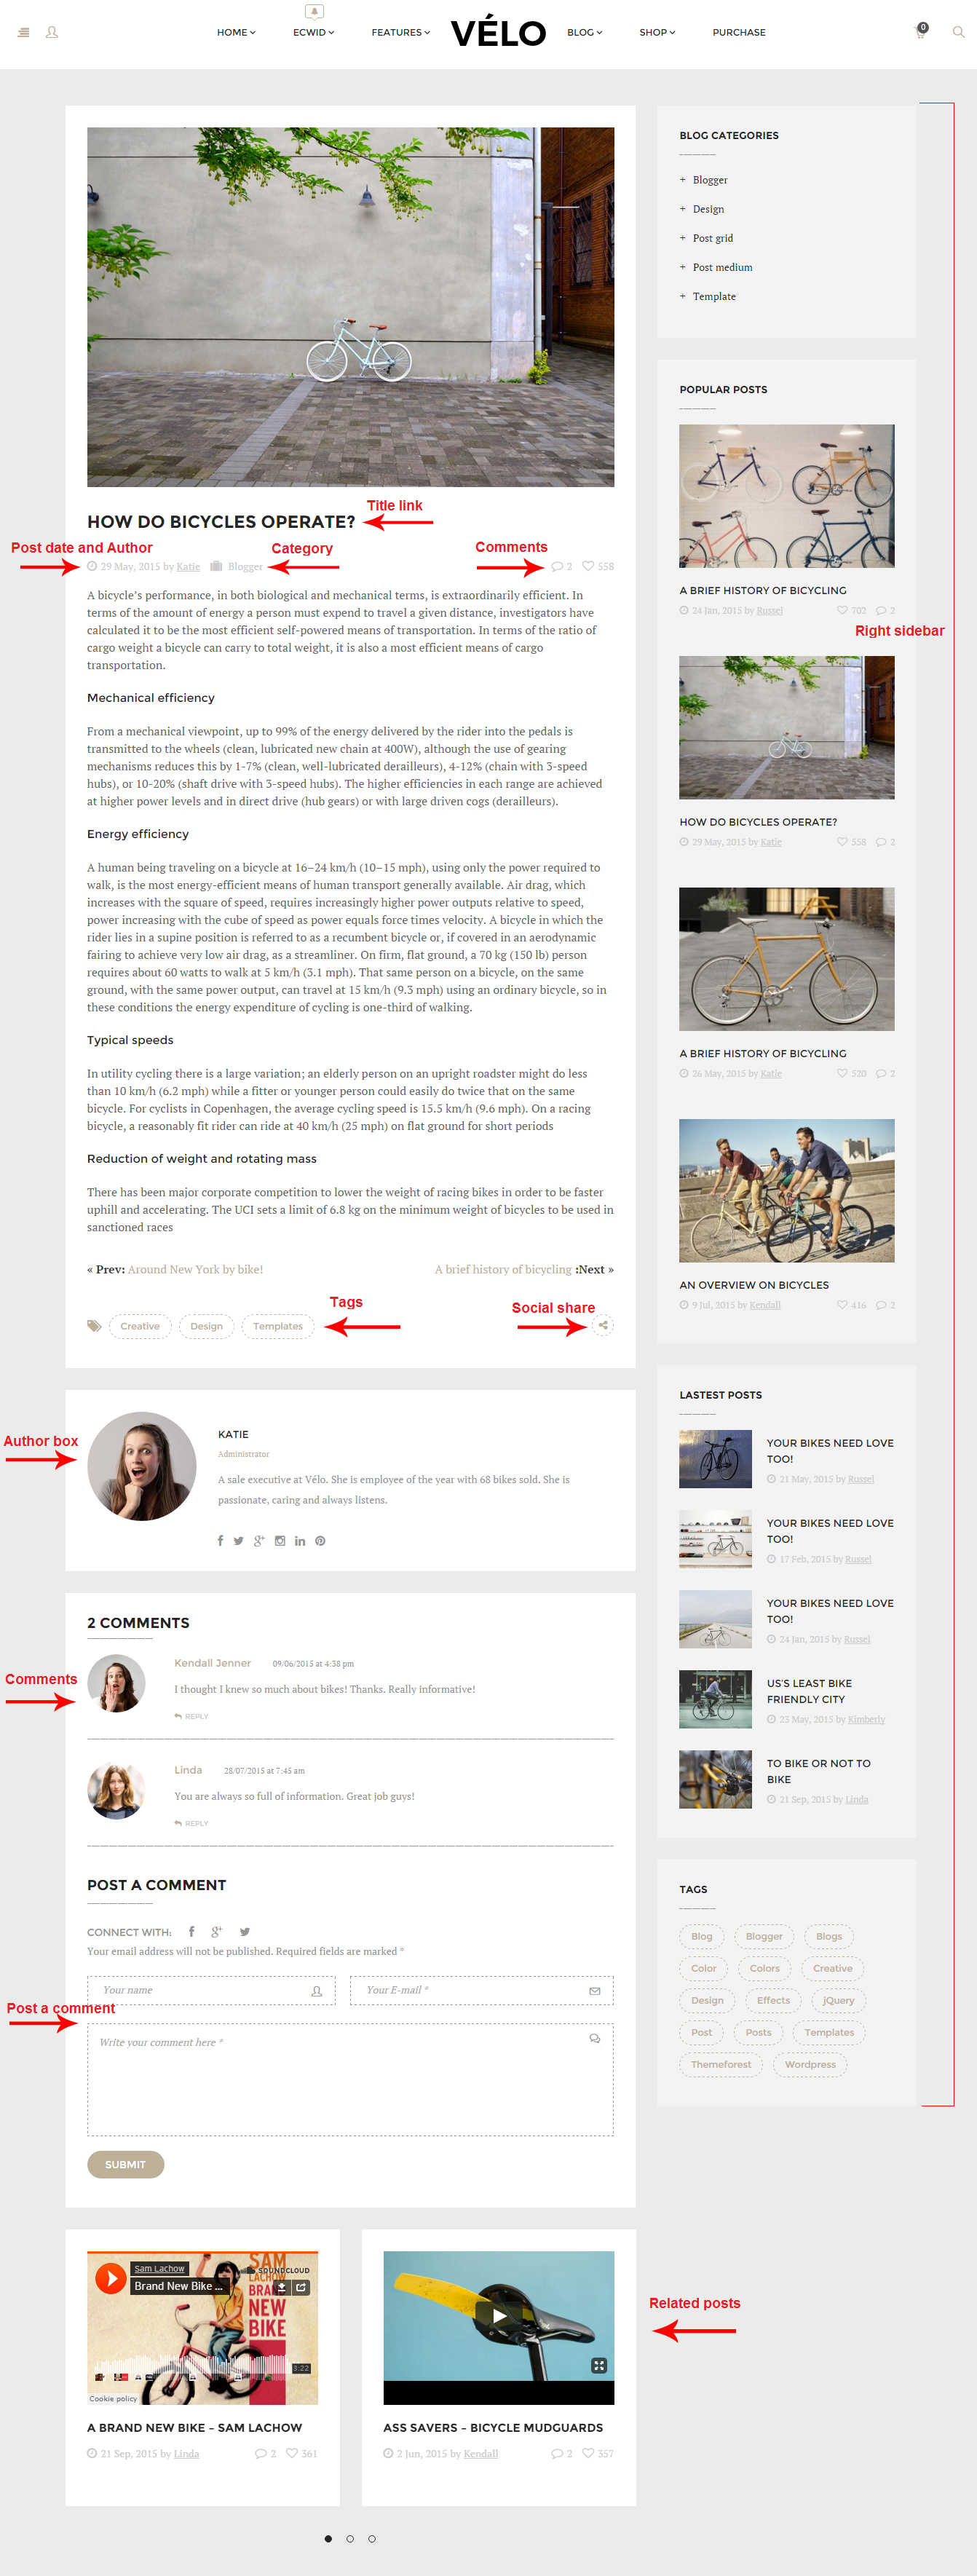
Single
NOTE: Similar to the 'Blog' section, all the changes that have been made in this 'Single' section of Theme Options will effect the entire website. That means if you make any adjustments in a certain page, it will overwrite options in Theme Options.
- Step 1: Navigate to Appearance >>> Theme Options >>> Single.
- Step 2: Select single layout such as right sidebar, left sidebar or no sidebar. Right sidebar will be selected by default.
- Single post layout: You can choose right sidebar, left sidebar or no sidebar
- Single custom sidebar: Enter the name of sidebar you have created in Appearance >>> Widgets. For example, "secondary-sidebar"
- Step 3: Set up meta information
- Social share: Turn ON to show Facebook, Twitter, Google Plus, Linkedin, Tumblr, Email on single post
- Tags: Turn ON to show tags on single post
- Comment number: Turn ON to show the number of comments
- Previous/Next link: Turn ON to show post navigation link
- Author box: Turn ON to show Author box information
- Related post: Turn ON to show related post on single post
- Related post title: Fill in the name of related posts, for example "You may also like"
- Number of related post: Fill in the number of related posts you want to show, for example "3". In case you want to show all related posts, you enter "-1"
- Comment form: Turn ON to show comment form on single post
- Step 4: Finally, Save changes

Front-end settings
WooCommerce Titlebar
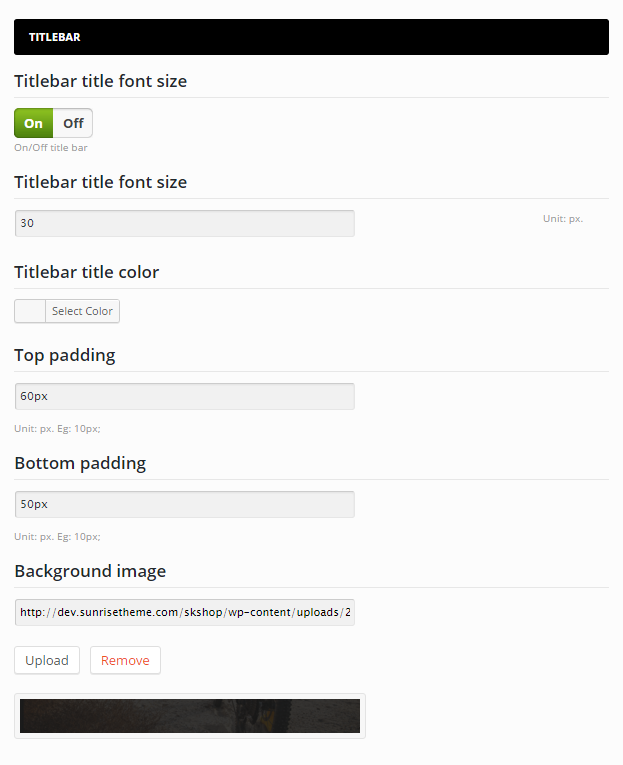
You can turn ON/OFF titlebar, adjust titlebar title font size, top padding, bottom padding or upload image for background
WooCommerce
You can go to Shop to know more about Woocommerce customization.
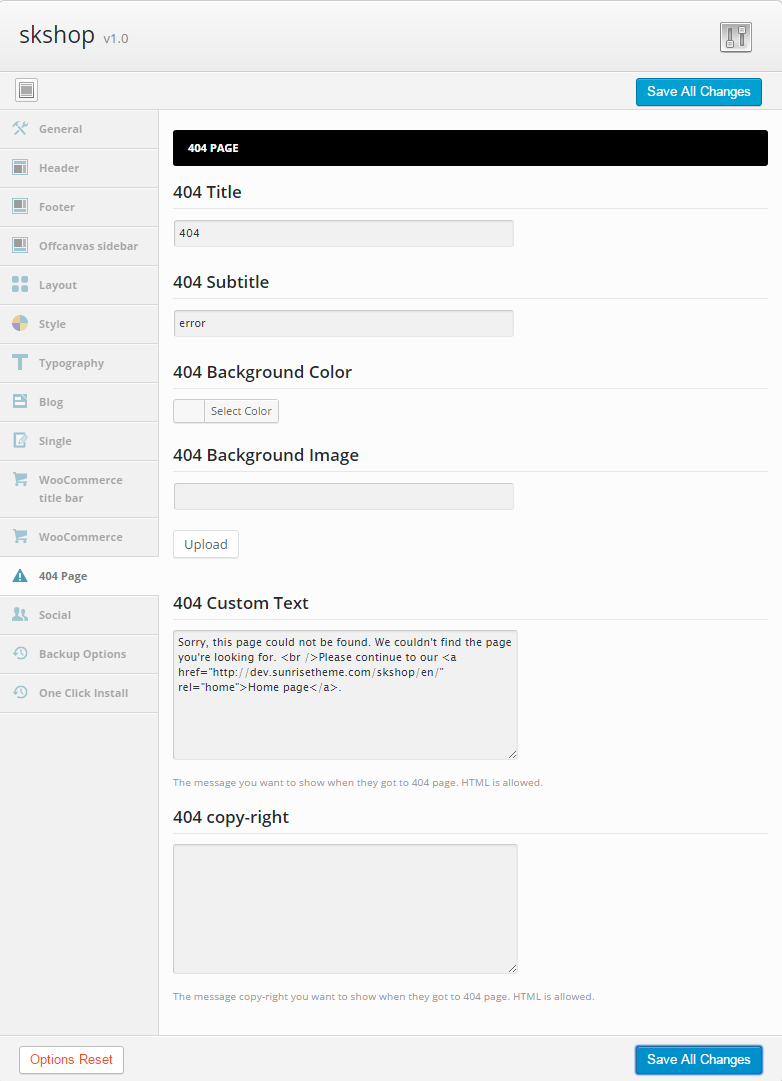
404 Page
You can enter 404 Title, custom text, upload 404 image you want to show when users go to 404 page. Check ON to display subcribe newsletter form. But you need to install newsletter plugin.
Social
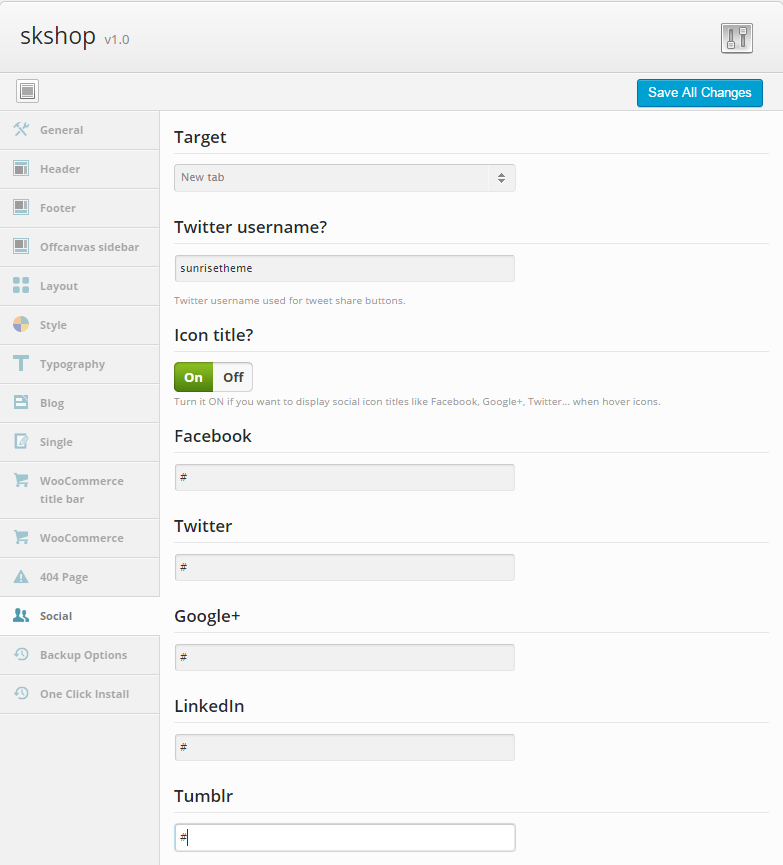
- Step 1: Navigate to Appearance >>> Theme Options >>>Social.
- Step 2: Social Tab in Theme Options is where you will insert your custom social media links you want to display. If you want to display Facebook icon, Twitter icon or Google+ icon in header or footer you need to insert the URL of your Facebook, Twitter, Google+ in the corresponding field.
- Step 3: To display icon title when you hover icons, you only need to turn On in the icon title field.
Backup Options
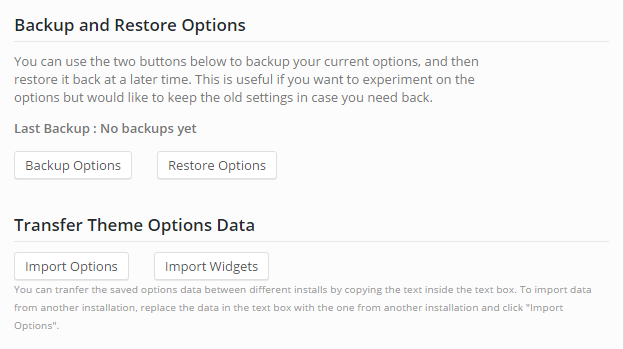
- Backup and Restore Options: You can use two buttons below to back up your current options, and then restore it back at a later time. This is useful if you want to experiment on the options but would like to keep the old settings in case you need to get it back.
- Transfer Theme Options Data: You can tranfer all the saved options data between different installations by copying the text inside the text box. To import data from another installation, replace the data in the text box with the one from another installation and click "Import Options".
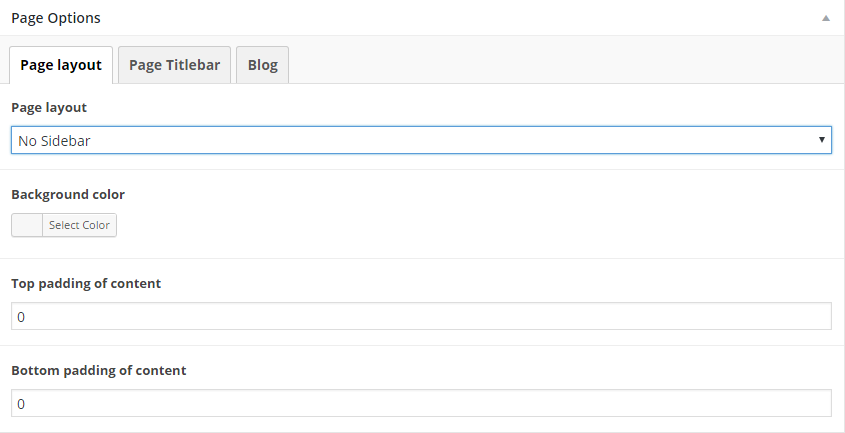
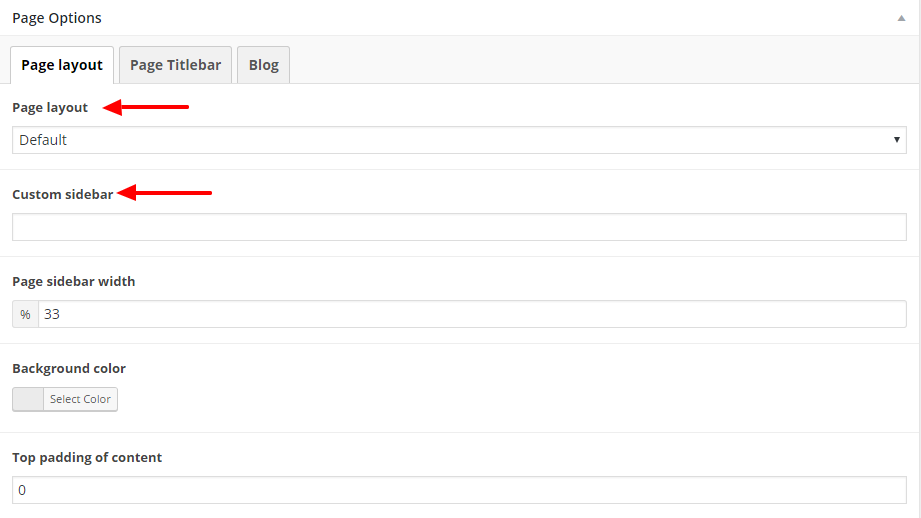
Page Options
Page Layout

- Page Layout: There are 3 page layout styles which are Right, Left and No Sidebar.
- Custom Sidebar: Fill in the name of custom sidebar you have created in Appearance >>> Widgets.
- Page sidebar width: Customize width of sidebar. The measuring unit is %
- Top padding of content: Set the measurement of top padding for layout.
- Bottom padding of content: Set the measurement of top padding for layout.
Page Title Bar
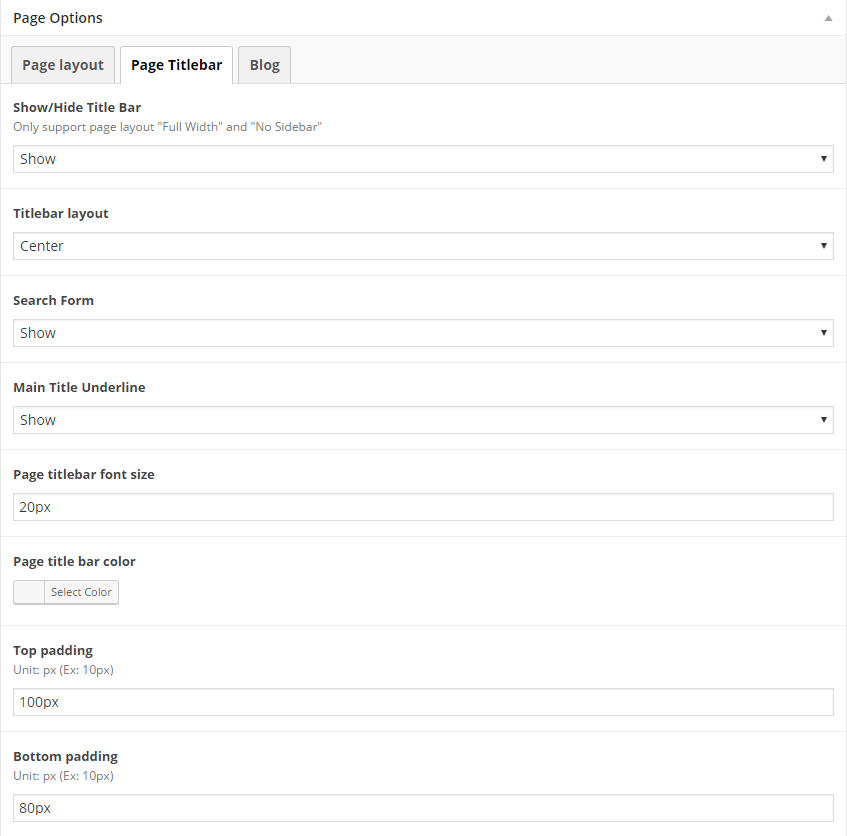
Page Titlebar: If you don't want to fill in the title name above, you can customize your page titlebar here. Beside some simply options, you can notice some special options in Grid:
- Title bar: Show or hide title bar. Default is show.
- Titlebar layout: Choose from justify or center for alignment of elements on titlebar.
- Titlebar font size: Set the size of your text in title area.
- Top Padding and Bottom Padding: It is a line at the top or bottom of your title area, which is different from padding of content.
- Background image: select image from "Media" or your computer. The size of image should be 1920x300px. Set your background image position among 9 available positions.
- Background color: Set your color in title area
- Background image position: set the position of image background from position list. Default is left top.
- Background zoom effect: True or False. If you choose True, your background will have zoom effect. Otherwise, set False. Default is False.
- Background parallax: True or False. If you choose True, your background will have nice paralax effect in title bar.
- Title opacity: adjust the opacity of titlebar
- Shadow opacity: Shadow makes a dark area for titlebar here, highlighting your titlebar name. This is the setting to adjust the opacity of titlebar
- Overlay opacity: An effect cover the surface of titlebar area with a coating. This is the setting to adjust the opacity of overlay
- Clipmask opacity: This is the setting to adjust opacity of clipmask, an effect cleaves scope of title into small squares.
- Custom title content: You can create your content for title area instead of filling the title name above, which is the same as customizing post content: you can add image, media or using shortcodes.
Blog
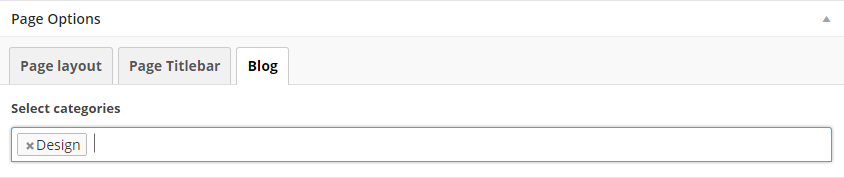
You can select a specific category of posts for page. This feature only supports for blog page template
Post Options
Post Layout

- Post Layout: There are 3 post layout styles which are Right, Left and No Sidebar. Default is right sidebar
- Choose large post thumbnail for masonry layout only: Only select True or False
- Custom Sidebar: Fill in the name of custom sidebar you have created in Appearance >>> Widgets.
Post Metadata

- Show/hide tags: Select if you want to show or hide tags. Default is to show tags
- Show/hide authorbox: Select if you want to show or hide authorbox
- Show/hide related post: Select if you want to show or hide related post
- Show/hide categories: Select if you want to show or hide categories. Default is to show categories
- Show/hide post date: Select if you want to show or hide post date.
Post Format
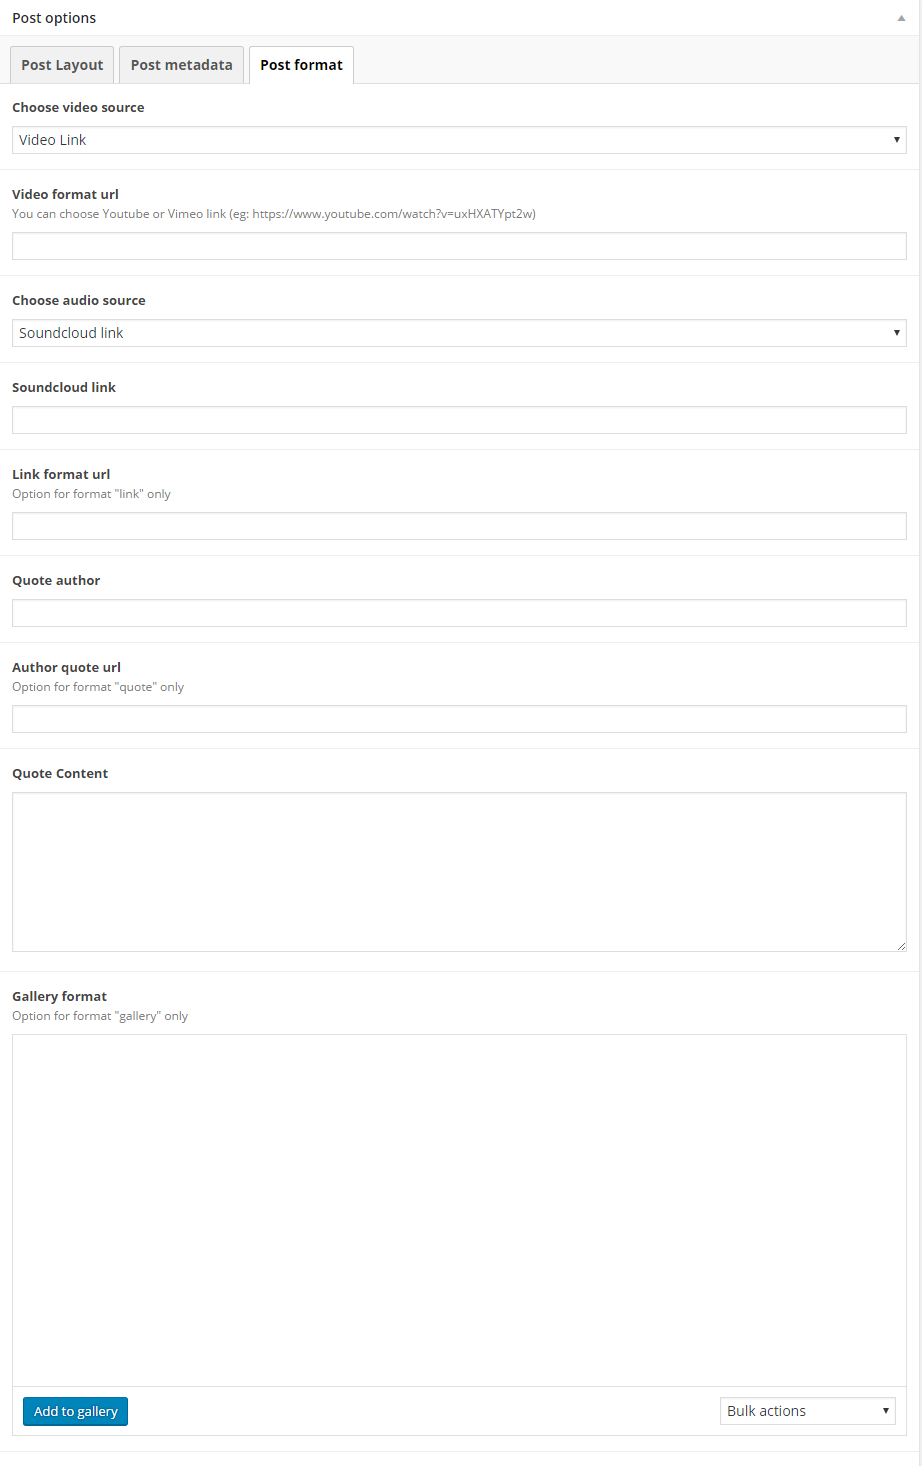
Customize Post format if you choose one of these formats "video, audio, link, quote, gallery":
- For format "video", you have some options:
- Video format url: you can only add link from Vimeo and Youtube
- Video source: select video source: video link, upload local file, video embed code.
- For format "audio", you have some options:
- Audio source: select audio source: soundcloud link or upload local file.
- Link: insert soundcloud link, or link audio from other websites (option for format "Link" only, please fill in full http:// address).
- For format "quote", you have some options:
- Quote author: fill the author name of the quote.
- Author quote url: add author link.
- Quote content: fill the quote.
- For format "gallery", you have some options:
- Gallery format: add images, audio, video... from gallery.
- Gallery auto play: True or False. If you choose True, your gallery will play in auto. Default is False.
- Gallery duration time: fill duration time for your gallery. Default is 5000.
- Gallery speed: custom the speed. Default is 300.
- Gallery pagination: True or False. If you choose True, your gallery will be paginated. Default is False.
- Gallery navigation: True or False. If you choose True, your post will have gallery navigation. Default is True.
- Gallery mousewheel using: True or False. If you choose True, the gallery can be used by mousewheel. Default is True.
Row (Visual Composer)
You can use row to add elements, shortcodes and build your own pages
Activate Row
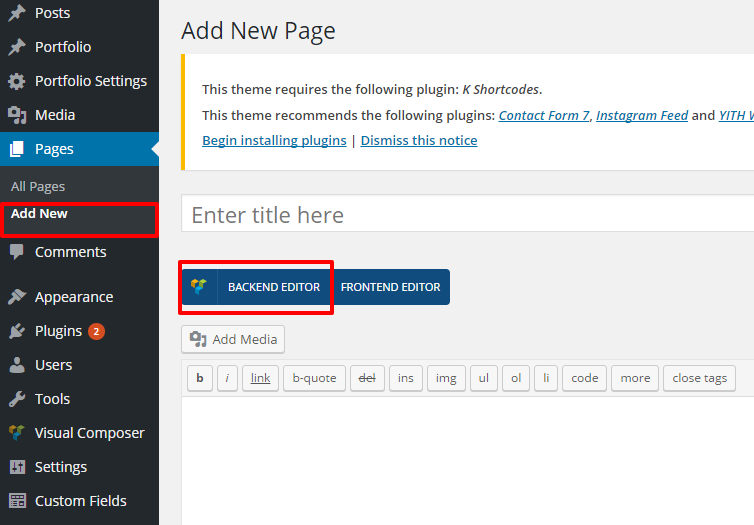
- Step 1: Login to your WordPress Admin
- Step 2: Click on Pages >>> Add new page
- Step 3: Click on Backend Editor
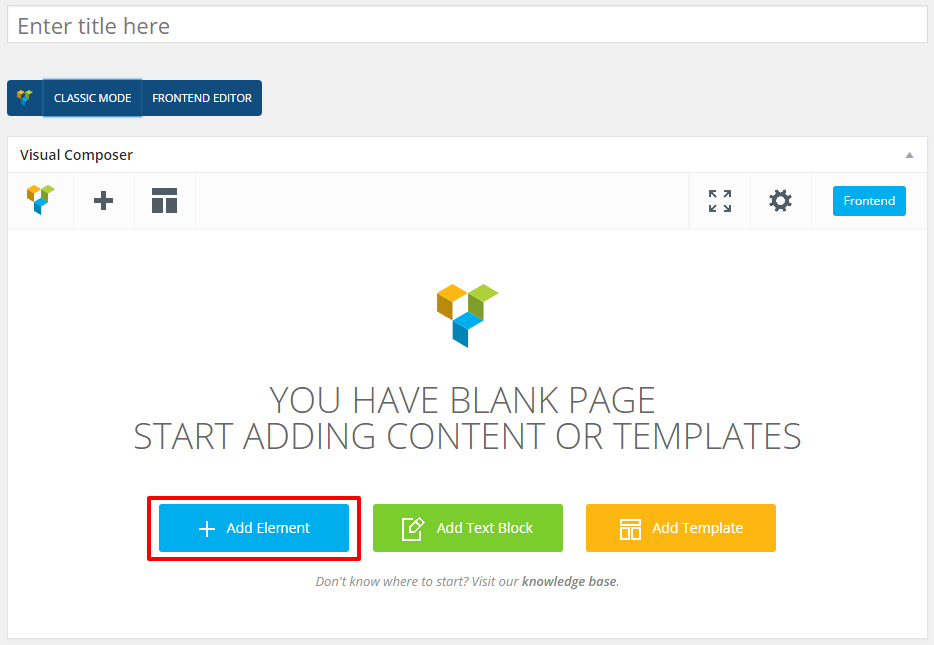
Add Row and Use Row Layout
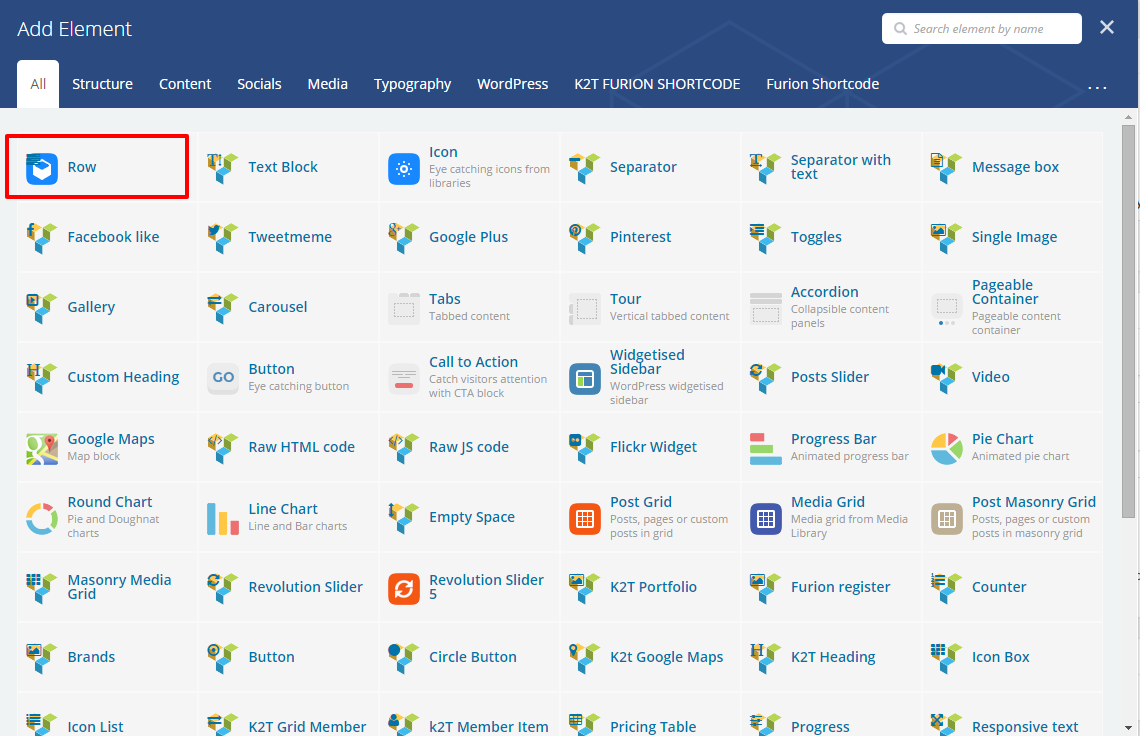
- Step 1: After you have activated the backend editor, you click Add element
- Step 2: Select Row
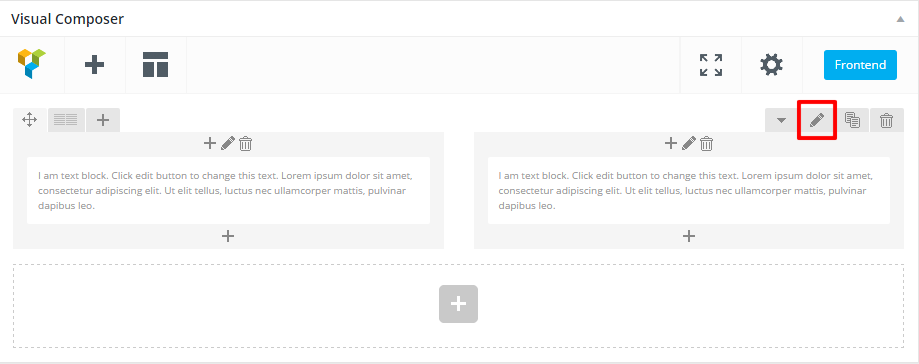
- Step 3: You can edit Row by clicking to pencil icon (in our example we use row with 2 columns filled with text block)
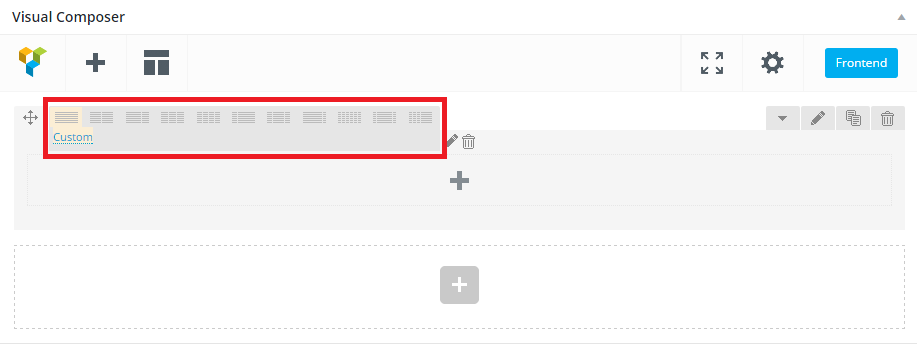
- Step 4: To change the Row layout (the number of columns) you need to click the second Icon from the left then select a layout or custom to make your own
Edit Elements
To edit Row, Column or Element, you need to click the Pencil icon
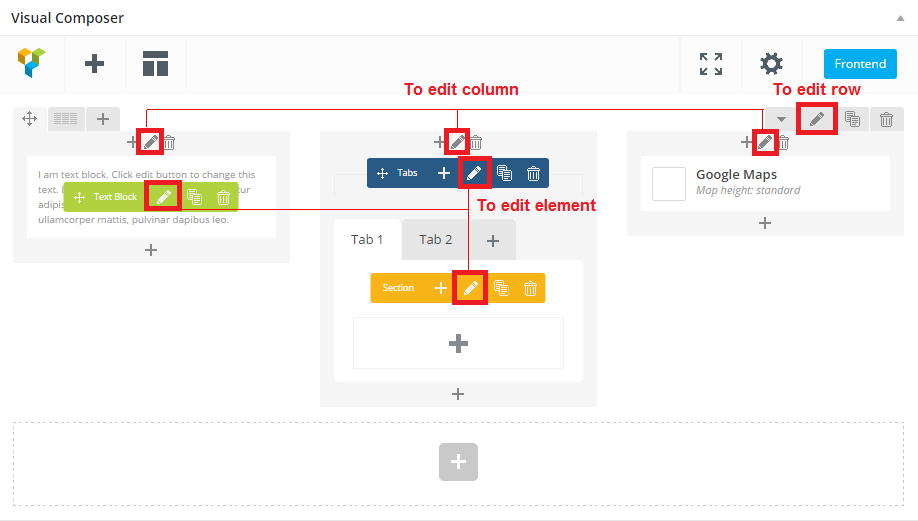
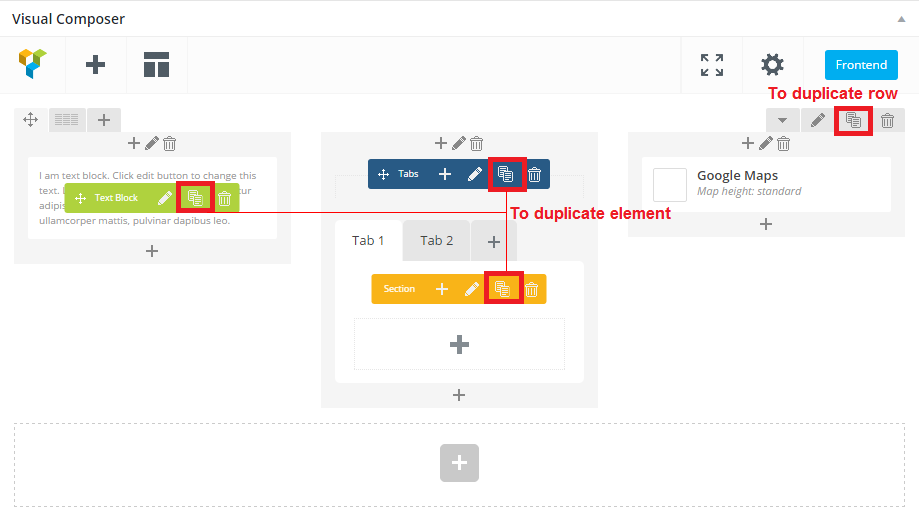
Duplicate Elements
To duplicate Row, Column or Element, you need to click the Pages icon
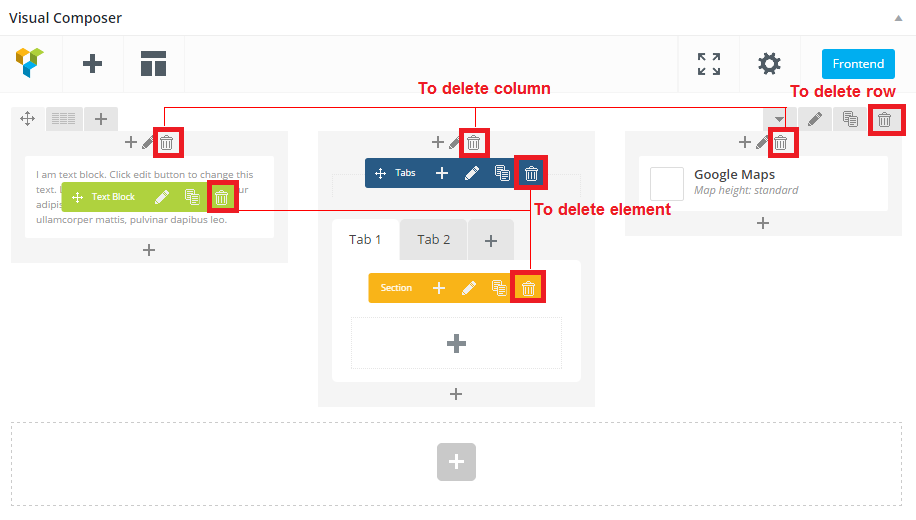
Remove Elements
To remove Row, Column or Element, you need to click the Trash box icon
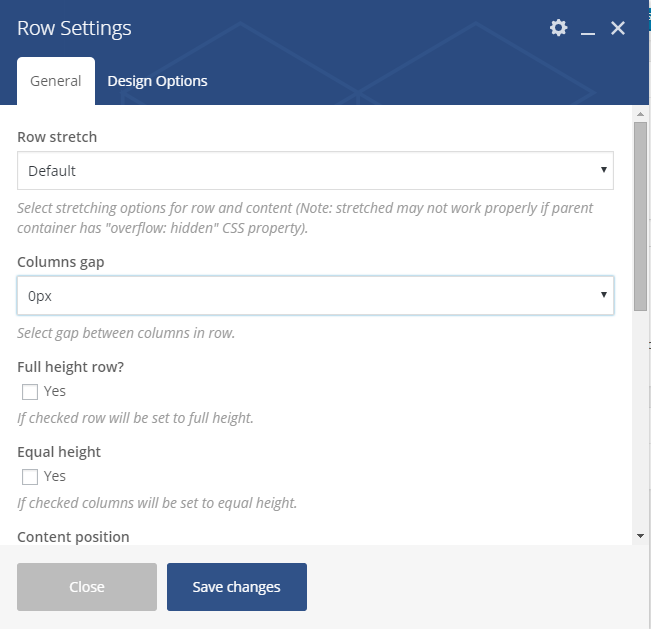
Row Settings
General options - When you edit row, you can edit general optipons
- Row stretch: How to make full width or full height row?
- Stretch row: Stretches row, but leave content in previous width
- Stretch row and content: Leaves default Bootstrap paddings of 15 pixels on the left and right side of row
- Stretch row and content without spaces: Remove default Bootstrap padding of 15 pixels as well
- Columns gap: The gap will be introduced between all columns within this row. Default value of gap is set to 0.
- Full height row: If checked row will be set to full height
- Equal height row: If checked columns will be set to equal height.
- Content position: Top, middle, bottom
- Use video background: If checked, video will be used as row background, then you can insert Youtube link
Note: If WordPress theme uses overflow:hidden in markup it may result in inappropriate row stretching.
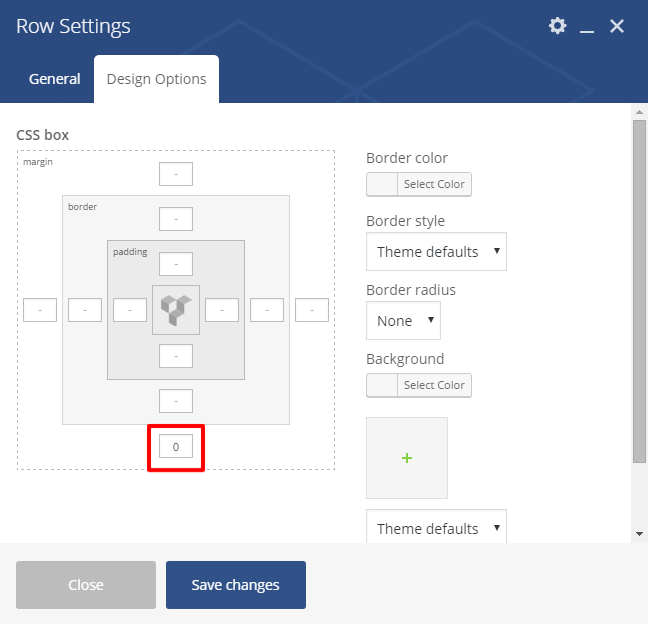
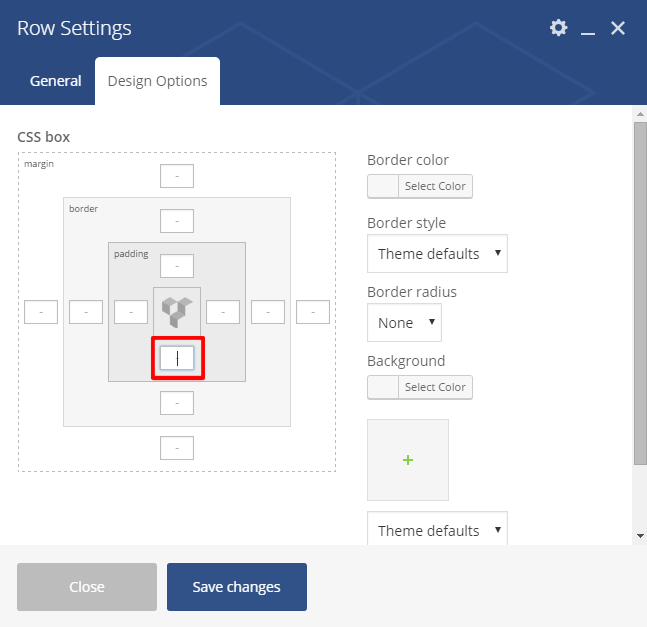
Design options - When you edit row, you can edit the design optipons
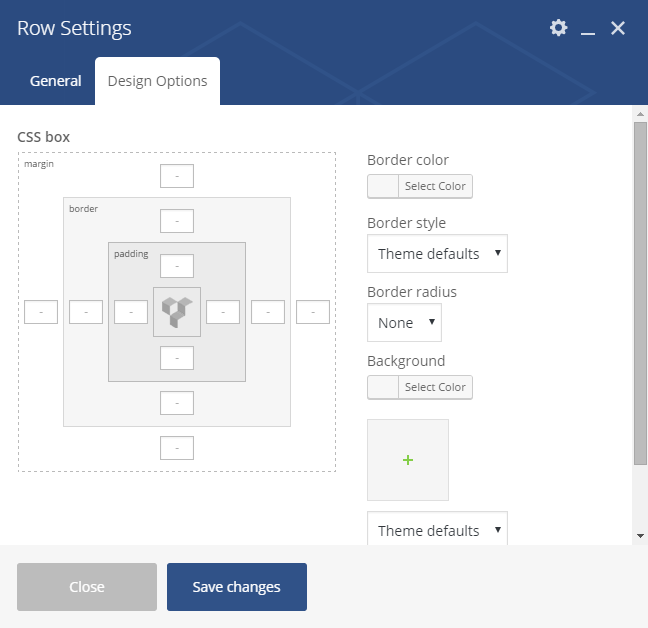
- Row has a default Bottom Margin of 35 pixel, you may want to set it to 0 if you don't want to have bottom space
- You can set bottom padding to your column
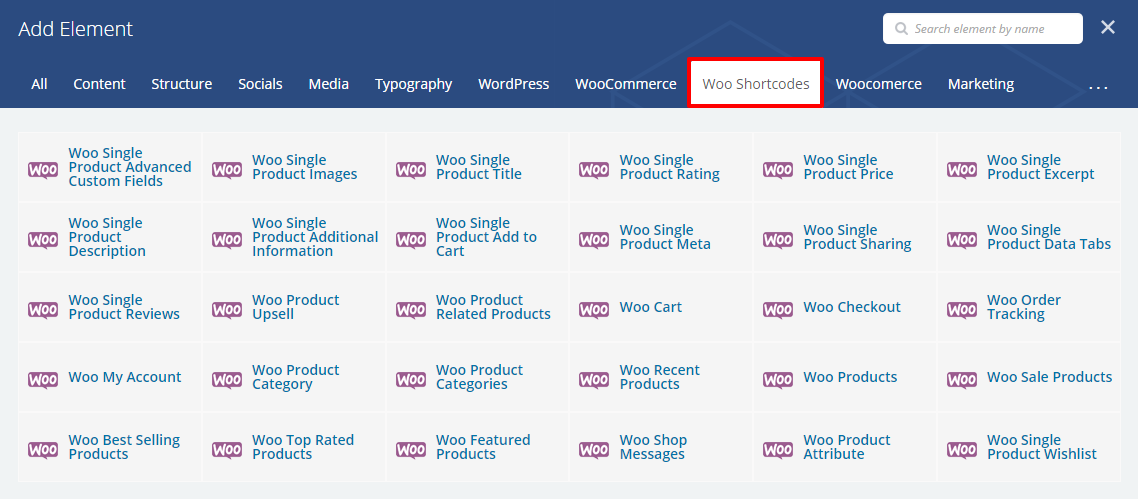
SHORTCODES
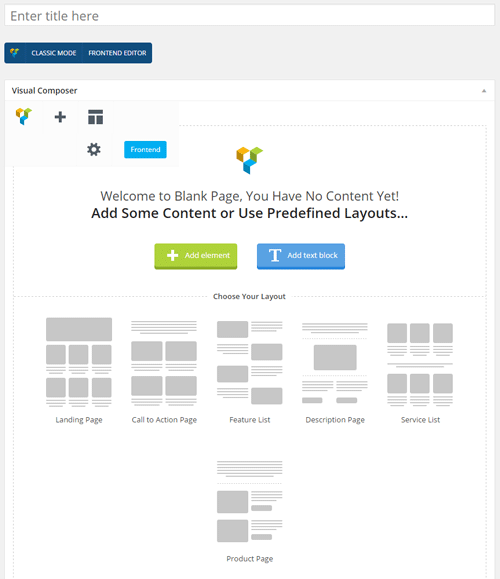
Visual Composer is a very modern and useful feature of SK Store, it allows users to make a new page in a short time, simplifying shortcodes. If you like the traditional way to create your own page, you can always click to Classic Mode.
It is very easy to create your own page.
Step 1:
- Create a very new page by yourself, choose "Add element" to insert any rows, texts or shortcodes you want to show on your page or "Add text blog" to write text.
- Create new page based on available layouts: Landing page, Call to action page, feature list, description page, product page or service list.
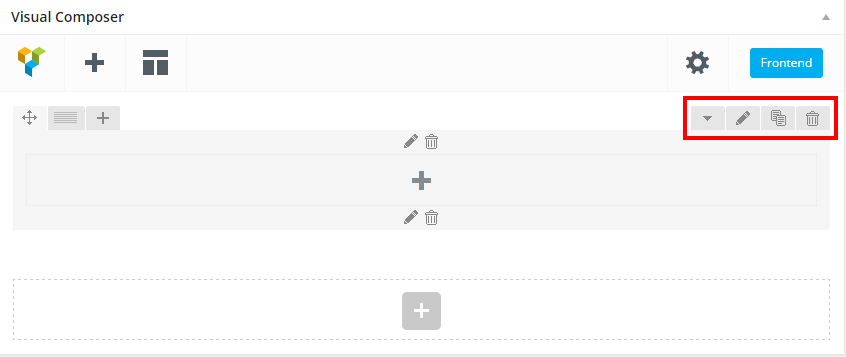
Step 2: To custom each row, you choose options in the right of the row.
2.1. Edit this row:
-
Design option:
- Css: padding, border and margin.
- Color: color of border and background. Choose color from color palette.
- Theme_border: select theme from theme list: solid, dotted, dash, none.... Default is theme defaults.
- Theme_background: select theme from theme list: cover, contain, no repeat, repeat. Default is theme defaults.
- Box_controls: tick the checkbox if you want to simplify controls. Otherwise, deselect it. General:
- Row_fullwidth: tick the checkbox if you want the row to have full width (no wrap content). Otherwise, deselect it.
- Background_type: background color, background image, background slider and background video
- Color" color of background. Choose color from color palette.
- ID: enter a unique ID for your button.
- Class: enter a unique class name for your button
2.2. Clone: make a clone from original element.
2.3. Delete: delete the element.
Step 3: Each element you choose will have different setting. The below is detail setting for each shortcode.
1.1. Button
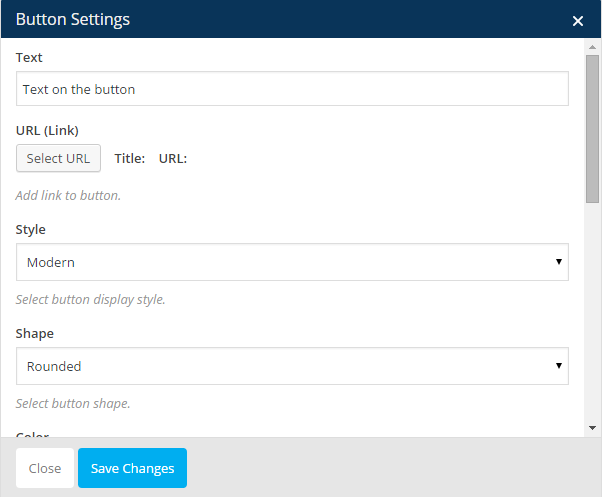
- Text text you want to show inside the button.
- ULR (Link): the URL that the button should link to.
- Style: You can choose any style such as modern, classic, flat, outline, 3D, or custom.
- Shape: You can choose any shape such as rounded, round, square.
- Color: Choose color for your button.
- Size: button size. You can choose among mini, small, normal or large. Default is normal.
- Alignment: Inline, left, center or right. Default is inline.
- Add icon?: Check Yes if you want to add icon.
- CSS Animation: Select type of animation for element to be animated when it "enters" the browsers viewport (Note: works only in modern browsers). You can choose no, top to bottom, bottom to top, left to right, right to left or appear from center.
- Extra class name: Style particular content element differently - add a class name and refer to it in custom CSS.
1.2. Circle Button
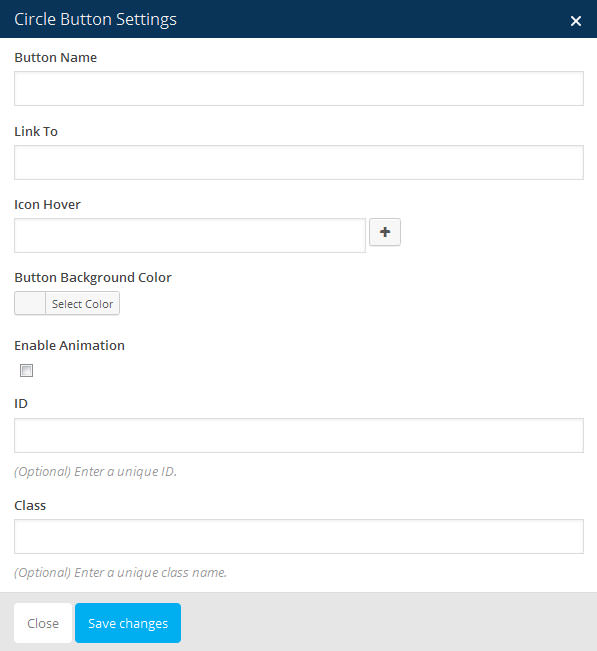
- Button_name: You will fill in the name of button.
- Link to: the URL that the button should link to.
- Icon hover: choose an icon from the icon set.
- Button background color: You can select any custom color for button.
1.3. Text Block
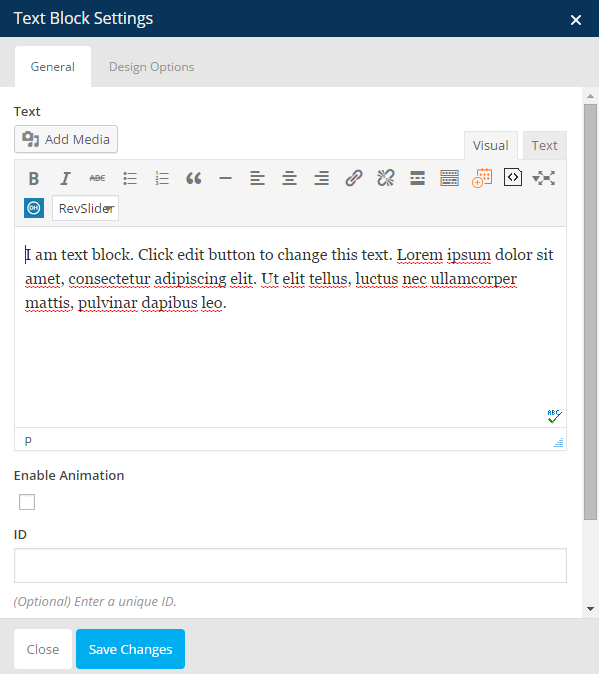
Here are the parameters of this shortcode:
- Text: Enter text.
- Animation: tick the checkbox if you want to enable animation, then select kind of animation and fill animation time delay. Otherwise, deselect it.
- ID: enter a unique ID for your step.
- Class: enter a unique class name for your step.
1.4. Progress
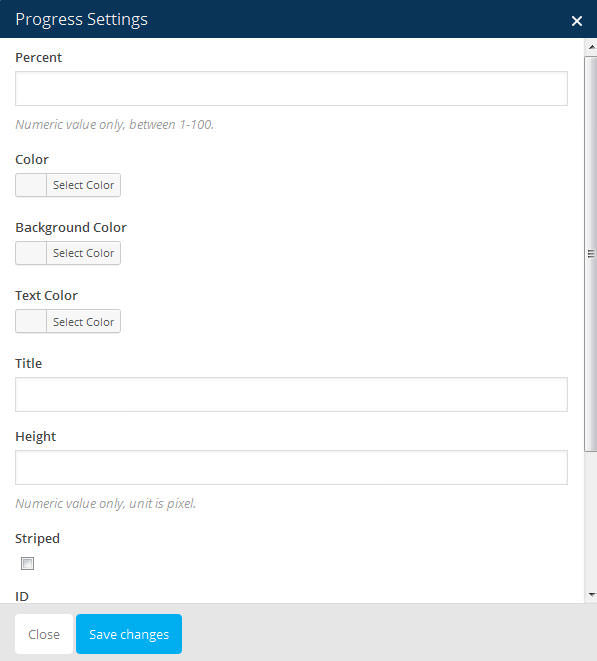
Here are the parameters of this shortcode:
- Percent: should be a number from 0 – 100.
- Color: Color of the progress, background and text. You can choose any color from color palette.
- Title: the name/title of the progress
- Height: the height of progess bar.
- Striped: tick the checkbox if you want your progress to be striped. Otherwise, deselect it.
- ID: enter a unique ID for your step.
- Class: enter a unique class name for your step.
1.5. Icon
Here are the parameters of this shortcode:
- Icon library: You can these icon from font awesome, open iconic, typicons, entypo, linecons.
- Icon: an icon from the icon set.
- Color: selecting color for icons from colors that is available.
- Background style: that can be square, rounded or circle .
- Size: Size of icons can be normal, mini, small, large, extra large.
- Icon alignment: You can place icons to be left, right or center.
- URL (link): You can click to select URL and fill in the icon URL and title you want.
- CSS animation: To show animation, you can choose some styles that is available.
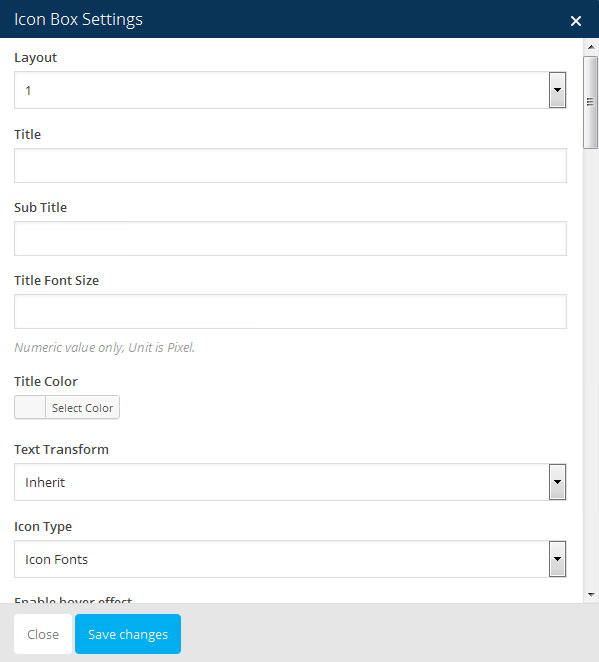
1.6. Icon box
Here are the parameters of this shortcode:
- Title: title/name of the iconbox.
- Font size: size of font title. Numeric value only. Unit is pixel.
- Color: color of the title, icon, icon background and background. You can choose any color from color palette.
- Text_transform: tranform of text: inherit, uppercase, lowercase, initial and capitalize.
- Sub_title: sub title you want to show below Title.
- Layout: select layout for your icon box: 1, 2 or 3. Default is 1.
- Type: choose icon type: Icon fonts or Graphics. .
- Size: choose size of the icon. Numeric value only. Unit is pixel.
- Transparent:tick the checkbox if you want the icon to be transparent. Otherwise, deselect it.
- Border: tick the checkbox if you want icon to have border. Otherwise, deselect it.
- Link: the URL of “Learn more” button.
- Link_text: default is “Learn more”.
- Align: none, left, right or center. Default is none.
- Content: content you want to show inside box. You can insert image or audio too.
- Box_border: tick the checkbox if you want the box to have border. Otherwise, deselect it.
- Margin margin of top, right, bottom and left. Numeric value only. Unit is pixel.
- Animation: tick the checkbox if you want to enable animation, then select kind of animation and fill animation time delay. Otherwise, deselect it.
- ID: enter a unique ID for your step.
- Class: enter a unique class name for your step.
1.7. Icon list
Select shortcode Icon list, then choose small Icon inside Icon list.
Here are the parameters of shortcode Icon list:- Icon: select icon from icon list.
- Color: select color of all of icon in icon list.
- Animation: tick the checkbox to enable animation, then choose style of animation and time delay (numeric value only, 1000 = 1sec).
- ID: enter a unique ID for your step.
- Class: enter a unique class name for your step.
1.8. Message Box
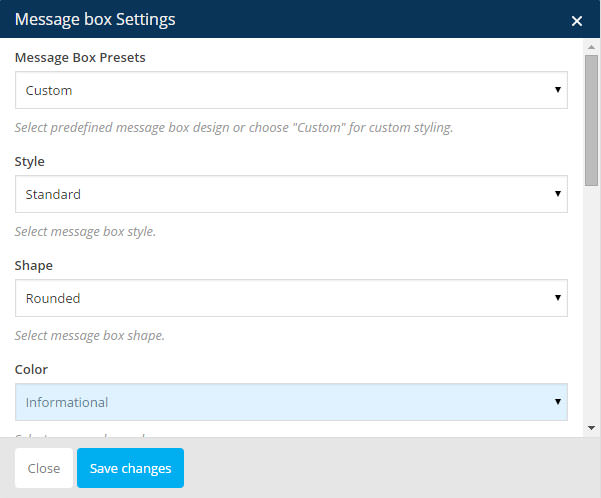
Here are the parameters of this shortcode:
- Style: select the style for your message: solid, solid icon, outline, 3D.
- Shape: select the shape for your message: rounded, square, round.
- Text: content you want to show inside message box. You can insert image or audio too.
- Transparent: tick the checkbox if you want background to be transparent. Otherwise, deselect it.
- Close: tick the checkbox if you want message box is close. Otherwise, deselect it.
- Animation: tick the checkbox if you want to enable animation, then select kind of animation and fill animation time delay. Otherwise, deselect it.
- ID: enter a unique ID for your step.
- Class: enter a unique class name for your step.
- Icon: an icon from the icon set.
Firstly, you have to choose from message box presets you want, it can be custom, informational, warning, successful, error
1.9. Heading
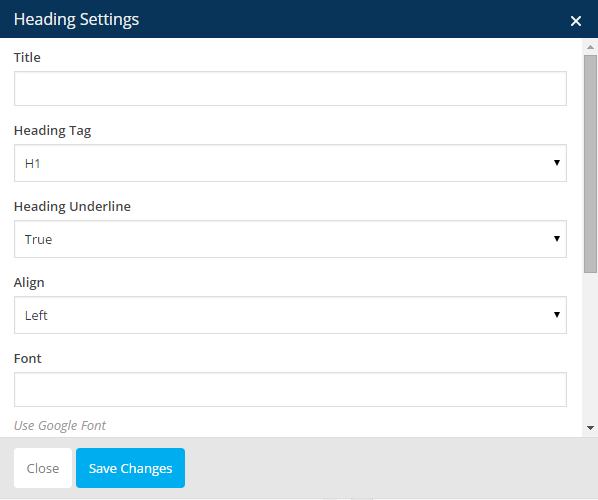
Here are the parameters of this shortcode:
- Title: name/title of heading.
- Heading_tag: h1, h2, h3, h4, h5 or h6. Default is h1.
- Heading Underline: True/false.
- Align: heading align: left, center or right. Default is left.
- Font: use any font from Google Font.
- Enable Animation: Check if you want to enable animation.
- ID: enter a unique ID for your step.
- Class: enter a unique class name for your step.
1.10. Custom Heading

Here are the parameters of this shortcode:
- Text: Enter text.
- Element tag: h3, h4, h5, h6, p or div. Default is h2.
- Text align: Select between left, right, justify and center.
- Font size: Enter font size.
- Line height: Enter line height.
- Text color: Select heading color.
- Font Family: Select font family.
- Font style: Default is 400 regular.
- Text Transform: Select inherit, lowercase, uppercase, initial or capitalize.
- Enable Animation: Check if you want to enable animation.
- ID: enter a unique ID for your step.
- Class: enter a unique class name for your step.
1.11. Pricing Table

Here are the parameters of this shortcode:
- Separated: True/false.
- ID: enter a unique ID for your step.
- Class: enter a unique class name for your step.
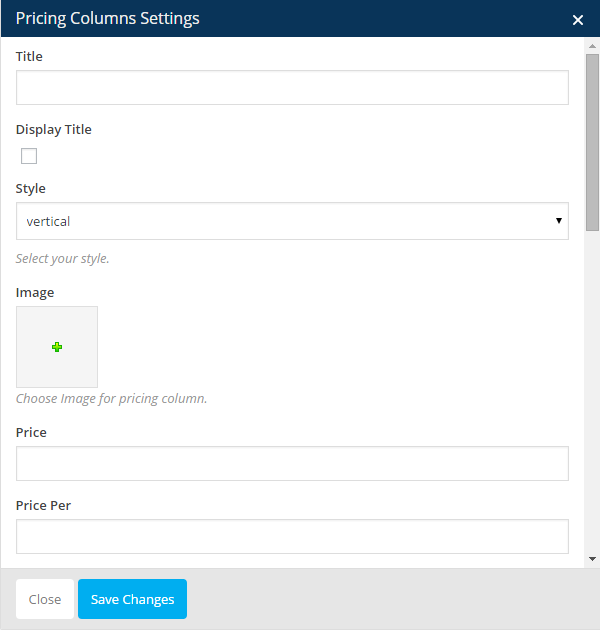
After adding Pricing Table, you can insert more pricing collumns. Here are the parameters of this shortcode:
- Title: Enter text for the title.
- Display Title: Check to display title.
- Style: Vertical/horizontal.
- Image: Choose Image for pricing column.
- Price, Price per, Unit: Enter data for the prices and number of unit.
- Link to: Enter the link you want this collumn to be linked to.
- Link Text: Enter text for the link.
- Link Target: Open in a new window/open in the same frame as it was clicked.
- Featured: True/false.
- List Item: Enter item information.
- ID: enter a unique ID for your step.
- Class: enter a unique class name for your step.
1.12. Carousel
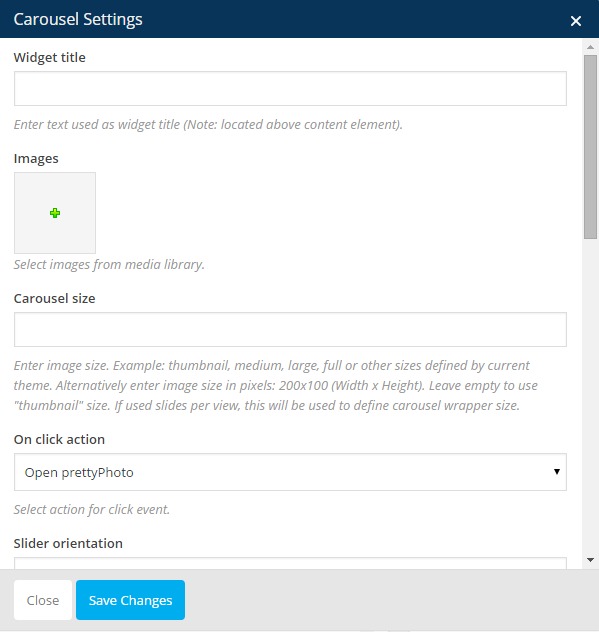
- Widget title: Enter text which will be used as widget title. Leave blank if no title is needed.
- Images: Select images from media library.
- Carousel size: Enter image size. Example: thumbnail, medium, large, full or other sizes defined by current theme. Alternatively enter image size in pixels: 200x100 (Width x Height). Leave empty to use "thumbnail" size. If used slides per view, this will be used to define carousel wrapper size.
- On click action: what to do when slide is clicked. Select between: Open prettyPhoto, None and Open custom links.
- Slider orientation: Horizontal or vertical.
- Slider speed: duration of animation between slides.
- Slides per view: the number of slides you want to display.
- Slider autoplay: Tick the checkbox to nable autoplay mode.
- Hide pagination control: If checked, pagination controls will be hidden.
- Hide prev/next buttons: If checked, prev/next buttons will be hidden.
- Partial view: If checked, part of the next slide will be visible.
- Slider loop: Enable slider loop mode.
- ID: enter a unique ID for your step.
- Class: enter a unique class name for your step.
1.13. K2T Carousel
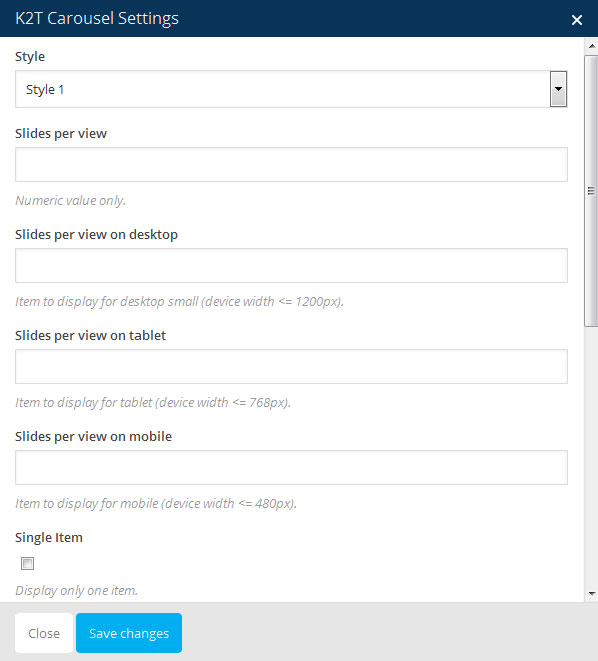
You can choose style 1 or style 2 for carousel. After that, selecting small elements for carousel such as single iamge, raw HTML code, testimonials or events.
Here are the parameters of K2T shortcode:
- Slides_per_view: number of slides per view. Numeric value only.
- Slides_per_view_on_desktop: number of slides per view can display on desktop. Item to display for desktop small (device width <= 1200px).
- Slides_per_view_on_tablet: number of slides per view can display on tablet. Item to display for tablet (device width <= 768px).
- Slides_per_view_on_mobile: number of slides per view can display on mobile. Item to display for tablet (device width <= 480px).
- Single_item: tick the checkbox if you want your page display only one item. Otherwise, deselect it.
- Slide_speed: slide speed in milliseconds. Default is 5000
- Auto_play: tick the checkbox if you want slide auto play. Otherwise, deselect it.
- Navigation: tick the checkbox if you want show navigation. Otherwise, deselect it.
- Pagination: tick the checkbox if you want show pagination, then select position of pagination: inside, top or bottom. Otherwise, deselect it.
- Lazy_load: Delays loading of images. Images outside of viewport won't be loaded before user scrolls to them. Great for mobile devices to speed up page loadings.
- Class: choose a unique class name for your carousel.
1.14. Testimonial
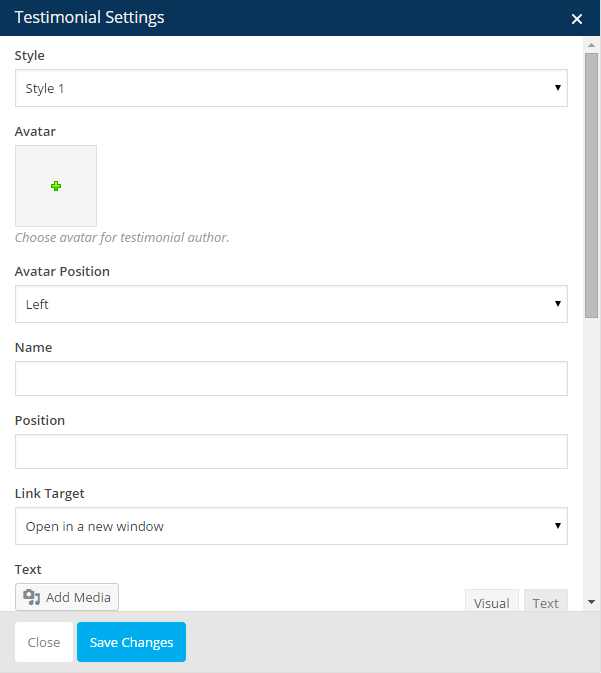
Here are the parameters of this shortcode:
- Style: select Style 1, Style 2 or Style 3. Default is style 1.
- Avatar: choose avatar for testimonial author from library media.
- Avatar position: left or right.
- Name: name of testimonial author.
- Position: position of testimonial author.
- Link_target: open in a new window or open in the same frame as it was clicked.
- Text: you can add text or image, audio... from library media.
- Animation: tick the checkbox if you want to have animation on your page. Otherwise, deselect it.
- ID: enter a unique ID for your step.
- Class: enter a unique class name for your step.
1.15. Single image
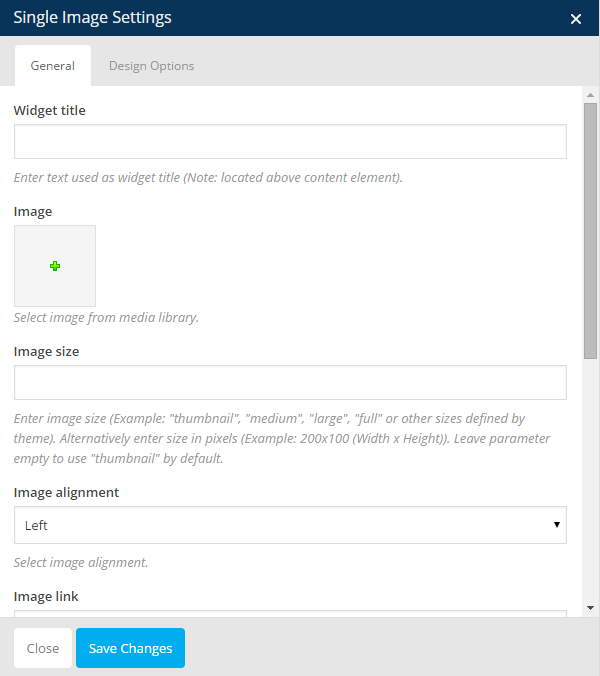
Here are the parameters of this shortcode:
-
General:
- Widget title: enter text which will be used as widget title. Leave blank if no title is needed.
- Image: select image from media library.
- Image_size: enter image size. Example: "thumbnail", "medium", "large", "full" or other sizes defined by current theme. Alternatively enter image size in pixels: 200x100 (Width x Height). Leave empty to use "thumbnail" size.
- Image_alignment: select image alignment: left, center or right.
- Image_link: enter URL if you want this image to have a link.
- Image_style: select image style: rounded, outline, shadow or border. Default is none.
- Image_hover_style: select image hover style: dark, light or banner. Default is none.
- Animation: tick the checkbox if you want to have animation on your page. Otherwise, deselect it.
- ID: enter a unique ID for your step.
- Class: enter a unique class name for your step. Design option:
- Css: padding, border and margin.
- Color: color of border and background. Choose color from color palette.
- Theme_border: select theme from theme list: solid, dotted, dash, none.... Default is theme defaults.
- Theme_background: select theme from theme list: cover, contain, no repeat, repeat. Default is theme defaults.
- Box_controls: tick the checkbox if you want to simplify controls. Otherwise, deselect it.
1.16. Countdown

- Countdown Style: Square or circle.
- Time: fill the time
- Year, Month, Day, Hour, Minute, Second: fill in the blank the word of year, month, day, hour, minute and second in your language.
- Font_size: size of text.
- Align: left, center or right.
- Color: color of number and background. Choose color from color palette.
- ID: enter a unique ID for your step.
- Class: enter a unique class name for your step.
1.17. Counter
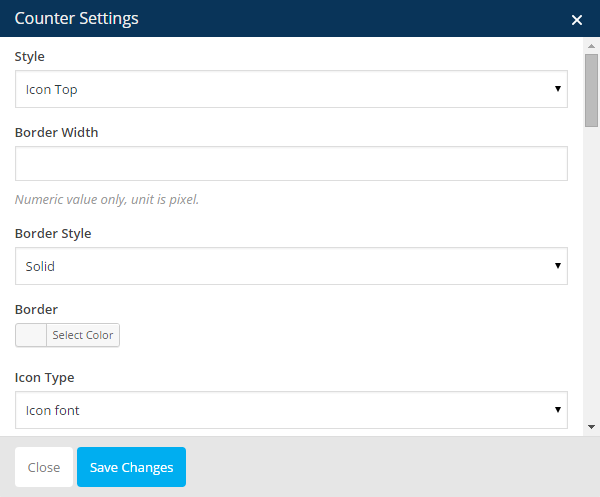
- Style select icon top or icon left.
- Border Width: width of the counter border. Numeric value only. Unit is pixel.
- Border Style: select solid or dashed.
- Border: choose a color for the counter directly from the pallette or using color code.
- Icon Type: select icon font or icon graphic.
- Choose Icon: You can choose any icon from our icon pack.
- Icon Size: size of the icon. Numeric value only. Unit is pixel.
- Icon Color choose a color for the counter directly from the pallette or using color code.
- Icon Background: choose icon background color.
- Icon Border: choose icon border color.
- Icon Border Style: select solid or dashed.
- Icon Border Width: width of the icon border. Numeric value only. Unit is pixel.
- Icon Border Radius: radius of the icon border. Numeric value only. Unit is pixel.
- Counter to number: enter the number you want to count to.
- Number font size: size of number font. Numeric value only. Unit is pixel.
- Number Color: choose a color for the number directly from the pallette or using color code.
- Counter Title: text you want to show as title of the counter
- Counter Underline: check the checkbox if you want your counter underlined
- Title Color: choose a color for the title directly from the pallette or using color code.
- Animation Speed: tracking speed. Numerical value only, 1000 = 1 second.
- Animation Delay: The time delay before the animation run in millisecond unit.
- Enable Animation: If you check Enable Animation, you can customize animation (bounce, flash, pulse...) and animation delay time for your banner.
- ID: enter a unique ID for your counter.
- Class: enter a unique class name for your button
1.18. Blog post
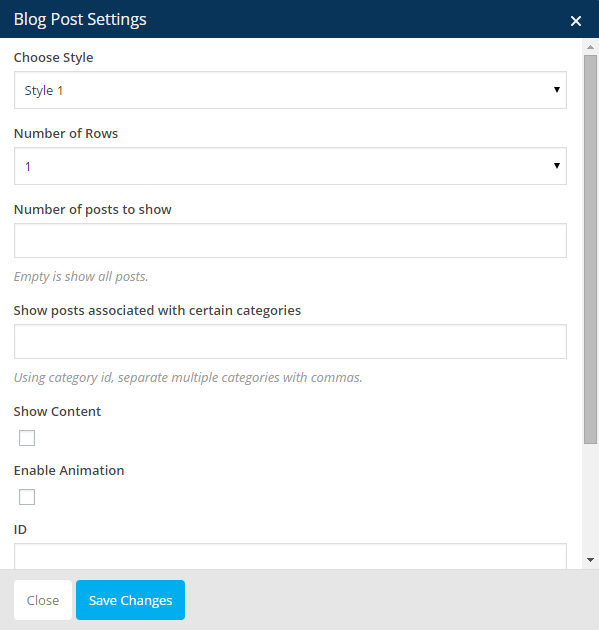
- Style: Choose between style 1 and 2
- Number of rows: Show number of rows in page. Empty is show all posts.
- Number of posts to show: Number of posts you want to show. Empty is show all posts.
- Show posts associated with certain categories: Using category id, separate multiple categories with commas.
- Enable animation: Check if you want to enable animation
- ID: enter a unique ID for your step.
- Class: enter a unique class name for your step.
1.19. Google maps
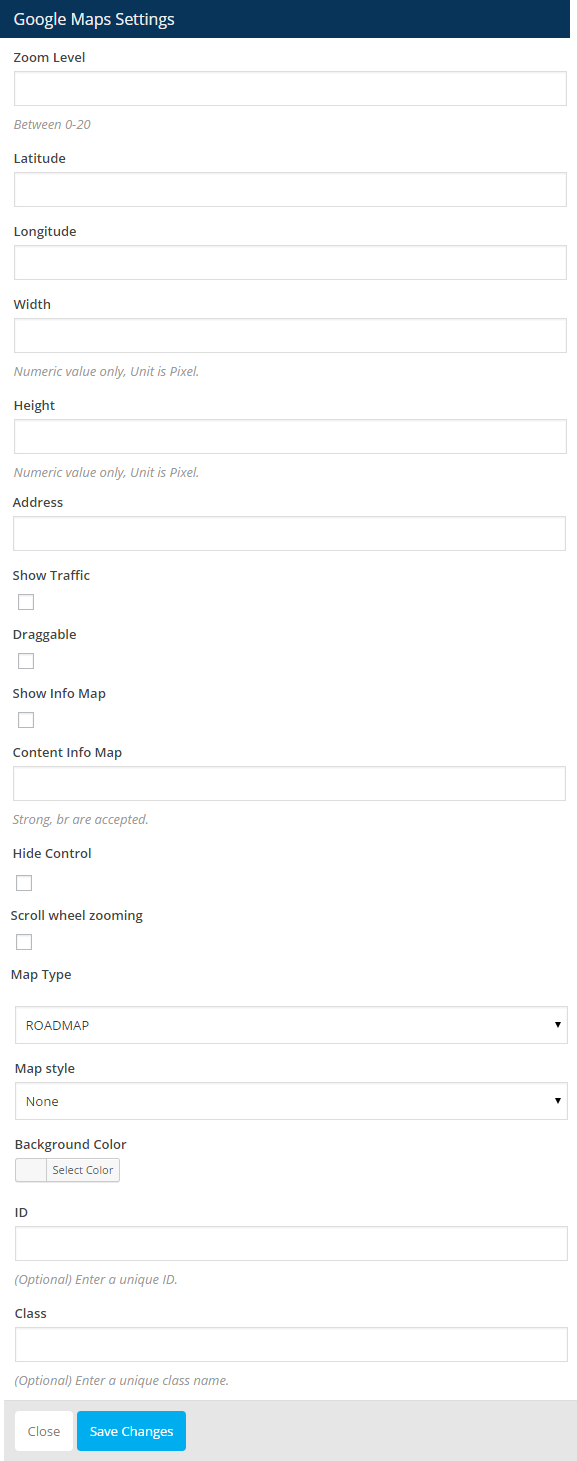
- Zoom level: between 0-20.
- Latitude: line of latitude.
- Longitude: parallel of longitude.
- Width: default is 600.
- Height: default is 400.
- Address: the place you want to mark.
- Marker: choose Yes or No. Yes to display marker.
- Marker_image: to change default Marker.
- Traffic: tick the checkbox if you want to show traffic on the map. Otherwise, deselect it.
- Draggable: tick the checkbox if you want to drag the map. Otherwise, deselect it.
- Show_Info_Map: tick the checkbox if you want to show info map. Then fill information in the Content Info Map. Strong, br are accepted. Otherwise, deselect it.
- Maptype: the type of Google Maps: Roadmap, Satellite, Hybrid, Terrain.
- Hide_control: tick the checkbox if you want to show control on the map. Otherwise, deselect it.
- Scroll_wheel_zooming: tick the checkbox if you want to scroll wheel zooming. Otherwise, deselect it.
- Map_type: select type of map: Road map, Satellite, Hybrid or Terrain.
- Color: Select color of background from pallete.
- ID: enter a unique ID for your step.
- Class: enter a unique class name for your step.
1.20 Brands
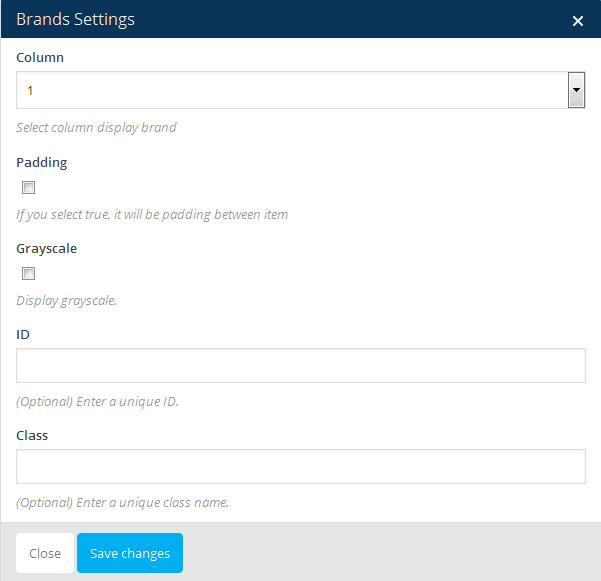
Choose Brand then Brand Item Here are the parameters of shortcode Brand:
- Column: select column display brand (from 1-8).
- Padding: if you select true, it will be padding between item.
- Grayscale: tick the checkbox to display grayscale..
- ID: enter a unique ID for your step.
- Class: enter a unique class name for your step.
1.21. Member
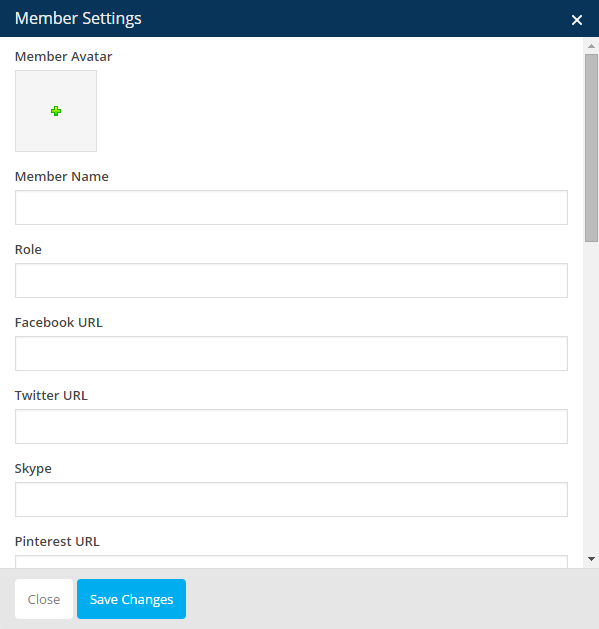
- Member_name: name of member.
- Role: role of member.
- Links: fill links of Facebook, Twitter, Skype, Pinterest, Instagram, Dribble and Google Plus.
- Info: fill info of member. You can add text, image...
- Animation: tick the checkbox to enable animation, then choose style of animation and time delay (numeric value only, 1000 = 1sec).
- ID: enter a unique ID for your step.
- Class: enter a unique class name for your step.
1.22. Blockquote
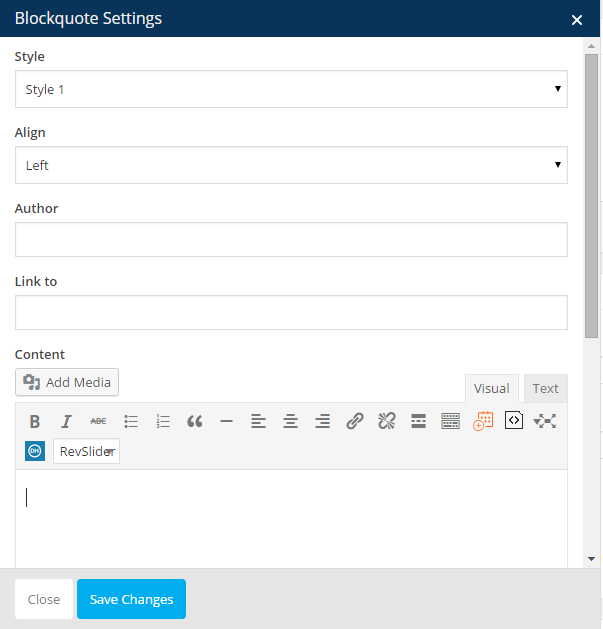
- Style: select style 1 or 2.
- Align: Select align: left, center or right.
- Author: fill author name of the quote.
- Link to: fill the link.
- Content: fill the quote.
- Animation: tick the checkbox to enable animation, then choose style of animation and time delay (numeric value only, 1000 = 1sec).
- ID: enter a unique ID for your step.
- Class: enter a unique class name for your step.
1.23. Video
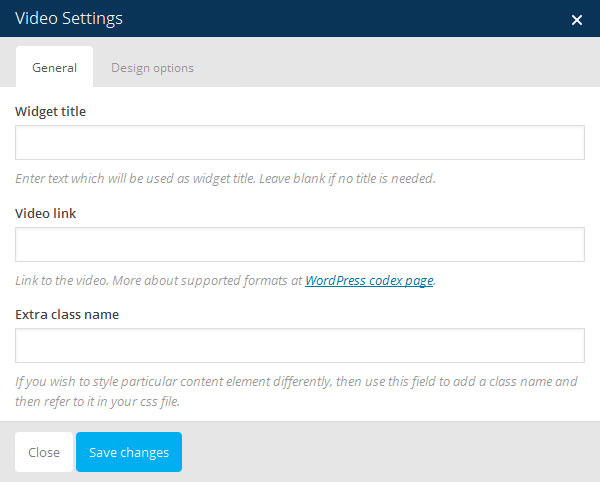
- Widget_title: Enter text which will be used as widget title. Leave blank if no title is needed..
- Link: Link to the video. More about supported formats at WordPress codex page.
- Vimeo
- Youtube
- Extra_class_name: if you wish to style particular content element differently, then use this field to add a class name and then refer to it in your css file.
1.25. Contact form
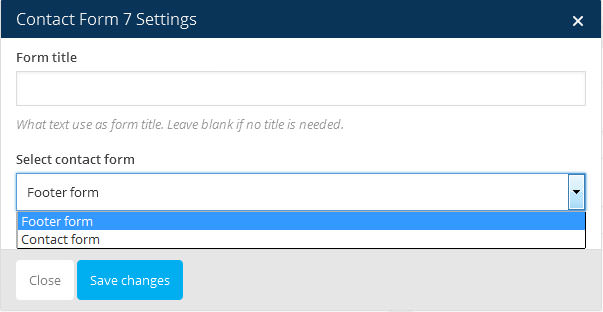
- Title: title of form. Leave blank if no title is needed.
- Contact_form: Choose previously created contact form from the drop down list.
1.26. Accordion and Toggles
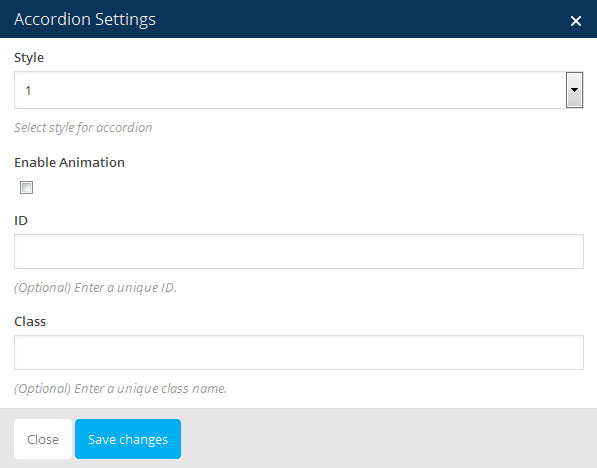
- Style: Select style for accordion: style 1, style 2 or style 3.
- Animation: tick the checkbox to enable animation. Otherwise, deselect it.
- ID: enter a unique ID for your step.
- Class: enter a unique class name for your step.
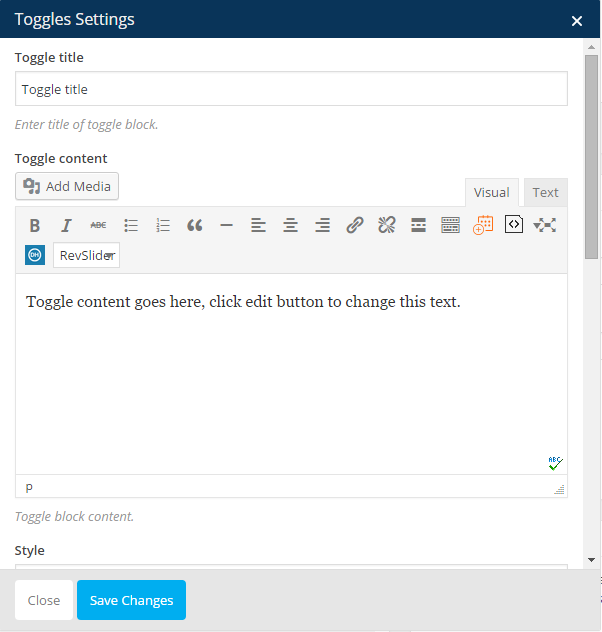
Here are the parameters of shortcode Toggles:
- Title: title of toggle block. Leave blank if no title is needed.
- Content: enter text of media (audio, image...).
- Style: select style for toggle: default, simple, round, round outlline, rounded, rounded outline, square, quare outline, arrow or only text.
- Color: select color of icon.
- Size: select size of toggle: small, normal or large.
- Default state: state of toggle: closed or open.
- Element ID: Enter optionally row ID. Make sure it is unique, and it is valid as w3c specification: link (Must not have spaces).
- Animation: tick the checkbox to enable animation. Otherwise, deselect it.
- ID: enter a unique ID for your step.
- Class: enter a unique class name for your step.
1.27. Media grid
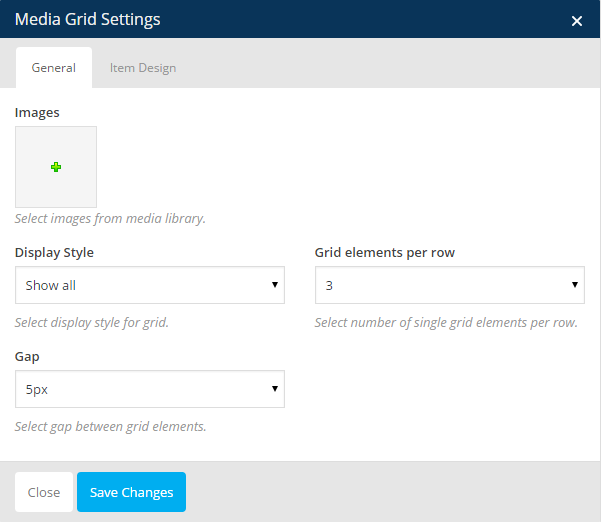
- Images: Select images from media library.
- Display Style: Choose show all, load more button, lazy loading, pagination.
- Grid elements per row: the number of single grid elements per row.
- Gap: Distance between grid elements.
1.28. Gallery
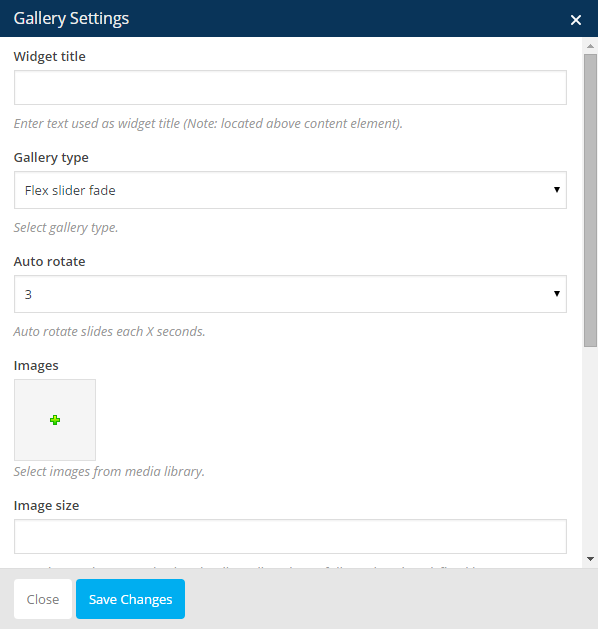
Here are the parameters of this shortcode:
1.29. Banner
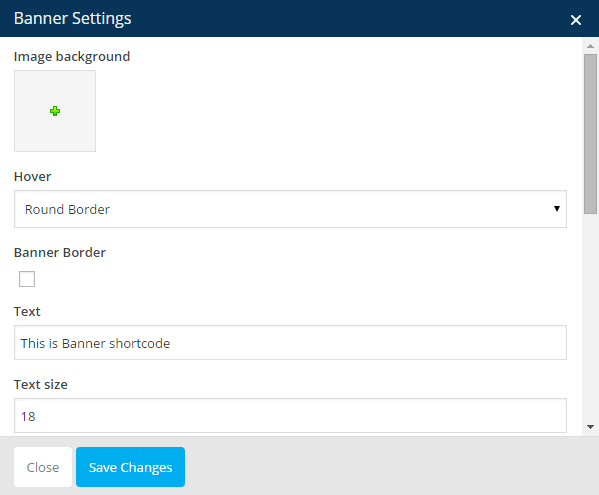
Here are the parameters of this shortcode:
SHOP
SK Store is completely compatible with WooCommerce, you can use all WooCommerce shortcodes and functions to build your shop pages. More about the WooCommerce shortcodes.
1. How To Create Your Products (Simple Product)
- Step 0: Make sure that you have installed WooCommerce plugin
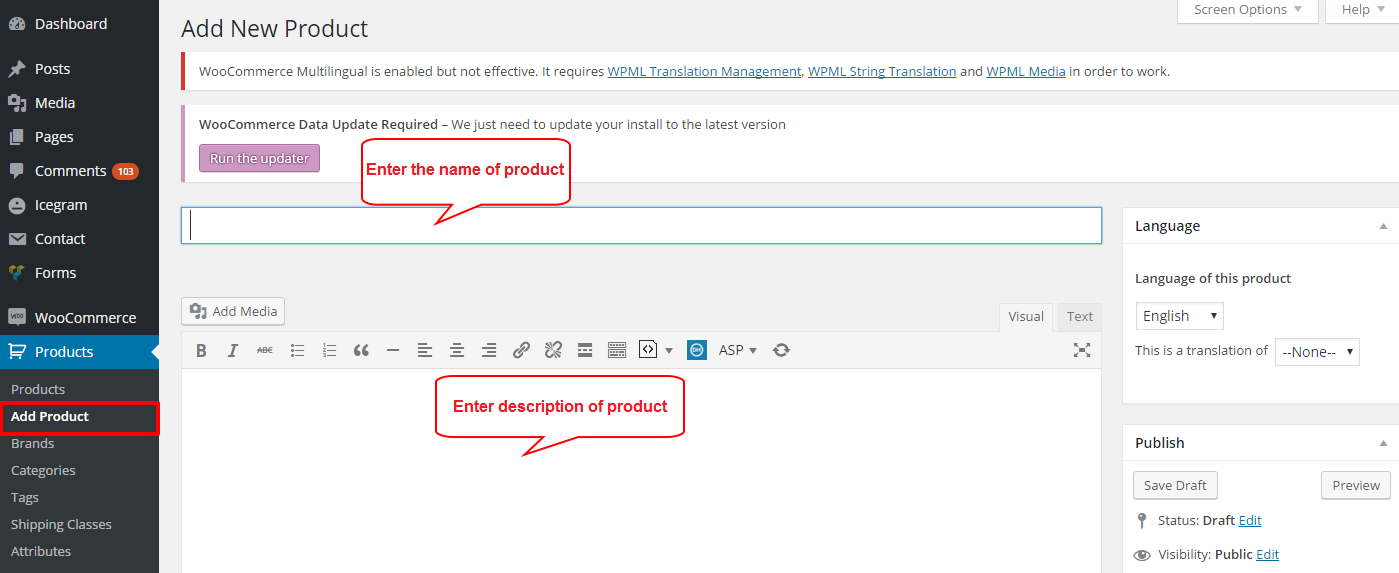
- Step 1: In the dashboard, navigate to Product >>> Add new product. Enter a name for your product.
- Step 2: Write the product description into the post content field, this will be all the product information.
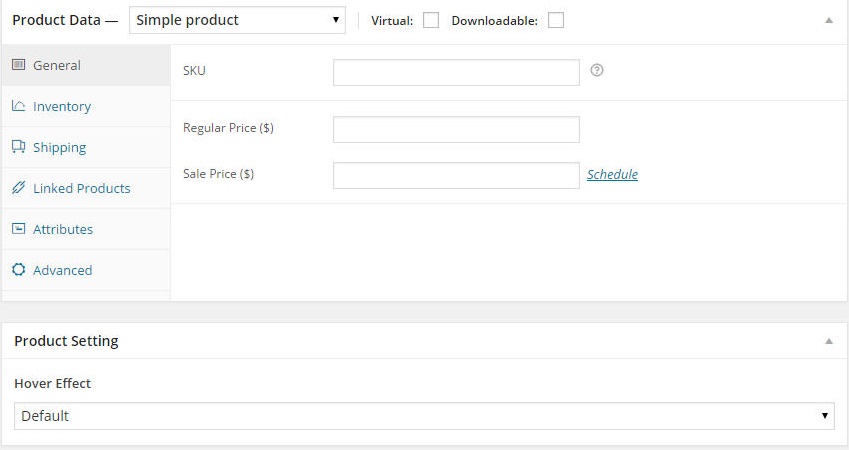
- Step 3: In "Product data", select type of products: simple product
- Step 4: You enter the product information such as price, SKU, shipping, and more into the “Product Data”.
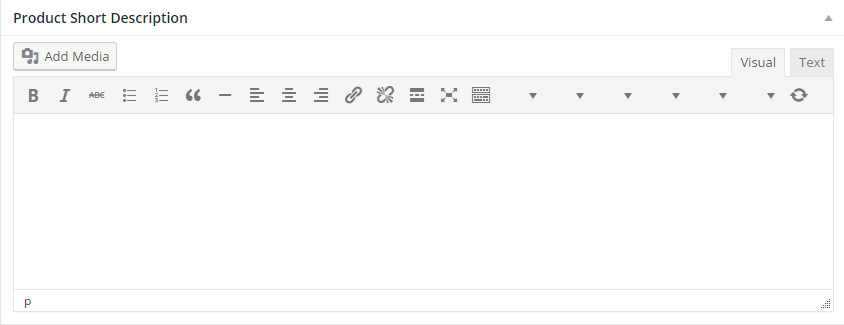
- Step 5: The “Product Short Description” permit you to write the short information about product.
- Step 6: Select product brands, product categories, product tags
- Step 7: Set “Featured Image” in the right sidebar.
- Step 8: When all manipulations are finished, click “Publish” to show on your product.
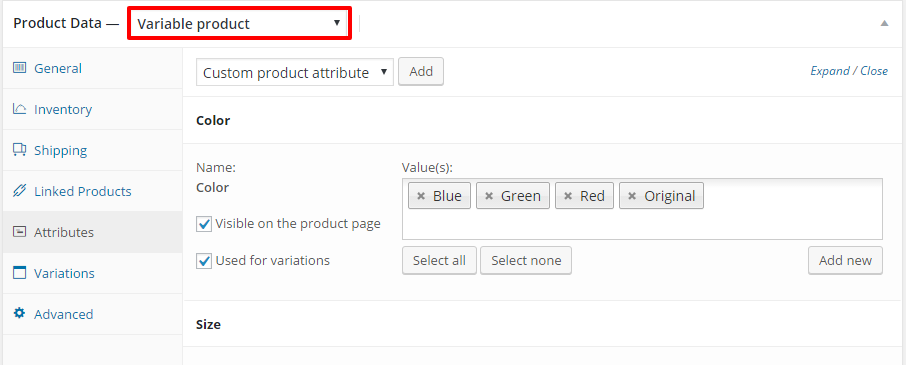
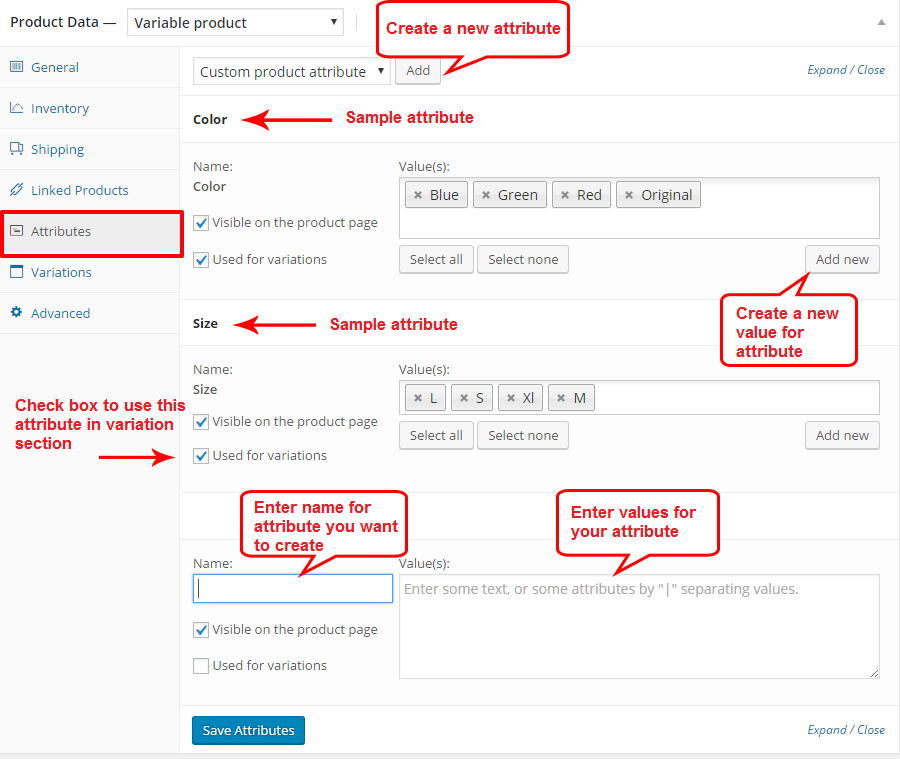
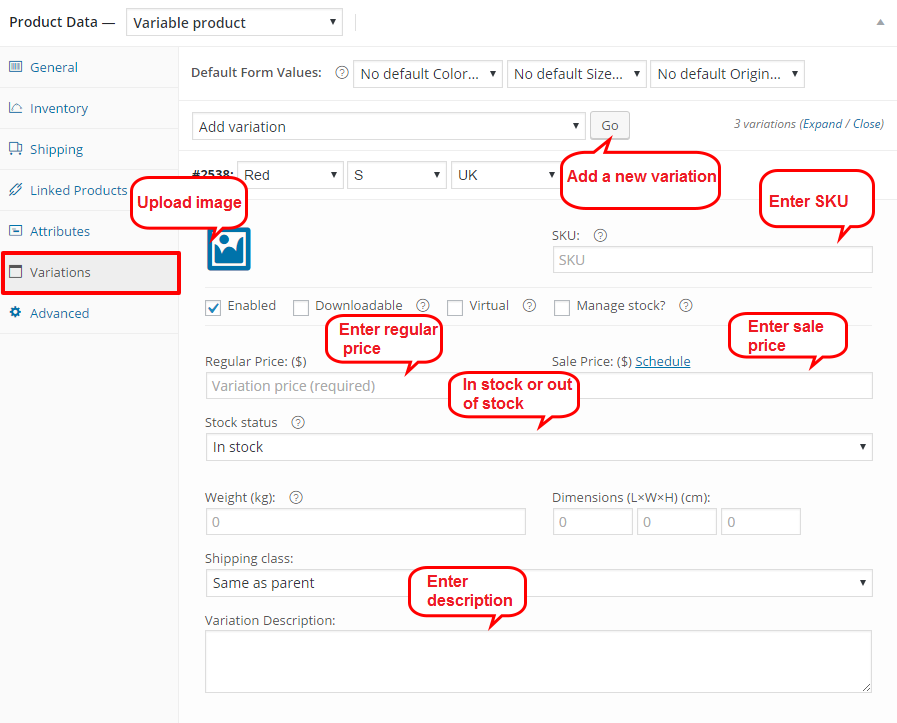
2. How To Create Variable Product
- Step 0: Make sure that you have installed WooCommerce plugin
- Step 1: In the dashboard, navigate to Product >>> Add new product. Enter a name for your product.
- Step 2: Write the product description into the post content field, this will be all the product information.
- Step 3: In "Product data", select type of products: variable product
- Step 4: Enter the product information such as SKU, shipping, and more into the “Product Data”.
- Step 5: Click to Atributes tab to add attributes for product
- Step 6: Click to Variations tab to add variable products
- Step 7: The “Product Short Description” permit you to write the short information about product.
- Step 8: Select product brands, product categories, product tags
- Step 9: Set “Featured Image” in the right sidebar.
- Step 10: When all manipulations are finished, click “Publish” to show on your product.
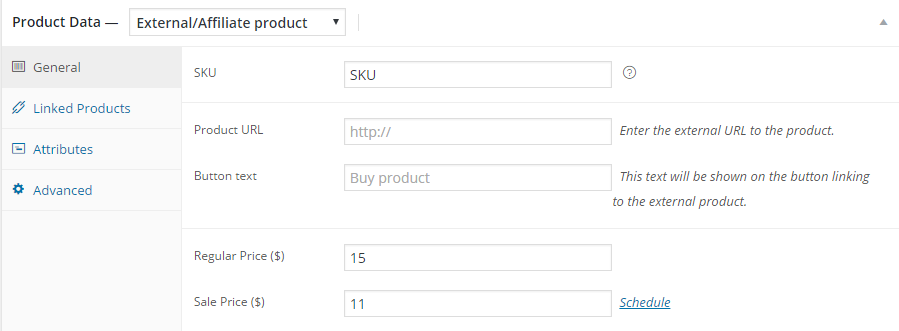
3. How To Create External/Affiliate product
- Step 0: Make sure that you have installed WooCommerce plugin
- Step 1: In the dashboard, navigate to Product >>> Add new product. Enter a name for your product.
- Step 2: Write the product description into the post content field, this will be all the product information.
- Step 3: In "Product data", select type of products: external/affiliate product
- Step 4: You enter the product information such as regular price, sale price (optional), SKU, product URL, button text, and more into the “Product Data”.
- Step 5: The “Product Short Description” permit you to write the short information about product.
- Step 6: Select product brands, product categories, product tags
- Step 7: Set “Featured Image” in the right sidebar.
- Step 8: When all manipulations are finished, click “Publish” to show on your product.
4. How To Create Grouped product
Create a Child Product inside a groupTo create a child product, go to: Products > Add New to add a new product. The only information you’re required to enter is:
- Title
- Product Type = Simple
You can also add a price and other product details, as needed. Now go to Linked Products to select the parent product from the Grouping dropdown:
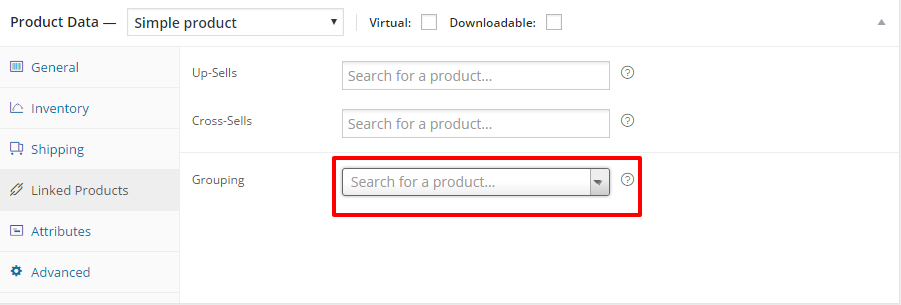
A grouped product is created in much the same way as a simple product. The only difference is you select Grouped from the Product data
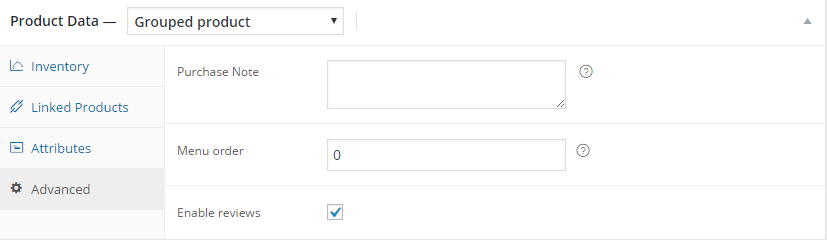
Upon setting the parent product as Grouped, the price and several other fields will disappear. This is fine because you’ll add this information to individual child products. Once you’re finished with the parent product, publish it and come back to the Add New Product page.
- Step 0: Make sure that you have installed WooCommerce plugin
- Step 1: In the dashboard, navigate to Product >>> Add new product. Enter a name for your product.
- Step 2: Write the product description into the post content field, this will be all the product information.
- Step 3: In "Product data", select type of products: grouped product
- Step 4: You enter the product information such as regular price, sale price (optional), SKU, product URL, button text, and more into the “Product Data”.
- Step 5: The “Product Short Description” permit you to write the short information about product.
- Step 6: Select product brands, product categories, product tags
- Step 7: Set “Featured Image” in the right sidebar.
- Step 8: When all manipulations are finished, click “Publish” to show on your product.
5. How To Create A Shop Listing Page in SK Store
5.1. The first way: Create a Shop listing page default
- Step 1: Go to Pages >>> Add new page, then enter the name of page, for example "shop" and publish it
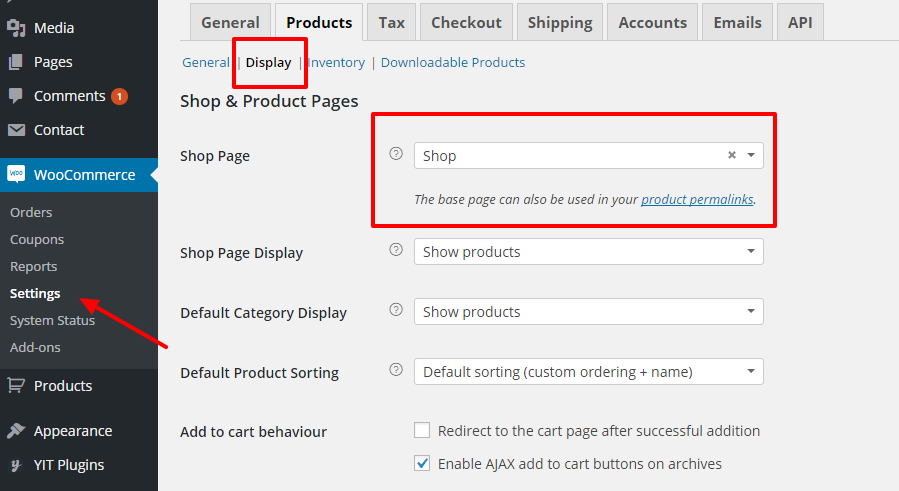
- Step 2: Go to WooCommerce >>> Settings in your Dashbroad
- Step 3: Click on “Product” tab. This includes 'General', 'Display', 'Inventory', 'Downloadable Products'.
- Step 4: Click on "Display" tab, you will see "shop page" option, select "shop" page from drop down menu
- Step 5: Back to the shop page and set “Featured Image” in the right sidebar.
- Step 6: Save all changes to show on your main shop page.
- Step 1: Go to Pages >>> Add new page, then enter the name of page, for example "shop" and publish it
- Step 2: Click to Backend Editor and add elements
- Step 3: You can using any Woo shortcodes to create a shop listing page. For example, we used "Woocomerce Product Layout"
- Step 4: Back to the shop page and set “Featured Image” in the right sidebar.
- Step 5: Save all changes to show on your main shop page.
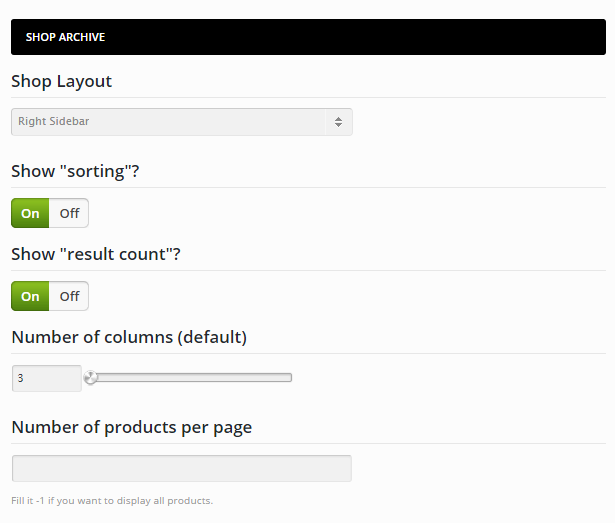
- Step 1: Go to Appearance >>> Theme options
- Step 2: Click to Woocommerce tab. You can see options for single product and product page
- Step 3: In Shop Achieve of WooCommerce Theme Option, you can choose 3 layouts: Right Sidebar, No Sidebar or Left Sidebar
- Step 4: Turn on/turn off the product softing and the number of results per page.
- Step 5: Set number of Columns for products, we set it 4 as default. You can change it with different quantity.
- Step 6: You can custom the number of products per page to tailor your need. Also, type -1 if you want to display all products.
- Step 7: Titlebar: You can custom anything about titblebar of shop achieve.
- Step 8: Save all changes
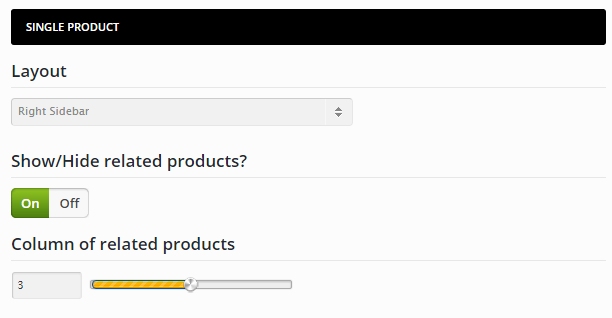
- Step 1: Go to Appearance >>> Theme options
- Step 2: Click to Woocommerce tab. You can see options for single product
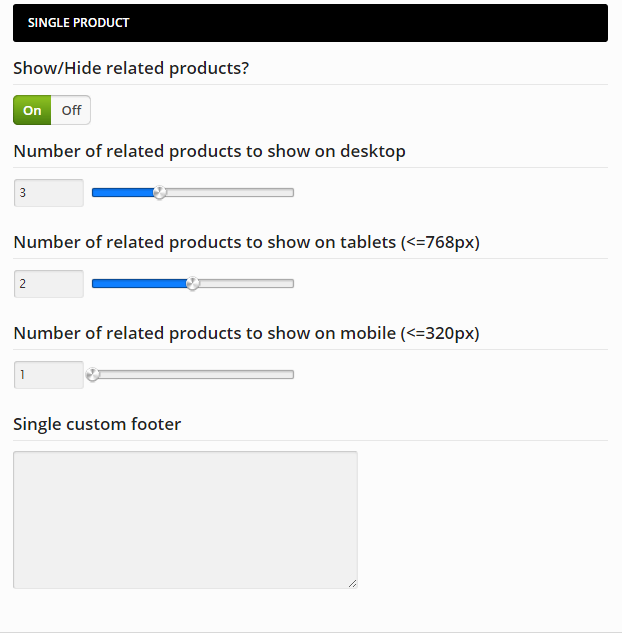
- Step 3: In Single product of WooCommerce Theme Option, you can customize your single product page with 3 layouts: Right sidebar, Left sidebar and No sidebar
- Step 4: You can show/hide (turn on/turn off) the related products in every single product page.
- Step 5: In detail, you can select the number of columns to show related products w.
- Step 6: Titblebar: You can custom anything about titblebar of shop single product.
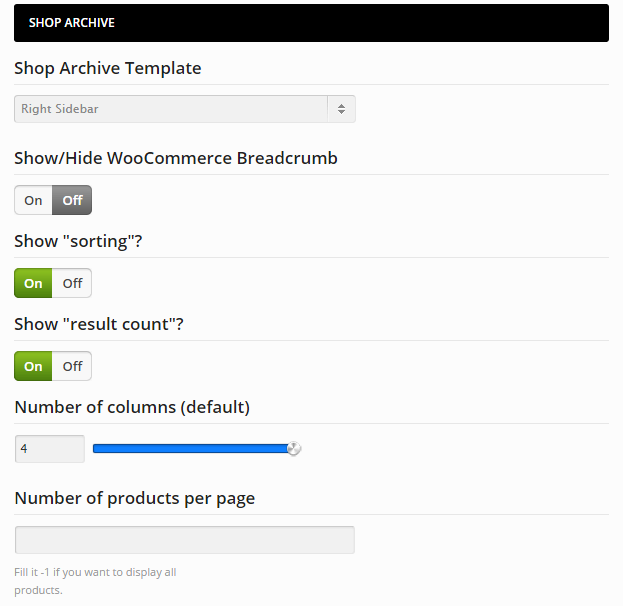
In Shop Archive Template of Theme Option, you can choose 3 template: Width Sidebar, No Sidebar or Fullwidth
For With Sidebar, you can choose Right Slidebar or Left Slidebar
In Single Product, you can customize your page with 3 templates : Width Sidebar, No Sidebar or Fullwidth and 2 Sidebar position: Right sidebar or Left sidebar
On single product page, if you want to display the buttons to share your products on social networks such as facebook, twitter, pinterest, google+, tumblr, email, or display related products you only select On or Off. On if you want to display and Off is opposite.
In detail, there are options for you selecting such as number of related products to show, number of related products items per row, number of up sell products to show, number of up sell products items per row.
5.2. The second way: Create a Shop Listing page using Woo shortcodes

-
Note: Some shortcodes included with WooCommerce you can see Here
6. How To Set Up Shop Template
6.2. Checkout 6.3. My Account 6.3. Cart7. How To Set Up Your Own Shop Listing Page in Theme Options
8. How To Set Up Single Product Page in Theme Options
CHILD THEME
SK Store comes with a Child Theme. Simply install SK Store-Child.zip like a regular WordPress theme.
What is A Child Theme?
A child theme is a theme that inherits the functionality of another theme, called the parent theme. Child themes allow you to modify, or add to the functionality of that parent theme. A child theme is the best, safest, and easiest way to modify an existing theme, whether you want to make a few tiny changes or extensive changes. Instead of modifying the theme files directly, you can create a child theme and override within.
Why Use A Child Theme?
There are a few reasons why you would want to use a child theme:
- A WordPress child theme allows you to apply custom code changes to your site. Using a child theme ensures that all your customizations will not be overwritten even when you update the parent theme.
- If you modify code directly from a parent theme, then update the parent theme, your changes will be lost. Always use a child theme if you are modifying core code.
FONT ICONS
Follow these steps to know how to add different icons fonts to SK Store:
Step 1: Copy the icon fonts following the link: theme root / framework / k2ticon / inc / font. An icons fonts standard includes 4 files: your_font.eot, your_font.svg, your_font.ttf and your_font.woff
Step 2: Open file as link: root theme / framework / k2ticon / css / style.css to inform font-face and the whole css class for the new font. (Note to change the path to adapt). For example:
@font-face {
font-family: " your_font ";
src: url("../inc/font/ your_font.eot");
src: url("../inc/font/ your_font.eot#iefix") format("embedded-opentype"),
url("../inc/font/ your_font.woff") format("woff"),
url("../inc/font/ your_font.ttf") format("truetype"),
url("../inc/font/ your_font.svg") format("svg");
font-weight: normal;
font-style: normal;
}
.icon-1 { content: “” }
.icon-2 { content: “” }
….
Step 3: Open file as the direction: theme root / framework / k2ticon / inc/ list.php and find line 729 to add new class of the new icon fonts
‘your_font ‘ => array(
‘icon-1’,
‘icon-2,
‘icon-3’
…
)
Step 4: Open file as the direction: theme root / framework / k2ticon / js / generator.js and find line 56, duplicate line 56-59 and then paste down
if ( selectedIcons == ‘your_font-icons-list' ) {
listIcons.hide();
jQuery( 'ul. your_font -icon-list' ).show();
}
Step 5: Open file as the direction: theme root / framework / k2ticon / k2ticon.php, find line 80 to paste the code down
Step 6: Done!. See the results!
Note: You can replace "your_font" by your own name
FINALLY
Thank you for reading!
We hope you can create the best website with SK Store.
One again, thank you so much for using SK Store. As I said at the beginning, I'd be glad to help you if you have any questions relating to this theme. No guarantees, but I'll do my best to assist. If you have a more general question relating to the themes.
Do not hesitant to contact us via email: sunrisetheme@gmail.com or submit ticket via Forum
Please take a screenshot photo with descriptions about your problem. More details about your problems help us more easier to figure out and respond you sooner.
*******************Note*********************************************************************************************************
SCOPE OF SUPPORT
Our support covers getting setup, trouble using any features and any bug fixes that may arise. Unfortunately we cannot provide support for customizations or 3rd party plugins. If you need help with customizations of your theme, please contact with us with your requirement. Our technical team will help you with some fees.
SUPPORT SCHEDULE
Our working time is 8:30am - 5:30pm from Monday to Friday (GMT+7). So if you email us or submit ticket besides this working time, we are really sorry that we are not able to respond you soon. We will try to reply you as fast as we can. Especially if you email or submit ticket at weekend, please be patient and we will respond to you right when we are back on Monday.
1.24. Socials
To increase interact between you and your visitors, SK Store has 4 different popular social buttons for you to choose: facebook, twitter, google plus and pinterest.